Happy day after Thanksgiving!
I hope your day was filled with love, happiness, many blessings and lots of good food!
I am absolutely loving creating with the brand new dies that Heartfelt Creations released today!
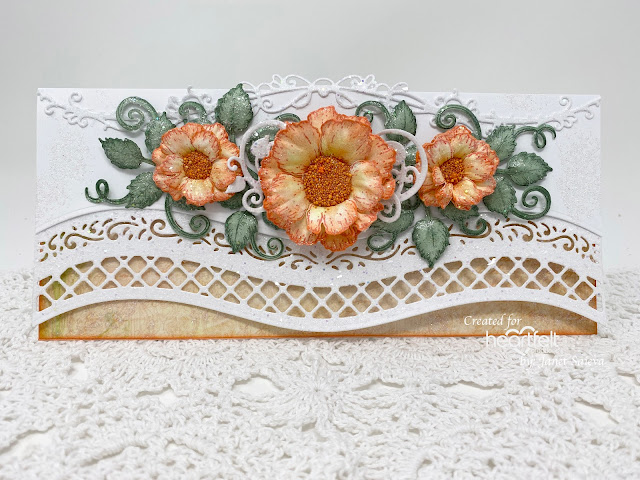
I can definitely see myself making many cards like the slimline I created here. The edge dies are amazing!!!
Instructions: Slimline card size is 9 x 4”. Score and fold 9 x 8” white cardstock at 4” on the short side to create tent fold card base. Using the plain edged curved die and the two insert curved dies from the Curvy Accent Border Die set, tape together and cut the 9” card front edge. Also cut one of the decorative curved dies from the same set from white cardstock. Sponge the diecut edge of the card and the decorative diecut with dries clear adhesive and cover with Rajni Chawla’s Crystal Clear glitter. Cut white cardstock 9 x 2 1/2”, cut the long edge using the plain edged curved die, adhere to the card front above the diecut area and adhere the decorative diecut to the top of this piece (this will add 1/4” to the top of the card). Cut paper from the Summer Garden Paper Collection sheet 5A 9 by 3 7/8”, ink the edges using Archival Bright Tangelo ink and adhere to the inside of the card using dries clear adhesive. Diecut the center die from the Slim Lattice Oval Die set, stamp the center with the ‘Best Wishes’ sentiment from the Celebrate Love Sentiments Cling Stamp Set using Tuxedo Black ink on the center piece and adhere the two pieces to the inside of the card.
Stamp the largest and the second largest Small Wild Rose on Deluxe Flower Shaping Paper using Bright Tangelo ink, color using Bright Tangelo and Vivid Chartreuse inks. Diecut using the coordinating dies, ink the edges and color the backs using the Bright Tangelo, place face down in the Small 3D Wild Rose Shaping Mold, spritz with water and run through the diecutting machine. Press down on all the centers, sponge with dries clear adhesive and sprinkle with Rajni Chawla’s Crystal Clear Glitter. Using hot glue adhere three flowers together offset to make one complete flower. Add a puddle of hot glue to each flower center and add Orange Juice prills.
Stamp the Leafy Accents on Deluxe Flower Shaping Paper using Brilliance Pearlescent Ivy ink, color with the same ink, diecut, add more ink to the edges and centers of all the leaves using daubers and color the backs with the same color. Shape the leaves using the Deluxe Flower Shaping Kit. Sponge with dries clear adhesive and cover with Crystal Clear glitter. Diecut the swirly leaf image from white cardstock using the Cut Mat Create 2A Die, sponge with adhesive and cover with glitter.
Adhere the flowers, leaves and swirly leaves to the card front using hot glue. To add a little extra sparkle, randomly sponge the inside of the card and the top of the card front with dries clear adhesive and sprinkle with Crystal Ultrafine Transparent Glitter.
You can get the list of products used on this card by visiting the Heartfelt Creations Gallery. Please be sure to also visit the Heartfelt Creations Blog to see all of the absolutely gorgeous projects created by the fabulous design team.
Thank you so much for stopping by! I really appreciate you!
Till we meet again, please stay safe and be well.
Have a beautiful day!
Crafty Hugs, 🤗🤗🤗
Janet


3 comments:
Absolutely stunning my friend! I love the way you used the dies and all the sparkle you added to the card. Next let's talk about the flowers...just amazing. I love everything about them!
This is so beautiful!! I love how you have used the dies to create the edge and also your flowers are just stunning!!
Oh wow, this card is so fresh and elegant! I love your flowers :)
Post a Comment