Wednesday, September 28, 2022

Heartfelt Creations - Debuting the Filigree Frame & Border Dies

 Hi and welcome!

Can you believe October is almost here??? Time flies when you're having fun! lol

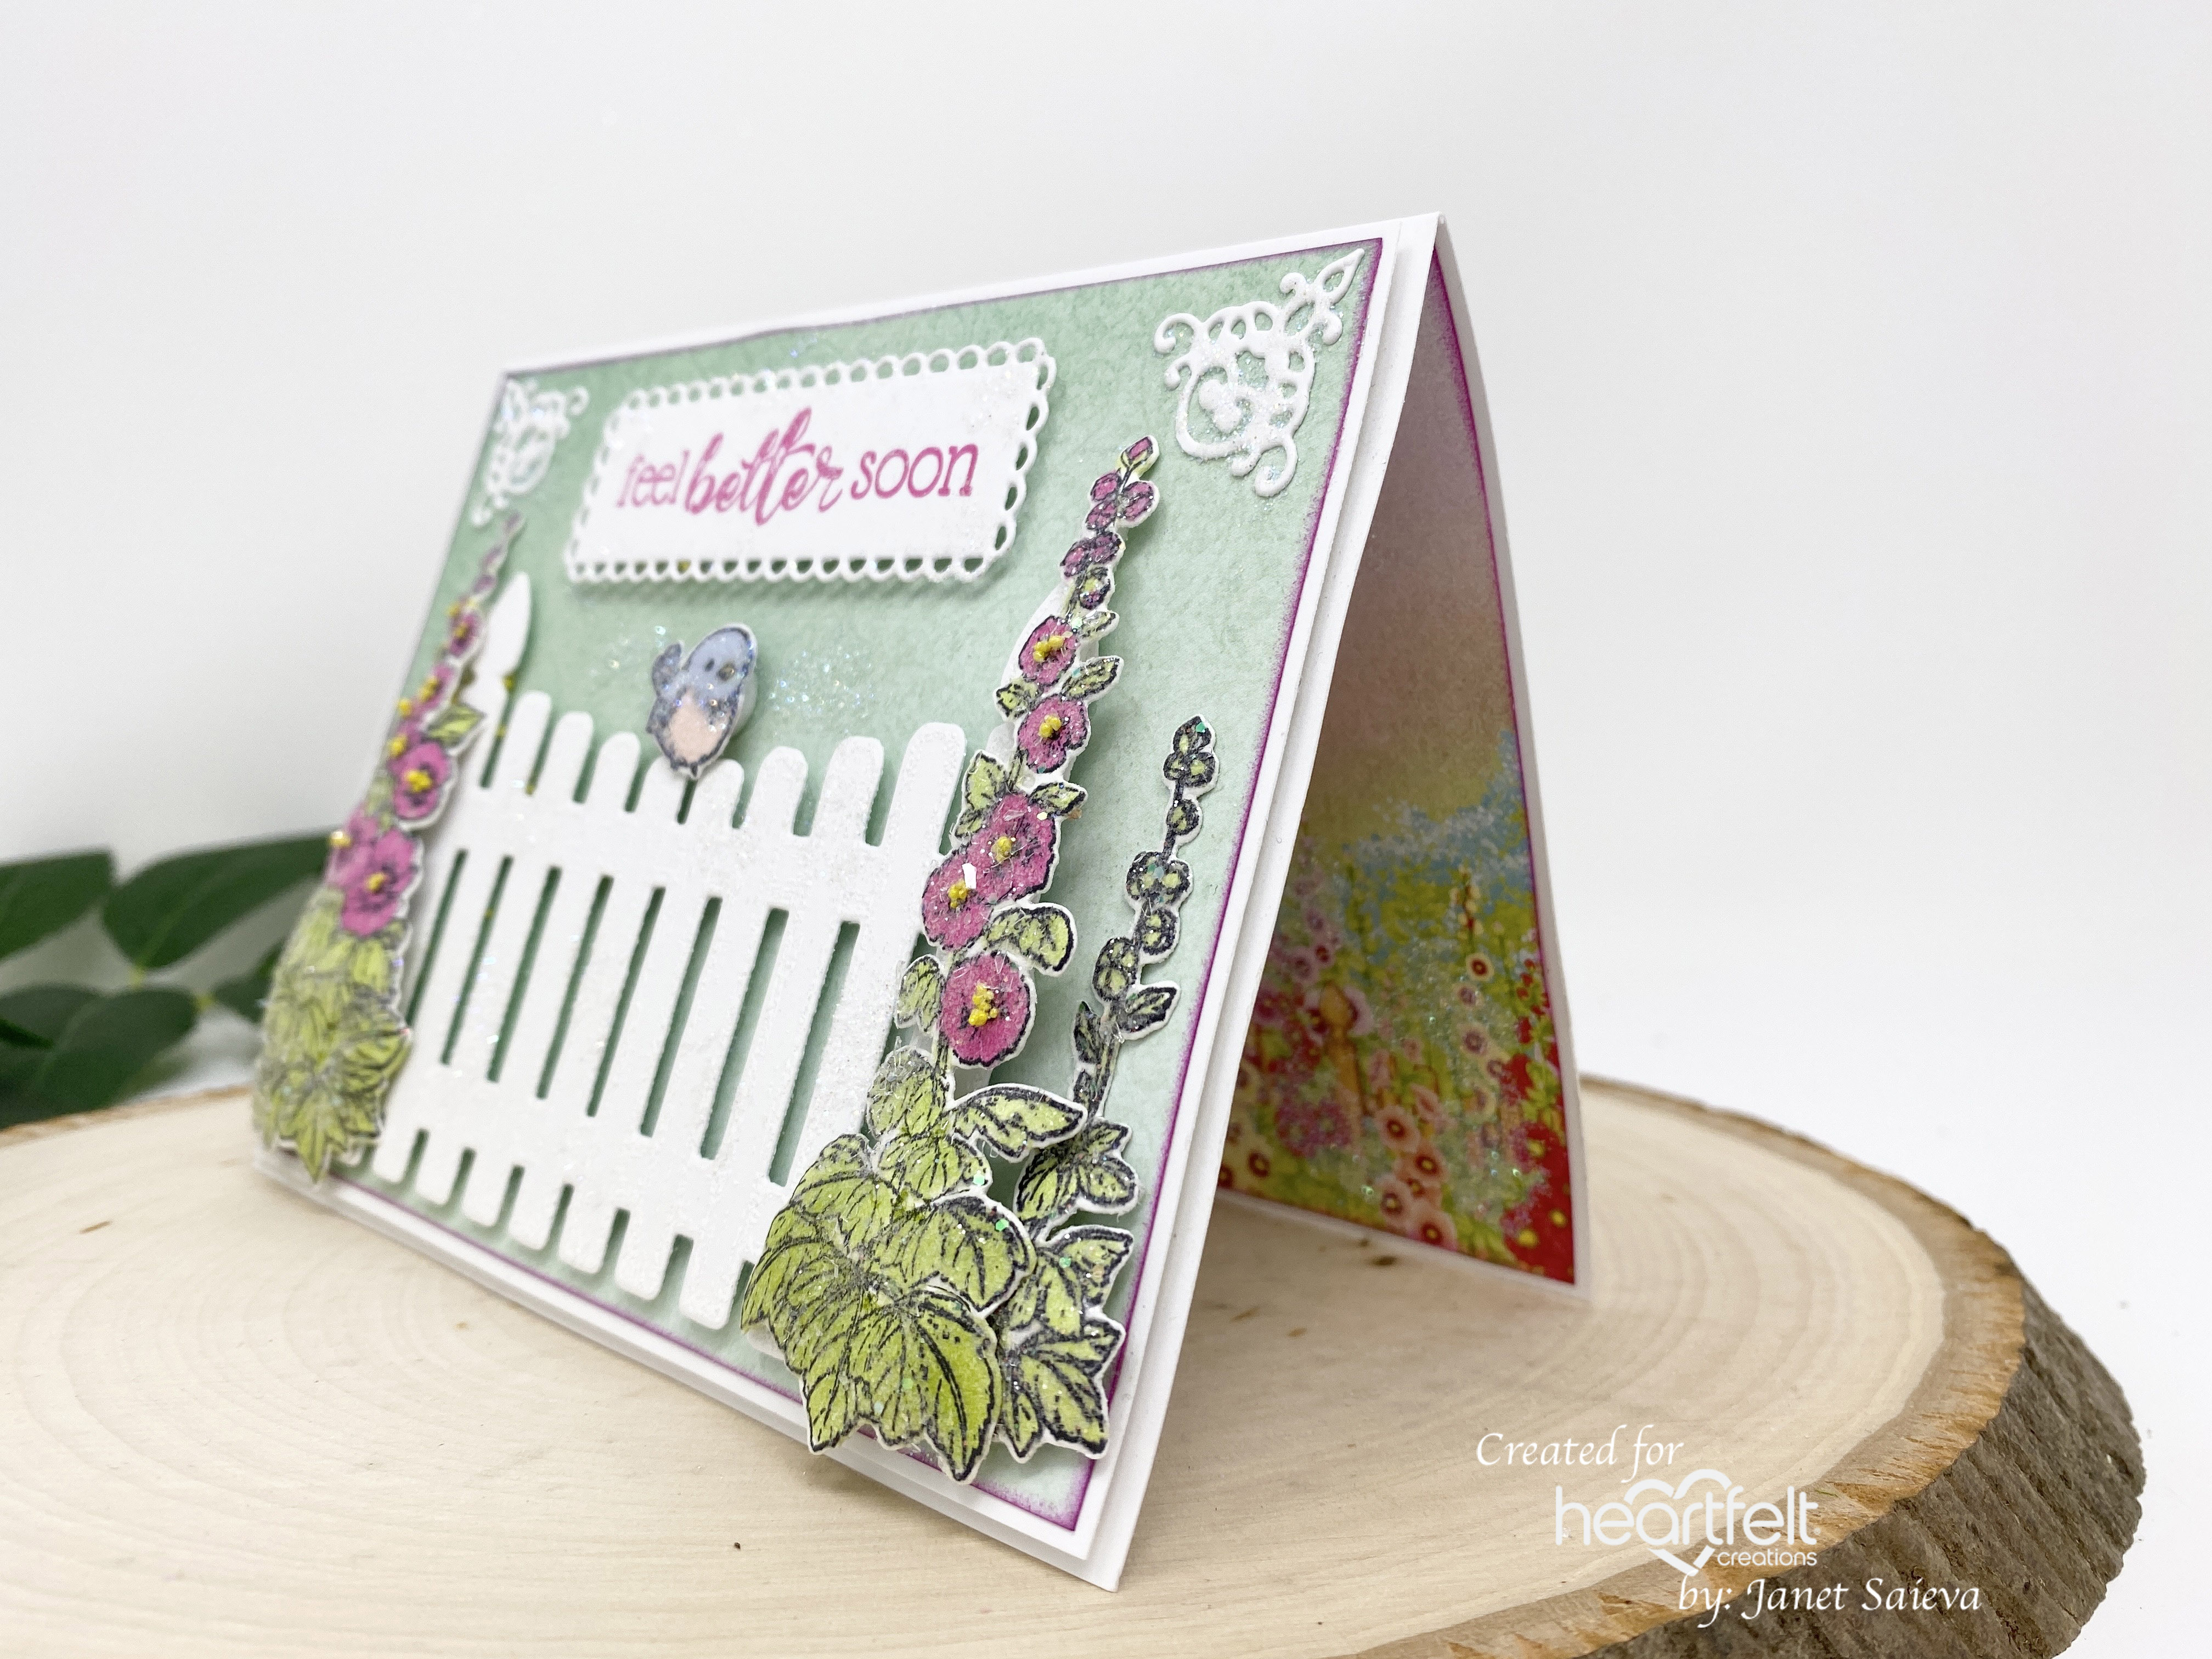
Speaking of fun, today we're debuting the gorgeous Filigree Frame & Border Dies and I had so much fun creating with them. Sooo many possibilities.


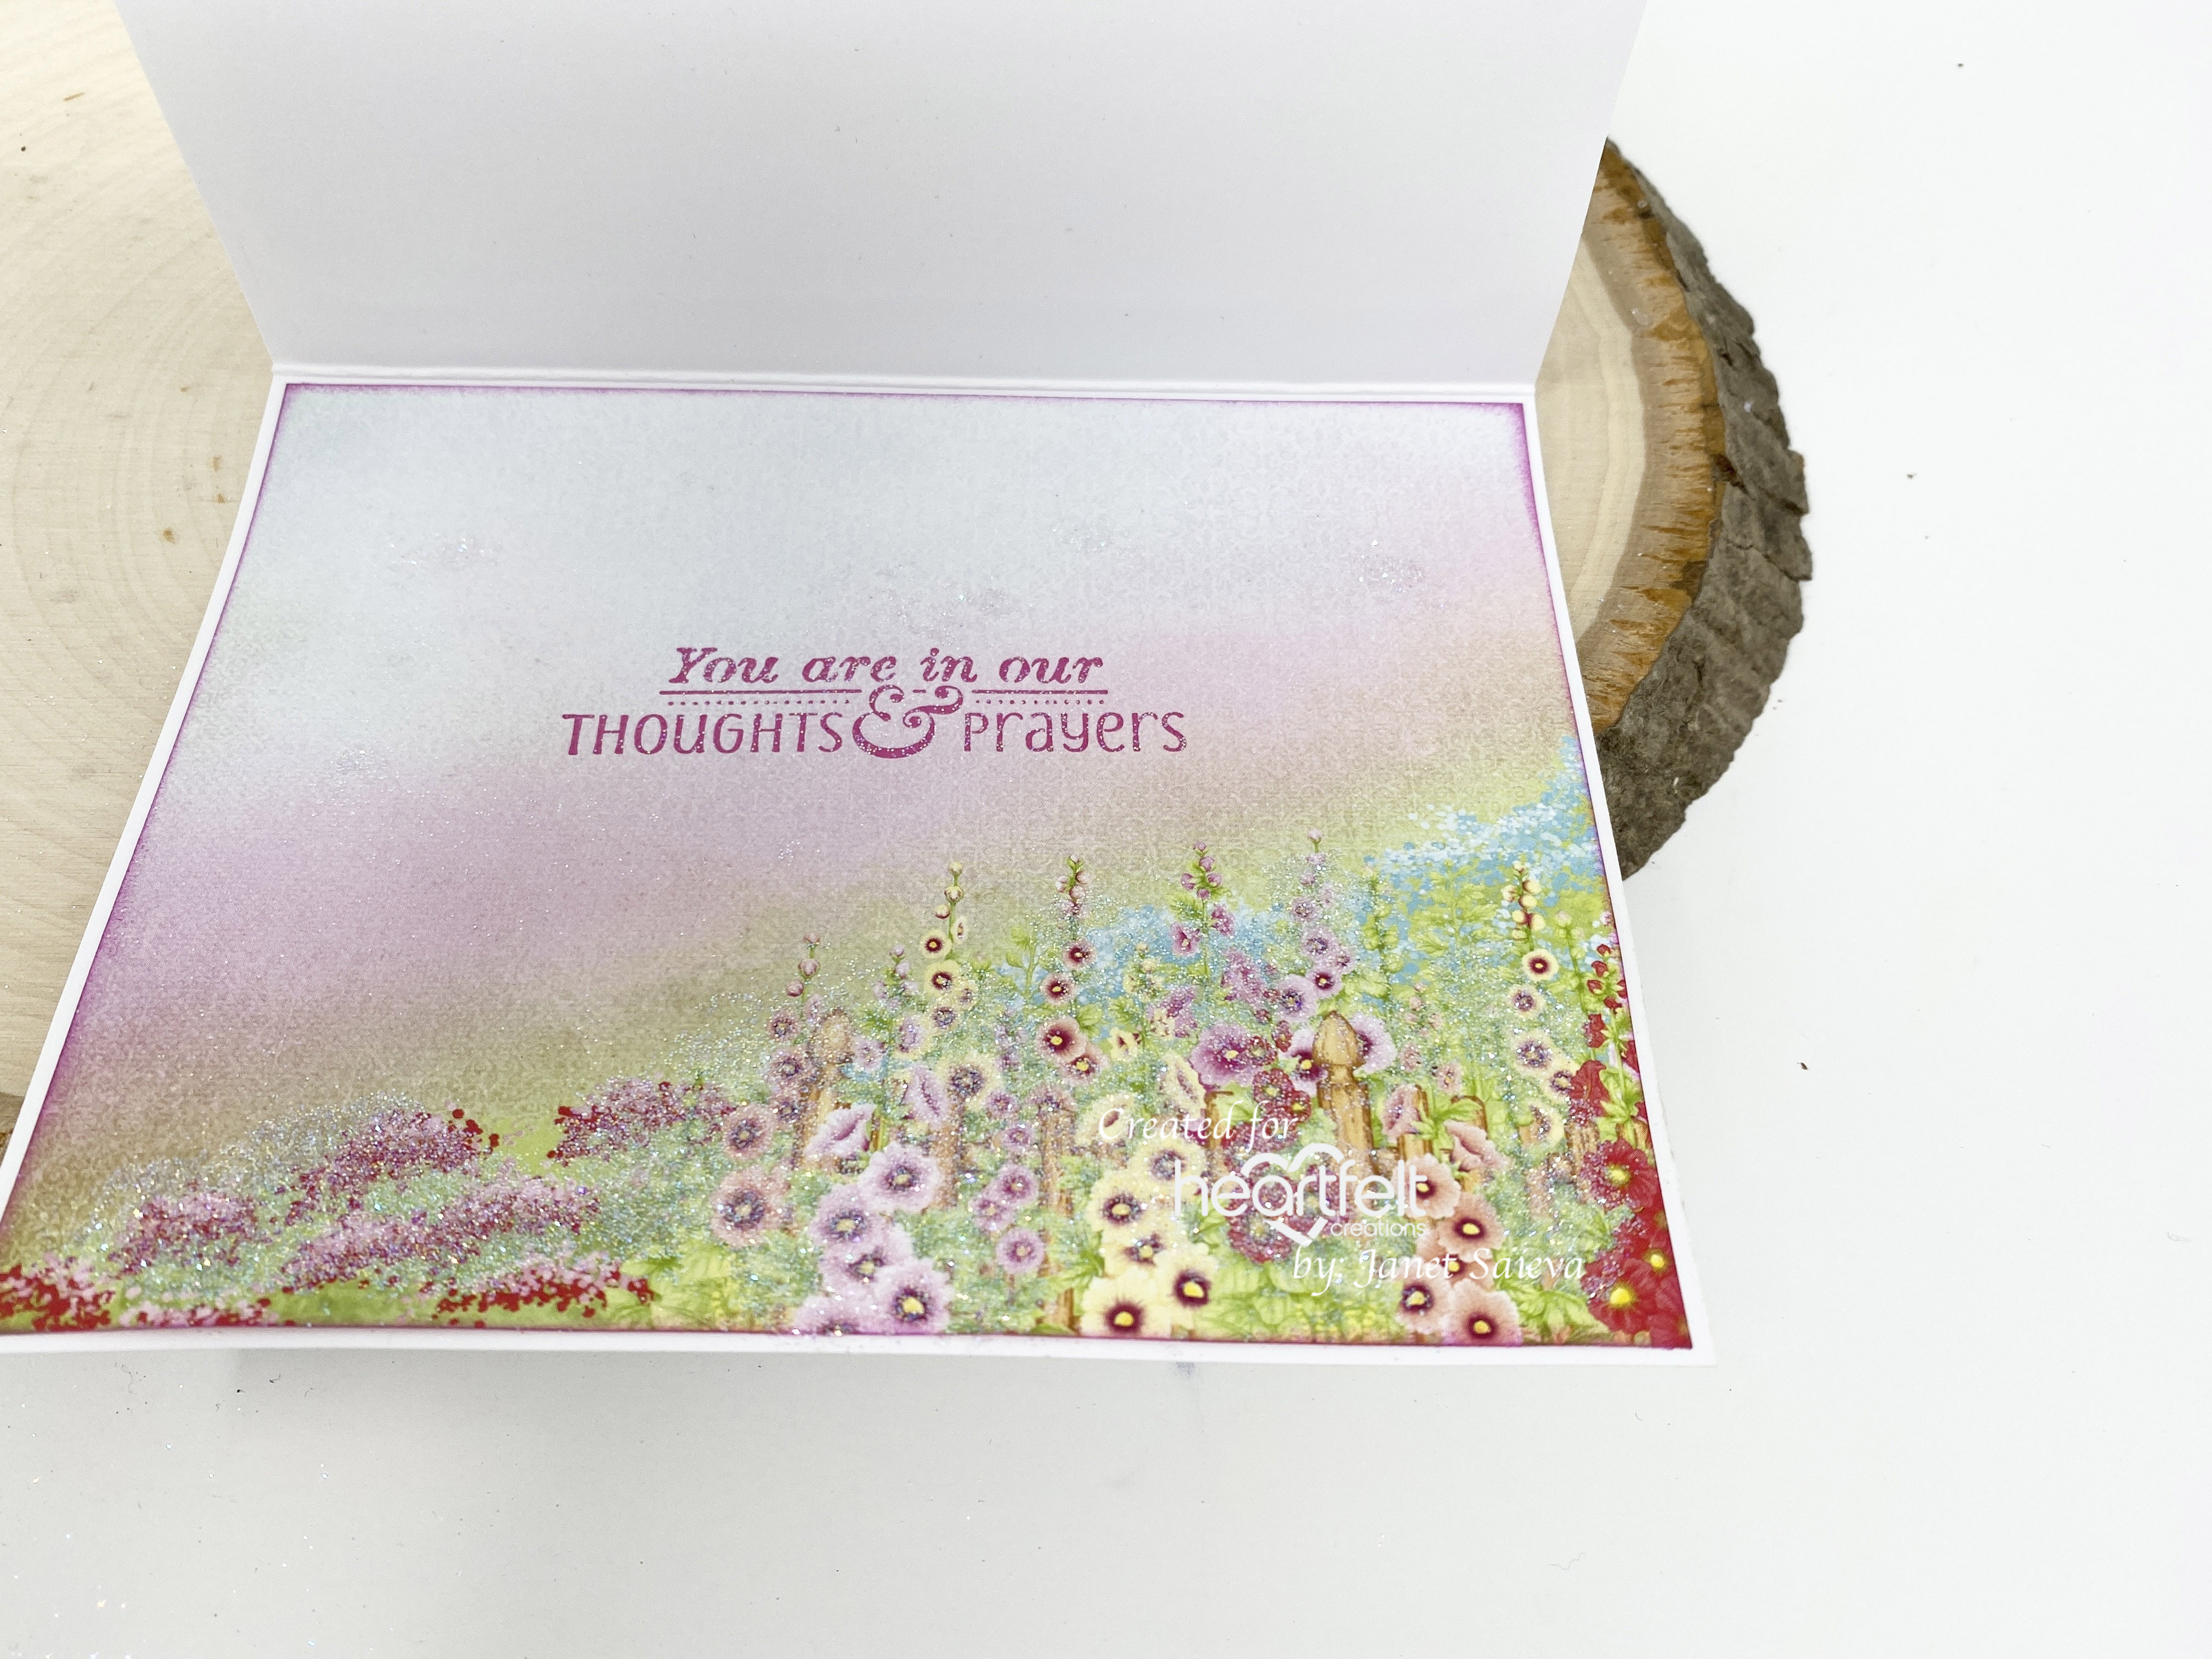
Instructions: Card Size is 5 x 7”. Score and fold 10 x 7” white cardstock at 5” to create side fold card base. Use the plain curved die from the Filigree Accents Die to cut the right side of the card. Use the decorative inner die to cut the front of the card base. Sponge the decorative cut out and around the edges of the card front with dries clear adhesive and sprinkle with Rajni Chawla’s crystal clear glitter. Using a paper trimmer and the curved die, cut a 4 7/8 x 6 7/8” piece from Hollyhock Paper Collection sheet 12B, ink the edges with Cactus Flower ink and adhere to the inside of the card. Cut white cardstock 2x to 3 1/2 x 6 3/4”. Stamp ‘Hope your day is as special as you are’ on one, ink the edges and adhere to the inside of the card. Emboss the other one using Georgette Lace embossing folder, adhere to a piece of 3 5/8 x 6 7/8” designer paper sheet 12B and adhere to card front using dimensional tape.

Stamp the flowers from the Hollyhock Petals & Leaves Cling Stamp set on Deluxe Flower Shaping paper using Lovely Lipstick ink, color with the same ink and diecut using the coordinating dies. Color the backs of the flowers, too. Place the flowers in the Hollyhock Shaping Mold and run through the diecut machine. Pierce the flower centers using the Groove Golf tools and add a yellow stamen to each flower securing with hot glue. Sponge with dries clear adhesive and sprinkle with crystal clear glitter.

Stamp the stems 3x from the Hollyhock Stem & Blooms Cling Stamp set on white cardstock and color using Leaf Green ink, diecut using the coordinating die, shape using the Deluxe Flower Shaping kit and adhere an EZ Stem Floral wire to the back of each stem using hot glue, sponge with dries clear adhesive and sprinkle with Rajni Chawla’s crystal clear glitter.

Adhere the stems together, slightly offset, and adhere to the card front as shown using hot glue. Adhere the hollyhock flowers to the stems using hot glue.

Check out the Heartfelt Creations Gallery to find all the products used on this card. Please be sure to visit the Heartfelt Creations Blog to see all of the fantastic projects created by the fabulous design team.

Thank you for stoping by, I really appreciate you!

Till we meet again, please stay safe and be well!

Have a beautiful day!!!

Crafty Hugs, 🤗🤗🤗

janet


Wednesday, September 21, 2022

Heartfelt Creations - Tweet Get Well Wishes

 Hi and welcome!

My card today is a simple A2 size card that will easily mail in a standard A2 envelope.


Instructions: Card size is 5 1/2 x 4 1/4”. Score and fold 11 x 4 1/4” white cardstock at 5 1/2” on the long side to create tent fold card base. Cut white cardstock 5 3/8” x 4 1/8” and sheet 4A from the Hollyhock Garden Paper Collection to 5 1/4 x 4”. Ink the edges of the designer paper with Vibrant Fuchsia Archival ink, adhere it to the white cardstock using dries clear adhesive and then adhere to card base using foam tape. Cut sheet 9A to 5 3/8 x 4 1/8”, edge with Vibrant Fuchsia ink, stamp ‘You are in our thoughts & prayers’ from Cheerful Note Sentiments with the same ink and adhere to the inside of the card.

Stamp the fence from the Hollyhock Fence Cling Stamp set on white cardstock using VersaMark, cover with WOW Sparkling Snow Embossing Glitter and heat set using the Heat It Tool. Stamp the stems from the same set on white cardstock using Memento Tuxedo Black ink, color using Stampin’ Blend markers Light Granny Apple Green and Light Lovely Lipstick, diecut with the coordinating dies and lightly shape using the Deluxe Flower Shaping Kit. Add a dot of glue in the flower centers and sprinkle with You Had Me at Yellow prills. Sponge with dries clear adhesive and sprinkle with Rajni Chawla’s crystal clear glitter. Stamp the little bird from the Clematis Birdhouse & Trellis Cling Stamp set in white cardstock using Tuxedo Black ink, color using Stampin’ Blend markers – Light Seaside Spray, 1000 and Light So Saffron, diecut using the coordinating die and lightly shape using the stylus. Stamp the sentiment ‘feel better soon’ on white cardstock using Vibrant Fuchsia ink, diecut using the eyelet die from the ticket and Tags Die set. Diecut a decorative hinge from white cardstock using the Window Hinges Die and cut in half.

Adhere the fence to the bottom center of the card front using adhesive strips. Adhere the hollyhock and stem images to both sides of the fence using dries clear adhesive and dimensional dots. Adhere the little bird to the to center of the fence using dries clear adhesive and dimensional dots. Adhere the sentiment at the top center of the card front using dimensional tape and adhere the window hinge pieces to the top corners using dries clear adhesive.

To add some sparkle, randomly dab all the elements and the card front and inside with dries clear adhesive and sprinkle with Crystal Ultrafine Transparent Glitter.

Please visit the Heartfelt Creations Gallery for the rest of the details on my card.

Please also visit the Heartfelt Creations Blog to see all of the absolutely gorgeous projects created by the fabulous design team.

Thank you so much for stopping by! It was so nice to 'see' you!

Till we meet again please stay safe and be well!

Have a beautiful day!

Crafty Hugs, 🤗🤗🤗

Janet


Wednesday, September 14, 2022

Heartfelt Creations - Debuting the Hollyhock Garden Collection

 Hi and welcome to. my blog!

Today we're debuting the absolutely gorgeous Hollyhock Garden Collection!

We all love the look of the hollyhock blooms, perfect for creating floral gardenscapes with depth and variation in sizes, adding that unique feature to our flower gardens. Create hollyhock blooms as a focal point, or add extra dimension & elegance to any project by layering multiple blooms together. Short on time? The 3D Hollyhock Garden Mold is your time saving tool, perfect for shaping large batches of flowers all at once. The new Hollyhock Garden collection has all you need to start creating exquisite floral gardenscapes for your next paper crafting project!

This is the first card I created using this beautiful collection!


Instructions: Card size is 5 x 7”. Using the largest Lattice Flourish Gateway die, cut 2x from white cardstock. Add double sided tape to the top of one before cutting. Score the one with the tape right under the tape, fold and adhere the two together to create the card base. Cut Hollyhock Garden Paper sheet 11B 2x using the same die. Adhere one to the card front and one to the inside of the card. You’ll need to trim the top of the inside one to make it fit. Using the third largest Eyelet Frame Gateway die, cut from white cardstock, stamp the sentiment ‘Hope your day is as Special as you are’ from Special Birthday Sentiments Cling Stamp set and a couple of hollyhock flowers using Vibrant Fuchsia Archival ink and adhere to the inside. Using the decorative Lattice Flourish dies, cut from white cardstock, sponge with dries clear adhesive and cover with Rajni Chawla’s crystal clear glitter. When dry, adhere to the card front using dries clear adhesive and adhesive strips.

Stamp the Hollyhock Petals & Leaves on Deluxe Flower Shaping paper using Lovely Lipstick and Leaf green inks, color with the same inks and diecut using the coordinating dies. Color the backs of the flowers, too. Place the flowers and leaves in the Hollyhock Shaping Mold and run through the diecut machine. Pierce the flower centers using the Groove Golf tools and add a yellow stamen to each flower, secure with hot glue. Sponge with dries clear adhesive and sprinkle with crystal clear glitter.

Stamp the Hollyhock Stem & Blooms on white cardstock and color using Leaf Green ink and Stampin’ Blend Light Lovely Lipstick marker, shape using the Deluxe Flower Shaping kit, sponge with dries clear adhesive and sprinkle with Rajni Chawla’s crystal clear glitter.

Adhere the stems and the flowers to the left side of the card front using hot glue, dries clear adhesive and dimensional dots. Stamp ‘Congratulations’ from the Celebrate Love Sentiments Cling Stamp set on white cardstock using Vibrant Fuchsia ink, diecut using the banner die from the Arrows and Banner die set, sponge with dries clear adhesive and cover with crystal clear glitter, shape using your hand and adhere to the card front using hot glue.

Find all the products I used on this project in the Heartfelt Creations Gallery.

Please be sure to visit the Heartfelt Creations Blog to see all of the absolutely gorgeous projects created by the fabulous design team. 

Thank you so much for stopping by, I so appreciate you!

Till we meet again, please stay safe and be well!
Have a beautiful day!

Crafty Hugs, 🤗🤗🤗
Janet


Wednesday, September 7, 2022

Heartfelt Creations - Simple Silver Merry Christmas

 Hi and welcome to my first post for September!

This is my last Christmas submission for a while. This card showcases the Festive Poinsettia Collection, the Holiday Star Collection and the Joyous Noel Collection!


Instructions:Card size is 8 1/4 x 3 1/2”. Score and fold 8 1/4 x 7” white cardstock at 3 1/2” on the short size to create slimline tent fold card base. Cut Luxe Silver cardstock 2x to 8 1/8 x 3 3/8”, purple paper from the Holiday Star Paper Collection sheet 12B 2x to 8 x 3 1/4” and white cardstock 2x to 7 7/8 x 3 1/8”. Edge both purple pieces with Archival Deep Purple ink. Stamp one of the white pieces with the star and snowflake images from the Large Holiday Star Cling Stamp set and the Noel sentiment from the Starry Noel Cling Stamp set using Archival Deep Purple ink. Stack one of the silver pieces, one of the purple pieces and the stamped white piece and adhere to the inside of the card. Place the other white piece in a snowflake embossing folder and run through the diecutting machine to emboss. Stack the silver, purple and white embossed pieces and adhere to the card front.

Stamp the ‘Merry Christmas’ sentiment from the Starry Holiday Greetings Cling Stamp Set on Luxe Silver cardstock using VersaMark and cover with WOW Metallic Silver Embossing Glitter. Heat set and diecut with the coordinating die. Diecut 4 more times from white cardstock, adhere together using dries clear adhesive and adhere behind the silver sentiment. Adhere to the top of the card front.

Stamp the Small Festive Poinsettia on Deluxe Flower Shaping paper using Archival Petunia ink, color using the same ink and diecut using the coordinating die. Add more ink to the edges and color the backs of the flowers. Place in the Small 3D Festive Poinsettia Shaping Mold, spritz with water and run through the diecutting machine. Pierce the centers using the Groove Golf Tool, add silver Assorted Bead Stamens-Medium and secure with hot glue. Use two same size flowers to create the poinsettia.

Stamp the small Holly Berry Sprays on Luxe Silver cardstock using VersaMark and cover with WOW Metallic Silver Embossing Glitter. Heat set, diecut with the coordinating die and lightly shape using the Deluxe Flower Shaping kit. Adhere the poinsettias and sprays to the center of the card front using hot glue.

Add some extra sparkle by sponging the poinsettias with dries clear adhesive and sprinkling with Rajni Chawla’s Crystal Clear Glitter.

Check out the Heartfelt Creations Gallery to see all the products used on this project. 

Please be sure to visit the Heartfelt Creations Blog to see all of the absolutely gorgeous projects created by the fabulous Design Team.

Thank you so much for stopping by! I truly appreciate you!

Till we meet again, please stay safe and be well!

Have a beautiful day!

Crafty Hugs, 🤗🤗🤗

Janet