Wednesday, March 29, 2023

Heartfelt Creations - Coral Special Day floral

Hi and welcome to the second week of spring! 

My card today is simple and elegant at the same time.


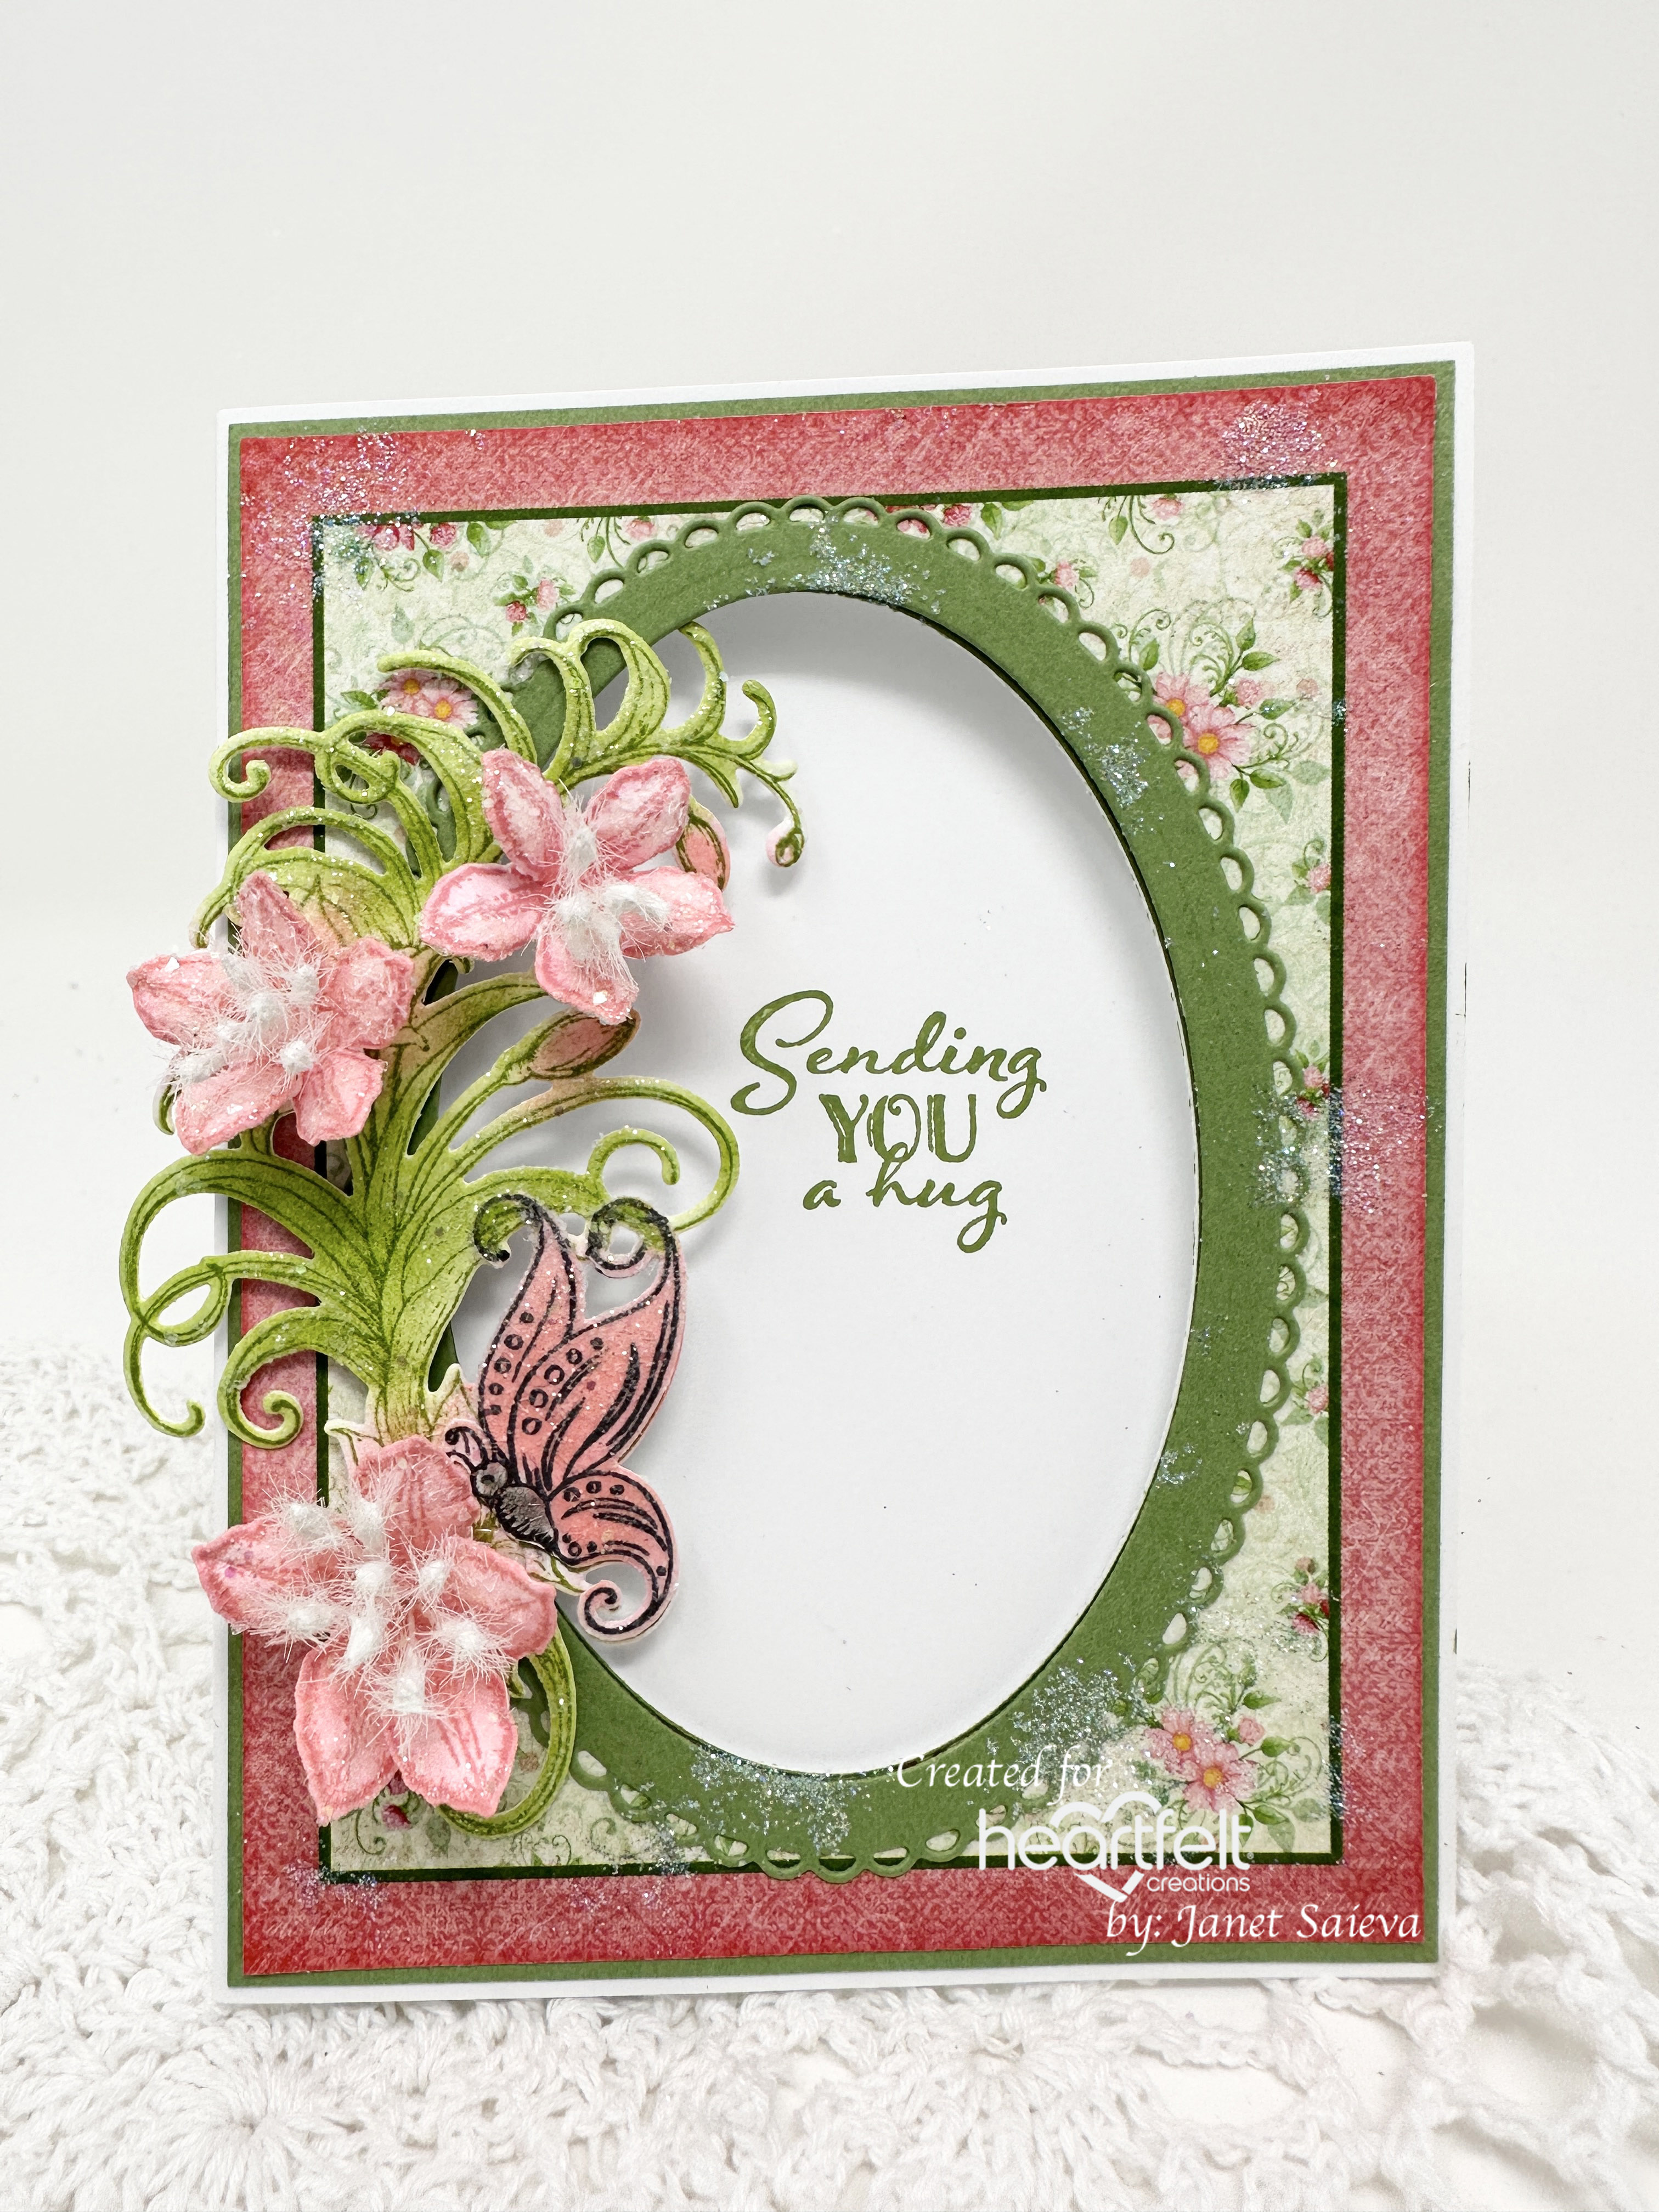
Instructions: Card size is 5 x 7”. Score and fold 10 x 7” white cardstock at 5” on the long side to create a side fold card base. Cut two pieces of white cardstock 4 7/8 x 6 7/8” and two pieces of sheet 11B from the Feathery Florals Paper Collection 4 3/4 x 6 3/4”. Ink the edges of the designer paper using Coastal Coral ink and adhere each one to the white mat layer. Adhere the panel to the inside of the card using dries clear adhesive. Stamp the ‘On Your special Day’ sentiment from the Celebrate Love Sentiments Cling Stamp set with Tuxedo Black ink on 4 x 6” white cardstock. Use a decorative punch on the corners and adhere to the inside of the card. Adhere the other panel to the card front using dimensional tape. Using the Simply Classic Oval Frame Die, cut from white cardstock, sponge with dries clear adhesive and cover with Rajni Chawla’s Crystal Clear Adhesive. Adhere the frame to the card front. 

Stamp the Petite Feathery Floral image on white cardstock using Leaf Green Archival ink, color with Leaf Green and Coastal Coral inks, diecut using the coordinating die and lightly shape using the Deluxe Flower Shaping kit. Adhere to the right side of the oval frame using dimensional squares and dries clear adhesive. Stamp the butterfly from the same set on white cardstock using Tuxedo Black ink and color using Stampin’ Blends markers – Light Calypso Coral, Dark Smokey Slate and Light Just Jade. Diecut using the coordinating die, lightly shape and adhere to the left side of the oval. Cut the sentiment from the paper collection sheet 6A, ink the edges with Coast Coral ink and adhere inside the oval.

Stamp the Clematis flowers on Deluxe Flower Shaping Paper using Coastal Coral Archival ink and color both sides of the flowers with the same ink. Diecut using the coordinating dies and shape in the 3D Clematis Shaping Mold. Pierce the centers using the Groove Golf Tool and insert Bridal Bouquet Stamens. Secure the stamens with hot glue. Sponge the flowers with dries clear adhesive and sprinkle with Crystal Clear Glitter. Adhere the flowers to the Petite Feathery Floral image using hot glue.

Add sparkle to the card by randomly sponging with dries clear adhesive and sprinkling with Ultrafine Transparent Glitter.

Get all of the product details in the Heartfelt Creations Gallery. Please be sure to visit the Heartfelt Creations Blog to see all of the absolutely amazing projects created by the fabulous Design Team!

I really appreciate you for stopping by!

Till we meet again, please stay safe and be well.

Have a beautiful day!

Crafty Hugs, 🤗🤗🤗

Janet


Wednesday, March 22, 2023

Heartfelt Creations - Feathery Clematis Aperture

 Hi and welcome!

Well, it's official...Spring is here and hopefully the weather warms up soon.

My card today is rather springlike and it's an easy card to create.


Instructions: Card size is 4 1/4 x 5 1/2”. Score and fold 8 1/2 x 5 1/2” white cardstock at 4 1/4” on the long side to create a side fold card base. Cut the 4 x 5 1/4 panel from the Feathery Floral Paper Collection sheet 9A. Using the second largest Eyelet Oval & Basics Small Die, cut the oval from the center of the panel. Cut two pieces of green cardstock (Wild Wasabi used here.) 4 1/8 x 5 3/8” and adhere one to the inside of the card. Take the second one and adhere to the front of the card using dries clear adhesive. Center the panel with the cut-out oval on top of the green layer and use a pencil to mark the oval on the green panel. Place the same oval die on the pencil mark and run the card base with the green panel through the diecutting machine to cut an aperture in the card front. Using the largest and second largest ovals from the same die set, cut a frame from green cardstock. Ink the edges of the designer card front panel using Coastal Coral Archival ink and adhere over the green panel. Adhere the green frame around the oval aperture.

Stamp the image from the Petite Feathery Florals Cling Stamp set on white cardstock using Leaf Green Archival ink, color using Leaf Green and Coastal Coral inks. Stamp the same image using Tuxedo Black ink and color using Coastal Coral and Black Soot inks. Diecut both images using the coordinating die, lightly shape using the Deluxe Flower Shaping kit. Fussy cut just the butterfly from the Tuxedo Black image. Adhere the butterfly on top of the butterfly on the other image. Sponge the whole image with dries clear adhesive and sprinkle with Rajni Chawla’s Crystal Clear glitter. Adhere to the left side of the card using dimensional squares and glue.

Stamp the Clematis flowers on Deluxe Flower Shaping Paper using Coastal Coral Archival ink and color both sides of the flowers with the same ink. Diecut using the coordinating dies and shape in the 3D Clematis Shaping Mold. Pierce the centers using the Groove Golf Tool and insert Bridal Bouquet Stamens. Secure the stamens with hot glue. Sponge the flowers with dries clear adhesive and sprinkle with Crystal Clear glitter. Adhere the flowers to the Feathery Floral image using hot glue.

Stamp the ‘Sending you a hug’ sentiment from the Friendship Sentiments Cling Stamp set on white 4 x 51/4” cardstock using Wild Wasabi ink and adhere to the inside of the card. Be sure that it shows through the diecut oval front. Add a little sparkle to the card by randomly sponging with dries clear adhesive and sprinkling with Ultrafine Transparent Glitter.

You can find a list of all products used on my card in the Heartfelt Creations Gallery. Please be sure to visit the Heartfelt Creations Blog to see all of the absolutely gorgeous projects created by the fabulous Design Team! You won't be disappointed.

Thank you so much for stopping by, I really appreciate you!

Till we meet again, please stay safe and be well.

Have a beautiful day!

Crafty Hugs, 🤗🤗🤗 

Janet


Wednesday, March 15, 2023

Heartfelt Creations - The Beauty of Life

 Hi and welcome!

Life is truly a beautiful thing and I just love this paper because of the sentiment. All I had to do to create a beautiful card was use the gorgeous paper, stamp, color and diecut the stunning images and add glitter. So easy peasy! 


Instructions: Card size is 6 x 6”. Score and fold 12 x 6” Deluxe Flower Shaping Paper at 6” to create a tent fold card base. Cut sheet 8B from the Feathery Florals Paper Collection 2x to 5 7/8 x 5 7/8” and ink the edges with Wilted Violet Distress Oxide ink. Adhere one to the inside of the card using dries clear adhesive. Stamp the ‘Hope your day is as Special as you are’ sentiment from the Just For You Sentiment Cling Stamp set on 5 x 5” white cardstock using VersaMark ink, cover with Ranger Super Fine Detail Black Embossing Powder and heat set using the Heat It tool. Ink the edges using Wilted Violet ink and adhere to the inside of the card using dries clear adhesive. Cut the 6 x 6" panel from sheet 10A, trim to 5 3/4 x 5 3/4”, ink the edges with Cracked Pistachio, adhere to the other purple panel using dries clear adhesive and adhere to the card front using dimensional tape.

Stamp the floral image from the Feathery Florals Cling Stamp set and the butterfly from the Petite Feathery Florals Cling Stamp set on glossy cardstock using VersaMark ink, cover with Ranger Super Fine Detail Black Embossing Powder and heat set using the Heat It tool. Using a small paint brush, color using Wilted Violet, Picked Raspberry, Cracked Pistachio, Black Soot and Fossilized Amber Distress Oxide inks. Diecut using the coordinating dies, diecut two more times each from white cardstock, adhere together, lightly shape using the Deluxe Flower Shaping tools and adhere to the card front using dimensional squares and hot glue.

Using a sponge, randomly add dries clear adhesive and sprinkle Crystal Ultrafine Transparent glitter on the card front to add some sparkle.

All the product details are available in the Heartfelt Creations Gallery. Please be sure to also visit the Heartfelt Creations Blog to see all of the absolutely gorgeous projects created by the fabulous Design Team.

Thank you so much for stopping by, I really appreciate you.

Until we meet again, please stay safe and be well!

Have a beautiful day!

Crafty hugs, 🤗🤗🤗

Janet


Wednesday, March 8, 2023

Heartfelt Creations - Debuting the Feathery Florals Collection

 Hi and welcome!

Spring is right around the corner and I can't wait to see all the beautiful colors of spring when the flowers start to bloom.

Speaking of color, my card today is full of color as we debut the beautiful Feathery Floral Collection.


Instructions: Card size is 7 x 5”. Score and fold 7 x 10” white cardstock at 5” on the long side to create card base. Cut sheet 8B from the Feathery Florals Paper Collection 2x to 6 7/8 x 4 7/8”, ink the edges with Distress Oxide Wilted Violet ink and adhere one to the inside of the card and one to the card front using dries clear adhesive. Stamp the ‘Thinking of you makes my heart smile’ sentiment from the Friendship Sentiments Cling Stamp set on white cardstock using VersaMark ink, cover with Ranger Super Fine Detail Black Embossing Powder and heat set using the Heat It tool. Diecut using the Slim Elegant Rectangle Die and adhere to the inside of the card. 

Stamp the image from the Floral Feathers Cling Stamp Set on 6 5/8 x 4 5/8” glossy cardstock many times using VersaMark ink, cover with white embossing powder and heat set. Using a makeup brush, ink the stamped glossy paper with Distress Oxide Wilted Violet, Cracked Pistachio and Picked Raspberry inks. Let dry, then buff with a paper towel. Adhere to 6 3/4 x 4 3/4” white cardstock and adhere to the card front using dimensional tape. Stamp the ‘Let’s Celebrate’ sentiment from the Celebrate Love Sentiments Cling Stamp set on the glossy cardstock using VersaMark, cover with the black embossing powder and heat set. Diecut using the Slim Elegant Rectangle Die, diecut two more times from white cardstock, adhere together and adhere to the card front using dimensional squares.

Stamp the image from the Feathery Florals Cling Stamp set on the glossy cardstock using VersaMark ink, cover with the black embossing powder and heat set. Using a small paint brush, color using Wilted Violet, Cracked Pistachio and Fossilized Amber Distress Oxide inks. Diecut using the coordinating die, diecut two more times from white cardstock, adhere together and adhere to the card front using dimensional squares. 

You can see all the products used on this card by visiting the Heartfelt Creations Gallery. Please be sure to visit the Heartfelt Creations Blog to see all of the absolutely gorgeous projects created by the fabulous design team. 

Thank you for stopping by, I really appreciate you!

Until we meet again, please stay safe and be well.

Have a beautiful day!

Crafty Hugs, 🤗🤗🤗

Janet

Wednesday, March 1, 2023

Heartfelt Creations - Peacock Shadow Box

 Hi and welcome!

We finally had a significant snowfall yesterday here on Long Island. We usually have so much more snow so it was exciting to wake up this morning and see everything looking so beautiful. 

My card today looks a little more tropical than the current situation. 


Instructions: Card size is 7 x 5”. Score and fold 10 x 7” white cardstock at 5” on the long side to create card base. Cut Ornate Peacock Paper Collection sheet 1B to 6 7/8 x 4 7/8”, ink the edges with Archival Forget-Me-Not ink and adhere to the card front. Cut sheet 5A to 6 7/8 x 4 7/8”, ink the edges with Forget-Me-Not ink, stamp the ‘Happy Birthday to You’ sentiment from the Special Birthday Sentiments Cling Stamp set using Archival Vibrant Fuchsia ink and adhere to the inside of the card. Cut two tags from the paper collection using the smaller Tickets and Tags Die, ink the edges with Forget-Me-Not ink and adhere to two white cardstock tags cut using the larger tag die. Punch the holes in the tags, diecut the reinforcements for the holes using the same die set and color with Forget-Me-Not ink, adhere the reinforcements to the tags and add fuchsia satin cord. Trim a little off the bottom of the tags and adhere them to the right side of the card front as shown.

Create a 5 x 5” shadow box. Score a 7 x 11 1/2” piece of Deluxe Flower Shaping Paper on the short side at 1/2”, 1”, 6” and 6 1/2”. Score the long side at 1/2”, 1”, 6” and 6 1/2”. Trim the right top and bottom score lines off up to the first vertical score line, using scissors to cut tabs. (See sample on my blog.) Cut paper from the paper collection sheet 12B x1 4 7/8 x 4 7 /8”, x4 3/8 x 4 7/8” and ink the edges with Forget-Me-Not ink. Using removable tape, temporarily adhere the 4 7/8 x 4 7/8” designer paper to the front of the shadow box. Using the Cut Mat Create 2A die, cut the aperture in both the card front and the designer paper at the same time. Adhere the designer papers to the box using dries clear adhesive prior to assembling. Cut a 4 7/8 x 4 7/8” piece from the paper collection sheet 4A and adhere to the inside of the box. Finish folding at all score lines and adhere to form the shadow box. Adhere the shadow box to the left side of the card front using dries clear adhesive.

Stamp the fence from the Hollyhock Fence Cling Stamp set on white cardstock using VersaMark ink, cover with Ranger Super Fine Detail Embossing Powder, heat set using the Heat It Tool and diecut using the coordinating die. Diecut 4 more times from Deluxe Flower Shaping paper and adhere all the diecuts behind the stamped one to create a dimensional fence and adhere to the shadow box. 

Stamp the pretty peacock, the flourish from Peacock and Posies Cling Stamp set and the flourish from the Ornate Peacock Cling Stamp set on white watercolor cardstock using VersaMark ink, cover with Ranger Silver Super Fine Detail Embossing Powder and heat set using the Heat It tool. Diecut using the coordinating die and color using Zig Clean Color Real Brush markers – Fl. Green, Yellow, Persian Green and Dark Pink. Diecut each once more from white cardstock and adhere behind the stamped images for stability. Lightly shape the images using the Deluxe Flower Shaping kit. Adhere the peacock to the fence and the flourishes to the shadow box as shown using dimensional dots, hot glue and dries clear adhesive.

Stamp the Clematis flowers on Deluxe Flower Shaping Paper using Vibrant Fuchsia ink. Color the fronts and the backs using the same ink, diecut using the coordinating dies and shape using the 3D Clematis Mold. Add additional shaping using the Deluxe Flower Shaping kit. Adhere two petals of the same size together to create each flower and create one large, two medium and one small flowers. Pierce the flower centers and add Bridal Bouquet stamens using hot glue. Stamp the Garden Lily leaves on Deluxe Flower Shaping Paper using English Ivy Archival ink, color the fronts and backs with the same color, diecut using the coordinating die, add additional ink to the edges and shape in the 3D Lily mold. Using a paint brush, add dries clear adhesive to the flowers and leaves and sprinkle with Rajni Chawla’s Crystal Clear glitter.

Adhere the flowers and leaves as pictured. Add a little extra sparkle by randomly sponging the card front and the inside with dries clear adhesive and sprinkle with Crystal Clear glitter.

You can see all the products used on my card by visiting the Heartfelt Creations Galllery. Please be sure to visit the Heartfelt Creations Blog to see all of the gorgeous projects created by the fabulous Design Team.

Thank you for stopping by, I really appreciate you.

Till we meet again, please stay safe and be well.

Have a beautiful day!

Crafty Hugs, 🤗🤗🤗

Janet