Wednesday, January 25, 2023

Heartfelt Creations - Lily Slimline Gateway

 Hi and welcome!

Today we're debuting the beautiful Slim Decorative Rectangle Dies!

I've used the gorgeous Slim Gateway Rectangle Die along with the Garden Lily to create my first card with this launch. 


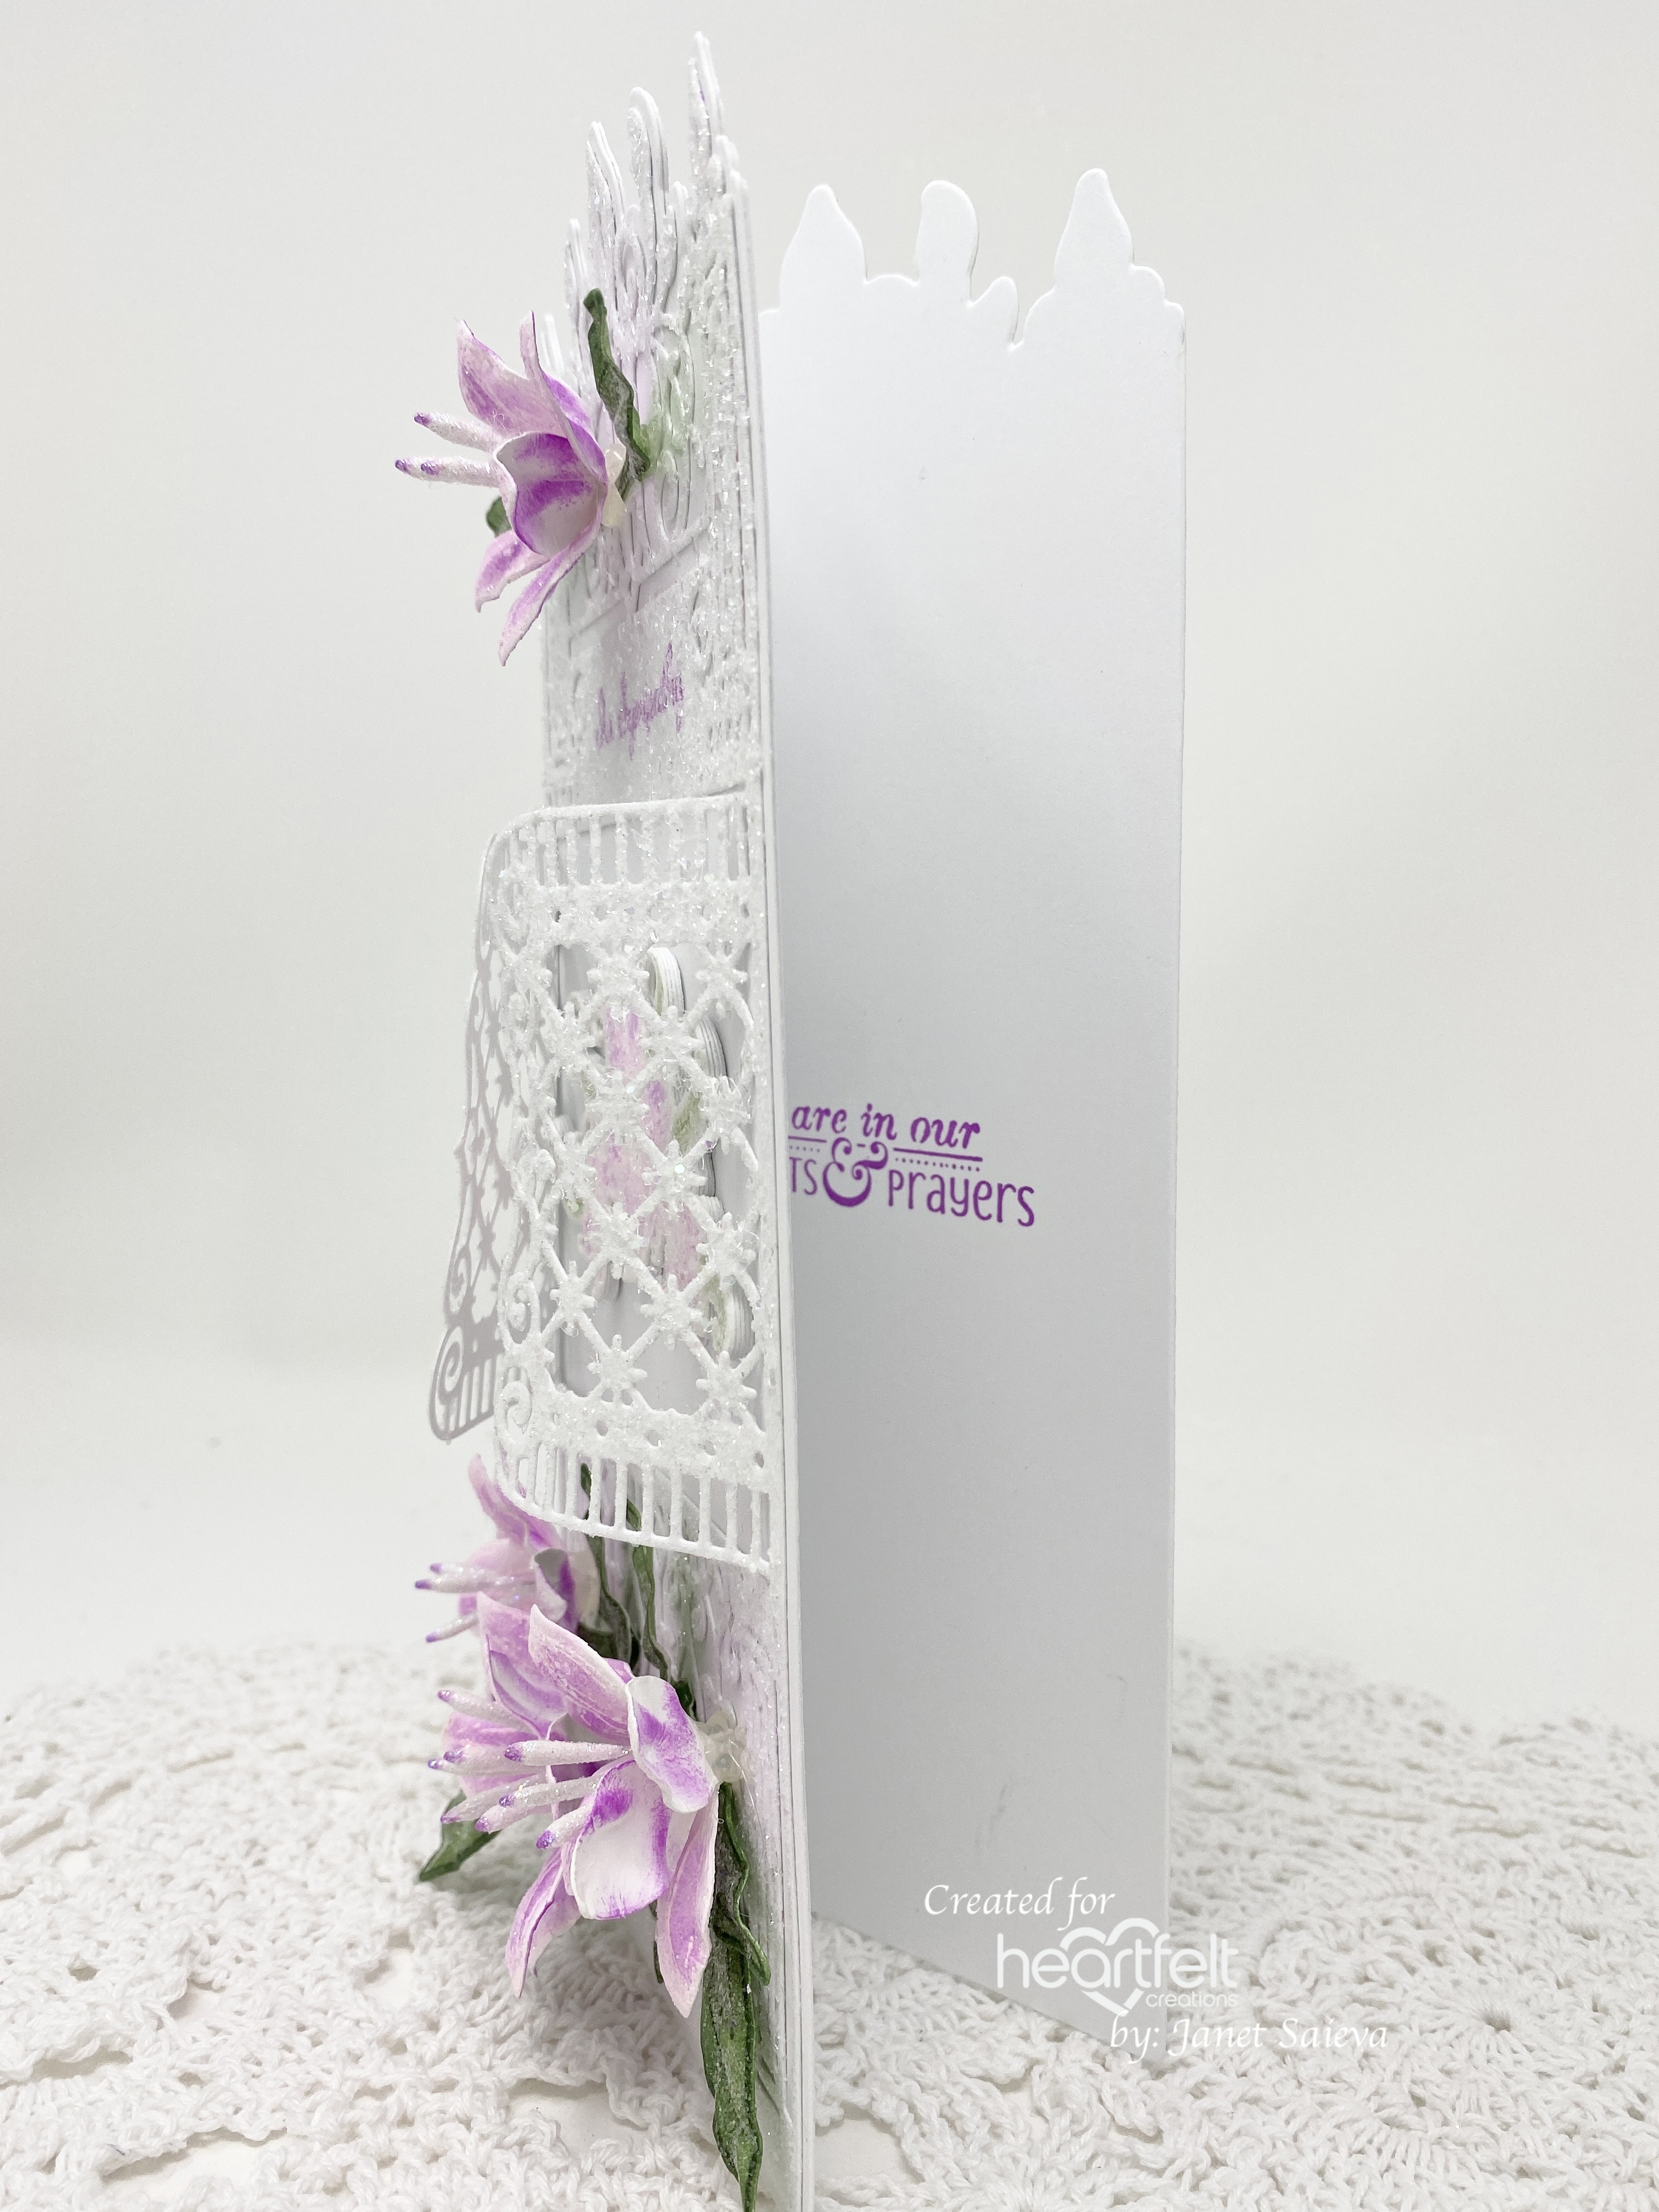
Instructions: Card size is 4 x 9”. Score and fold 8 1/2 x 9 1/2” white cardstock at 4 1/2”, place the largest Slim Gateway Rectangle Die just over the fold and diecut to get a shaped card base. Using the same die, cut two more times. Trim the left side of one, stamp the ‘You are in our Thoughts & Prayers’ sentiment from the Cheerful Notes Sentiments Cling Stamp set using Cactus Flower ink and adhere to the inside of the card. Adhere the other diecut to the card front using dries clear adhesive. Using the decorative Slim Gateway Rectangle Die, cut from white cardstock, stamp the ‘In Sympathy’ sentiment using Cactus Flower ink, sponge with dries clear adhesive and cover with Rajni Chawla’s Crystal Clear glitter. Add some shape to the gate using your fingers while it’s still wet. 

Stamp the floral spray from Garden Lily Spray & Fillers Stamp set on Deluxe Flower Shaping Paper using VersaColor white pigment ink, cover with Opaque Embossing Powder – White and heat set using the Heat It Tool. Color with Cactus Flower and Olive inks using Fantastix Blending Tools and diecut using the coordinating die. Diecut four more times, adhere behind the stamped image to create dimension, sponge with dries clear adhesive and sprinkle with Crystal Clear glitter. Adhere to the card base behind the gate using dries clear adhesive. 

Stamp the Garden Lilies on Deluxe Flower Shaping Paper using VersaColor white pigment ink, cover with Opaque Embossing Powder – White and heat set using the Heat It Tool. Color using Cactus Flower ink, diecut using the coordinating die and shape in the 3D Garden Lily Mold. At this point, I had forgotten to add some color to the backs of the flowers so I took a dauber and added some Cactus Flower ink to the embossed backs and got a really pretty effect. Adhere two petals of the same size together, offset, to create the lilies. Using the Groove Golf tool, pierce a hole in the flower centers, insert the Petite Pollen Stamens and secure with hot glue. I used the white stamens, sponged them with dries clear adhesive, dipped them in the Crystal Ultrafine Transparent Glitter and added a dab of Cactus Flower ink to the tips. Stamp the Garden Lily leaves using Archival Olive ink, color using the same ink, diecut, add more ink to the edges and the back of the leaves and shape in the 3D Garden Lily Mold. 

Using a paint brush, brush the flowers and leaves with watered down dries clear adhesive and cover with Rajni Chawla’s Crystal Clear glitter. Adhere the flowers and leaves to the card front as shown. 

Find all the products I used on my card by going to the Heartfelt Creations Gallery.

Please be sure to also visit the Heartfelt Creations Blog to see all of the absolutely gorgeous projects created by the fabulous Design Team. 

Thank you so much for stopping by, I really appreciate you. 

Till we meet again, please stay safe and be well.

Have a beautiful day!

Crafty Hugs, 🤗🤗🤗

Janet

Wednesday, January 18, 2023

Heartfelt Creations - Buttercup Lilies

Hi and welcome!

I can't get enough of these beautiful Garden Lilies. Don't they look amazing in bright yellow and coral?


Instructions: Card size is 5 x 7”. Score and fold 10 x 7” white cardstock at 5” to create the side fold card base. Using the Filigree Border & Accents Die, cut the edge of the card front. Sponge the decorative edge and the top and bottom edges of the card front with dries clear adhesive and sprinkle with Rajni Chawla’s Crystal Clear glitter. Cut sheet 6B from the Garden Lily Paper Collection to 4 7/8 x 6 7/8”, sponge the edges with Coastal Coral ink and adhere to the inside of the card. Stamp the ‘Thinking of You’ sentiment from the Just for You Sentiments Cling Stamp set on white cardstock using Tuxedo Black ink and diecut using the Album Tags and Accents Die. Diecut the larger eyelet die, adhere the two together and adhere to the inside of the card. Cut white cardstock 4 1/8 x 6 7/8”, dry emboss and adhere to the card front using dimensional tape. 

Stamp the Garden Lilies on Deluxe Flower Shaping Paper using Buttercup ink, color using Buttercup and Coastal Coral inks, diecut using the coordinating dies and color the backs of the flowers. Place face down in the 3D Garden Lily Shaping Mold and run through the diecutting machine to shape. Adhere two petals of the same size together, offset, to create each lily. Using the Groove Golf tool, pierce a hole in the flower centers, insert the Petite Pollen Stamens and secure with hot glue. I used the yellow stamens and added a dab of Coastal Coral ink to the tips. Stamp the Garden Lily leaves using Archival Olive ink, color using the same ink, diecut, add more ink to the edges and the back of the leaves and shape in the 3D Garden Lily Mold. 

Using a paint brush, brush the flowers and leaves with watered down dries clear adhesive and cover with Rajni Chawla’s Crystal Clear glitter. Adhere the flowers and leaves to the EZ Stem Floral Wire and add a little glitter to the stems. Adhere the arrangement to the card front as shown using hot glue.

Stamp the ‘For My Friend’ Sentiment from the Just for You Sentiments Cling Stamp set on white cardstock using Tuxedo Black ink and diecut using the banner die from the Arrows and Banner Die set. Adhere to the top of the card front using dimensional Tape. 

The list of products used on my card can be found in the Heartfelt Creations Gallery.

Please be sure to visit the Heartfelt Creations Blog to see all of the absolutely gorgeous projects created by the fabulous design team.

Thank you so much for stopping by. I really appreciate you. 

Until we meet again, please stay safe and be well.

Have a beautiful day!

Crafty Hugs, 🤗🤗🤗

Janet


Wednesday, January 11, 2023

Heartfelt Creations - Debuting the Garden Lily Collection

 Hi and welcome!

Today we're debuting the Garden Lily Collection and I have to say, I absolutely love making these gorgeous lilies!!!!!


Instructions: Card size is 6 1/2 x 6 1/2”. Cut two pieces of Deluxe Flower Shaping paper, 6 1/2 x 6 1/2” and 6 1/2 x 7”. Score and fold the 7” piece at 61/2” on the long side and adhere to the 6 1/2 x 6 1/2” piece using dries clear adhesive to create tent fold card base. Cut two pieces of the Garden Lily Paper Collection sheet 9B to 6 3/8 x 6 3/8” and cut two 6 x 6” panels from sheet 10A. Using a paper distresser, distress the edges of all the designer papers. Adhere one of the panels to the pink sheet and adhere to the inside of the card. Stamp the ‘Let’s Celebrate’ Sentiment from the Celebrate Love Sentiments Cling Stamp set on white cardstock using Magenta Hue ink, diecut using the banner die from the Banner and Arrows Die set, distress the edges then ink with Magenta Hue ink and adhere to the inside of the card. On the front 6 x 6” panel, make two tears, one on the right side at the top and one on the bottom on the left, dampen the paper and roll back, when dry adhere two ‘lace’ pieces snipped from a white Rounded Window Frame diecut behind the openings and then adhere to the pink designer paper. Adhere to the card front using dimensional tape. 

Using the Slim Lattice Oval Die, cut the small decorative center 3x from white cardstock, adhere together and lightly ink the edges with Magenta Hue ink and adhere to the card front as shown using dries clear adhesive. Stamp the ‘congrats’ sentiment from the Celebrate Love Sentiments Cling Stamp set on the small oval center using Magenta Hue ink, distress and ink the edges and adhere to the center of the decorative diecut using dimensional dots. 

Stamp the Garden Lilies on Deluxe Flower Shaping Paper using Pink Peony ink, color using Magenta Hue ink and diecut using the coordinating dies. Add some color to the back of the flowers, then place face down in the 3D Garden Lily Shaping Mold and run through the diecutting machine to shape. Adhere two petals of the same size together, offset, to create each lily. Using the Groove Golf tool, pierce a hole in the flower centers, insert the Petite Pollen Stamens and secure with hot glue. I used the green stamens and added a dab of Magenta Hue ink to the tips. Stamp the Garden Lily leaves using Archival Olive ink, color using the same ink, diecut, add more ink to the edges and the back of the leaves and shape in the 3D Garden Lily Mold. 

Using a paint brush, brush the flowers and leaves with watered down dries clear adhesive and cover with Rajni Chawla’s Crystal Clear glitter. Adhere three lilies to the bottom right corner and two lilies to the top left corner using hot glue. Tear the leaves apart and adhere around the lilies using hot glue. Make three small bows from satin cord and adhere one next to each lily.

To add a little extra sparkle, use a sponge to dab some dries clear adhesive randomly on the card front and the inside and sprinkle with Crystal Ultrafine Transparent Glitter. 

You can find all the products I used on my card by visiting the Heartfelt Creations Gallery. Please be sure to also visit the HC Blog to see all of the gorgeous projects created by the fabulous Design Team.

Thank you so much for stopping by, I really appreciate you!

Till we meet again, please stay safe and be well.

Have a beautiful day!

Crafty Hugs, 🤗🤗🤗

Janet


Wednesday, January 4, 2023

Heartfelt Creations - Blue Roses

 Hi and welcome to my first blog post of 2023.

I feel so blessed that I'll be celebrating 3 big milestones this year.

I'll celebrate my 80th birthday, being 10 years color cancer free and our 60th wedding anniversary. It's going to be a great year!!!

I'm a real big fan of the slimline cards and I love making them. Today's card was so easy to put together because I already had the blue roses made. The beautiful slim dies do all the work for you!


Instructions: Card size is 8 1/2 x 4”. Score and fold 8 1/2 x 8” white cardstock at 4”. Cut Luxe Gold cardstock 2x at 8 3/8 x 3 7/8”. Cut white cardstock 2x at 8 1/4 x 3 3/4”. Stamp the ‘On Your Special Day’ Sentiment from Celebrate Love Sentiments Cling Stamp set and the single Rose from the Budding Rose Heart Cling Stamp set on one of the white cardstock panels using Metallic Gold ink, cover with Ranger Gold Tinsel Embossing Powder and heat set using the Heat It tool. Adhere to one of the gold panels and adhere to the inside of the card. Dry emboss the second white cardstock panel using a textured embossing folder (I used the Stampin' Up Subtle Embossing Folder which is retired), adhere to the second gold panel using dries clear adhesive and adhere to the card front using dimensional tape.

Diecut the Slim Lattice Oval Die 2x, once from white cardstock and once from Luxe Gold cardstock. Adhere the white decorative diecuts on top of the gold decorative diecuts, slightly offset so that it creates a beautiful glimmery shadow. Adhere to the embossed white panel on the card front using dries clear adhesive. Stamp the ‘Best Wishes’ sentiment from the Celebrate Love Sentiments Cling Stamp set on the white center diecut using Metallic Gold ink, cover with Ranger Gold Tinsel Embossing Powder and heat set using the Heat It tool. Adhere the gold center piece behind the white piece slightly offset and adhere to the card front using dimensional dots.

Stamp the Classic Roses on Deluxe flower Shaping Paper using Seaside Spray ink, diecut with the coordinating dies, color the front and the back using the same ink and shape using the Groove Golf Tools. Use four same size flowers to create each rose. Using the Groove Golf Tool, pierce a hole in the middle of the smallest flowers and insert an Assorted Bead Stamen – Medium. Using a paint brush, cover the flowers with watered down dries clear adhesive and sprinkle with Rajni Chawla’s Crystal Clear glitter.

Stamp the Classic Rose, Leafy Accents and Large Floral Urn leaves on Deluxe Flower Shaping Paper using Archival Olive ink, color using the same ink along with Leaf Green ink and diecut using the coordinating dies. Add additional color to the edges of the leaves using the Olive ink. Shape using the Deluxe Flower Shaping Kit. Using a paint brush, cover the leaves with watered down dries clear adhesive and sprinkle with Rajni Chawla’s Crystal Clear glitter.

Adhere the flowers and leaves to the card front using hot glue. 

You can find out which products I used on my card by visiting the Heartfelt Creations Gallery

Also please be sure to visit the HC Blog to see all of the absolutely gorgeous projects created by the fabulous Design Team.

Thank you so much for stopping by! I really appreciate you!

Till we meet again, please stay safe and be well!

Have a beautiful day!

Crafty Hugs, 🤗🤗🤗

Janet