Saturday, August 28, 2021

Heartfelt Creations - Two More Festive Poinsettia Cards

 Welcome - It's Day 3 of the debut of the Festive Poinsettia Collection!

Here's my third card.

'Silver Poinsettia Gateway'


Instructions: Card size is 5 x 7”. Using the outside Lattice Flourish Gateway die, cut 2x from 5 x 7” Pearl White Metallic cardstock and 2x from Festive Poinsettia paper. Add 1” double side tape to the top of one of the Pearl White Metallic pieces before diecutting. Score the diecut with the tape just under the tape and adhere to the other Pearl White diecut to create card base. Add one of the designer papers to the front of the card, trim the top of the other designer paper, ink the edges with Real Red ink and adhere to the inside of the card. Diecut one of the journal pages from the Festive Poinsettia paper collection using the eyelet rectangle die and adhere to the inside of the card.

Stamp the ‘Merry Christmas’ sentiment on the front designer paper using VersaMark, sprinkle with WOW Metallic Silver Sparkle Embossing Glitter and heat set using the heat it tool. Diecut the decorative Lattice Flourish Gateway dies once from Pearl White Metallic cardstock and once from Luxe Silver cardstock. Adhere them together, slightly offset, and adhere the outside piece to the card front using dries clear adhesive and adhere the gate using foam strips.

Stamp the small flowers from the Large Festive Poinsettia Cling Stamp set 2x and the smallest Small Festive Poinsettia 2x on pearl white metallic cardstock using VersaMark, sprinkle with WOW metallic Silver Sparkle Embossing Glitter and heat set using the Heat It tool. Diecut using the coordinating dies and add a little Real Red ink to the poinsettias using Stack & Store Daubers. Shape in the 3D Festive Poinsettia Shaping Molds. Using the Groove Golf Tool Set, pierce a large hole in the center of the flowers and insert silver Assorted Bead-Medium stamens. Layer the flowers, slightly offsetting, and secure using hot glue.

Stamp the large spray and the leaves from the Holly Berry Spray Cling Stamp Set and the leaves 2x from the Small Festive Poinsettia Cling Stamp Set on Luxe Silver Cardstock using VersaMark, sprinkle with WOW metallic Silver Sparkle Embossing Glitter and heat set using the Heat It tool. Shape the leaves in the mold and the sprays using the Deluxe flower shaping kit.

Adhere the poinsettias, leaves and sprays to the card front using hot glue.

Visit the Heartfelt Creations Gallery to find out what products I used on my card.

And here's my fourth card.

'Intricate Swirl for Christmas' 


Instructions: Create a 7 x 5” shaped card base using the Intricate Swirl Frames outside Die. Cut two pieces of white cardstock 7 1/2 x 5 1/2”. Add 1” double sided tape to the top of the second one, then diecut both using the largest Intricate Swirl Frames die. Score the one with the tape just underneath the tape and adhere the two together. Cut two pieces of green Festive Poinsettia paper Sheet 8B 5 3/8 x 3 3/8”, ink the edges using Archival Olive ink and adhere one to the center of the card front and the other to the inside of the card. Using the same die, cut again from Luxe Gold cardstock, this time also using the next die in the set. Adhere the gold frame to the card front using dimensional tape offsetting slightly so that the white just peeks through. Adhere the intricate inside die using dries clear adhesive. Cut the next size die twice, once from Luxe Gold cardstock and once from white cardstock and adhere the white one behind the gold one making sure to offset. Adhere to the center using dimensional squares, Stamp “Merry Christmas’ from the Candlelit Poinsettia Cling Stamp Set on White cardstock using VersaMark, sprinkle with gold embossing powder and heat set. Diecut using the second smallest Circle Basics Large Die, ink the edges using Olive ink and adhere to the center.


Diecut Luxe Gold Cardstock using the third smallest Eyelet Circle & Basics Small Die. Adhere the two together and adhere to the center, Using the smallest eyelet die from the Eyelet Rectangle and Basics Die, cut from Luxe Gold Cardstock. Cut white cardstock from the smallest plain rectangle die and ink the edges, Cut the sentiment from Festive Poinsettia paper collection, sheet 3A, 2 1/4 x 1 1/8” and ink the edges. Adhere all three together using dries clear adhesive and adhere to the inside of the card.

Stamp the smallest Small Festive Poinsettia 2x on red pearl metallic cardstock using VersaMark ink, sprinkle with gold embossing powder and heat set using the Heat It Tool. Stamp the Small Festive Poinsettia Leaves 2x on green pearl metallic cardstock using VersaMark ink, sprinkle with gold embossing powder and heat set using the Heat It Tool. Stamp the large flourish from the Holly Berry Cling Stamp Set on Luxe Gold Cardstock using VersaMark ink, sprinkle with gold embossing powder and heat set using the Heat It Tool. Diecut all using the coordinating dies. Shape the poinsettias and leaves in the Small Poinsettia Shaping Mold and shape the flourish using the Deluxe Flower shaping Kit. Pierce the center of the poinsettia flowers using the Groove Golf Tool and insert the stamens, adhere the two flowers together using hot glue making sure to offset them.

Adhere the Holly Berry flourish, the poinsettia and the leaves to the left side of the card using hot glue as shown.

Visit the Heartfelt Creations Gallery to find out what products I used on my card. 

Thank you you so much for stopping by and please be sure to visit the Heartfelt Creations Blog to see all of the gorgeous projects created by the fabulous Design Team.

Till we meet next week, please stay safe and be well. 

Have a beautiful day!

Crafty Hugs, 🤗🤗🤗

Janet


Thursday, August 26, 2021

Heartfelt Creations - Glittering Gold Poinsettia

 Welcome - It's Day 2 of the debut of the Festive Poinsettia Collection!

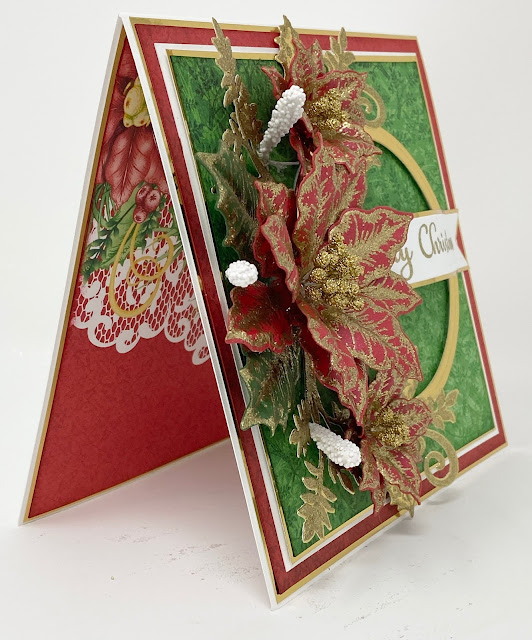
Here's my second card.


Instructions: Card size is 6 x 6”. Score and fold 12 x 6" Deluxe Flower Shaping Paper at 6” to create a 6 x 6” tent fold card. Cut Luxe Gold cardstock 5 7/8 x 5 7/8”. Cut red paper from the Festive Poinsettia Paper Collection 6 3/4 x 6 3/4”. Adhere the two together and adhere to the card base with dries clear adhesive. Cut Deluxe Flower Shaping paper 5 3/8 x 5 3/8”. Cut Luxe Gold cardstock to 5 1/4 x 5 1/4”. Cut green designer paper to 5 1/8 x 5 1/8”. Adhere the three together and adhere to the card base. Cut Luxe Gold cardstock to 5 7/8 x 5 7/8” and red designer paper to 5 3/4 x 5 3/4”. Adhere the two together and adhere to the inside of the card.

Using the two largest Circle Basics Large dies, cut a circle from Luxe Gold cardstock. Adhere the circle to the card base using foam strips.

Stamp the Large and Small Festive Poinsettias on red metallic cardstock using VersaMark, stamp leaves with VersaMark on green metallic cardstock, sprinkle with WOW Metallic Gold Sparkle Embossing Glitter and heat set using the Heat It Tool. Place the flowers and leaves in the molds, spritz with water and run through the die-cutting machine. When dry, pierce the flower centers using the Groove golf Tool and insert the gold stamens. Use two flowers to create each poinsettia making sure to offset them.

Stamp the Small Festive Poinsettia leaves and the Holly Berry Spray leaves on Luxe Gold cardstock using VersaMark. Sprinkle with WOW Metallic Gold Sparkle Embossing Glitter and heat set using the Heat It Tool. Shape the Small Poinsettia leaves in the mold and shape the Holly Berry Spray leaves using the Deluxe Flower Shaping kit.

Create a cluster on the left side of the circle using the poinsettias and gold leaves, glue down using a hot glue gun. Add a few white pastel pollen stamens to the cluster.

Stamp the ‘Merry Christmas’ sentiment on white cardstock using Versamark, sprinkle with WOW Metallic Gold Sparkle Embossing Glitter and heat set using the Heat It Tool. Diecut using the arrows and banners die and mat onto Luxe Gold cardstock. Shape with fingers and adhere over the center of the circle.

Visit the Heartfelt Creations Gallery for a list of all the products used on my card.

Thank you so much for stopping by. Please be sure to visit the Heartfelt Creations Blog to see the magnificent projects created by the fabulous Design Team.

Till I see you on Saturday, please stay safe and be well.

Have a beautiful day!

Crafty Hugs, 🤗🤗🤗

Janet


Wednesday, August 25, 2021

Heartfelt Creations - Debuting the Festive Poinsettia Collection

 Hi and welcome!

Yay! the day is finally here when we can debut the gorgeous Festive Poinsettia Collection!

Celebrate the holidays with a festive paper collection full of classic Christmas colors of reds & greens, and full of holiday sentiments, perfect for cards, scrapbooks or home decor! Stamp, die cut, and shape your festive poinsettias and spread some holiday cheer with everyone’s favorite holiday floral! Your Christmas cards will bring fond memories of past Christmases with the timeless beauty of these holiday poinsettias.

Here's my Sparkling Silver Poinsettia card for day 1 of the debut.


Instructions: Card size is 8 x 5 1/2”. Score and fold 11 x 8” pearl white metallic cardstock at 5 1/2” to create tent fold card base. Cut Luxe Silver cardstock to 7 3/4 x 5 1/4”. Cut pearl white metallic cardstock to 7 1/2 x 5”, dry emboss, adhere the two mat layers together and adhere to the card base. Cut Luxe Silver Cardstock to 7 3/4 x 5 1/4” again and red paper, Sheet 7B, from the Festive Poinsettia Paper Collection to 7 1/2 x 5”, ink the edges using Real Red ink and adhere to the inside of the card.

Stamp ‘Happy Holidays’ from the Festive Winterscapes Cling Stamp Set on pearl white metallic cardstock using VersaMark, sprinkle with silver embossing powder and heat set. Diecut using the Eyelet Rectangle & Basics die and adhere to the inside of the card.

Stamp the Large Festive Poinsettia flower 2x and the leaf 4x on pearl white metallic cardstock using VersaMark, sprinkle with WOW metallic Silver Sparkle Embossing Glitter and heat set using the Heat It tool. Diecut using the Large Festive Poinsettia Die and add a little Real Red ink to the poinsettias and a little Garden Green ink to the leaves using Stack & Store Daubers. Shape in the 3D Large Festive Poinsettia Shaping Mold. Using the Groove Golf Tool Set, pierce a large hole in the center of the flowers and insert 20 silver Assorted Bead-Medium stamens. Layer the flowers, slightly off setting, and secure using hot glue.

Stamp the large spray from the Holly Berry Spray Cling Stamp Set 2x and the leaves 4x from the Large Festive Poinsettia Cling Stamp Set on Luxe Silver Cardstock using VersaMark, sprinkle with WOW metallic Silver Sparkle Embossing Glitter and heat set using the Heat It tool. Shape the leaves in the mold and the sprays using the Deluxe flower shaping kit.

Adhere the poinsettia, leaves and sprays to the card front using hot glue.

Visit the Heartfelt Creations Gallery to see all the products used on my card.

Thank you so much for stopping by. Please be sure to visit the Heartfelt Creations Blog to see all of the gorgeous projects created by the fabulous Design Team.

Till we meet tomorrow, please stay safe and be well!

Have a beautiful day!

Crafty Hugs, 🤗🤗🤗

Janet

Wednesday, August 18, 2021

Heartfelt Creations - It's Snow Pretty

 Hi and welcome!

The summer is just flying by and here I am making Christmas Cards. I do absolutely love the Home for the Holidays Collection, I think it's one of my favorites. Today's card is a pretty snowy scene accented with bright red poinsettias.


Instructions: Card size with flowers is 7 3/4 x 5 1/4”. Cut three pieces of white cardstock 7 1/2 x 5 1/2”. Add 1” double sided tape to the third piece and diecut all using the largest Holiday Snowflake Frame Die. Adhere two of these large diecuts together for the front of the card. Diecut a smaller frame from white cardstock using the second and third largest dies from the same set. Diecut three of the larger snowflakes. Sponge all except the frame with the tape with dries clear adhesive and sprinkle with ultrafine transparent glitter. When dry, adhere the two larger frames together using the tape to create the card base. Adhere the smaller frame and two of the snowflakes to the larger frame using dries clear adhesive as shown. Cut the panel with the truck from the Home for the Holidays Paper Collection sheet 3A, round the corners, ink the edges using Archival Olive ink, stamp the sentiment from the Holiday Village Stamp set using Archival Jet Black ink and adhere to the inside.

Stamp the image with the full truck and the barn and deer from the Home for the Holidays Cling Stamp set 2x on Strathmore Bristol Vellum Cardstock using Jet Black Archival ink. Color everything except the truck and Deer on one scene and just the truck and deer on the second scene using Zig Clean Color Real Brush Markers Carmine Red, Wine Red, Yellow, May Green, Deep Green, Light Gray and Beige. Diecut the full scene using the coordinating die and diecut again from plain white cardstock. Adhere the two together to create a strong base. Diecut the colored truck and the deer from the second scene using the coordinating dies. cut the deer 2x more and the truck 4x more and adhere together. Spritz all the diecuts with Sheer Shimmer Craft Spray-Sparkle and let dry. To create the snow effect, add dries white glue and ultrafine transparent glitter. Adhere the truck and the deer and then adhere the whole scene to the card base.

Stamp the small poinsettias from the Large Festive Poinsettia Cling Stamp set 3x on red pearl metallic cardstock using Archival Red Geranium ink, diecut using coordinating die and shape using the Large 3D Festive Poinsettia Shaping Mold and the Deluxe Flower Shaping Kit. Adhere two flowers together making sure to offset them and add dries clear adhesive and gold glass shards to the flower centers.

Stamp the Holly Leaves from the Small Festive Poinsettia Cling Stamp set and the leaves from the Holly Berry Cling Stamp Set on green pearl metallic paper using Archival Olive ink and diecut using coordinating dies. Shape the leaves using the Small 3D Festive Poinsettia Shaping Mold and the Deluxe Flower Shaping Kit. Add dries white adhesive to the tips of the poinsettias and leaves and dip them in the transparent ultrafine glitter. Adhere the poinsettias and leaves to the left side of the card as shown using hot glue. Cut the last snowflake in half and glue a half behind the top and bottom poinsettias.

Other Products: White Cardstock, Red Pearl Metallic Cardstock, green Pearl Metallic Cardstock, Gold Glass Shards, Strathmore Bristol Vellum Cardstock, Sheer Shimmer Craft Spray-Sparkle, Dimensional Squares, Corner Rounder, Funnel Tray, Misti, Double Sided Tape

Click here to see all of the products I used on this project.

Thank you so much for stopping by! Please be sure to visit the Heartfelt Creations Blog to see all of the absolutely gorgeous projects created by the fabulous design team. 

Until we meet again, please stay safe and be well.

Have a beautiful day!

Crafty Hugs, 🤗🤗🤗

Janet

Wednesday, August 11, 2021

Heartfelt Creations - Debuting the Home for the Holidays Collection

 Hi and Welcome!

Here we are in 90 degree weather showcasing the beautiful Home for the Holidays Collection. The gorgeous winter scenes and the sparkling snowflakes will definitely help to cool us down.

Here's my first project with this collection.


Instructions: Card size with Flowers and Snowflakes is 8 x 6”. Cut white cardstock 7 x 10” score and fold at 5” on the long side to create a 7 x 5” top fold card base. Cut Home for the Holidays paper sheet 6A 2x to 6 7/8 x 5 7/8”. Cut one piece from the top right and the other from the bottom right that includes the beautiful scene with the truck. Ink the edges using Archival Olive ink and adhere the one with the scene on the inside of card and the plain green one on the card front, using dries clear adhesive. Using Jet Black ink, stamp the ‘Have a very Merry Christmas!’ Sentiment from the Holiday Village Cling Stamp set on the inside.

Create a 5 x 5” shadow box. Score a 7 x 11 1/2” piece of Deluxe Flower Shaping Paper on the short side at 1/2”, 1”, 6” and 6 1/2”. Score the long side at 1/2”, 1”, 6” and 6 1/2”. Trim the right top and bottom score lines off up to the first vertical score line, using scissors to cut tabs. (See sample on my blog.) Use the Cut Mat Create Die to cut the aperture in the front of the box. Cut paper from the paper collection sheet 5A x1 4 7/8 x 4 7 /8”, x4 3/8 x 4 7/8” and ink the edges with Olive ink. Use the Cut Mat Create 2A die to cut the aperture in the 4 7/8 x 4 7/8” pieces for the front of the shadow box. Adhere the papers to the box using dries clear adhesive prior to assembling. Cut 4 7/8 x 4 7/8” from the paper collection sheet 2B and adhere to the inside of the box. Finish folding at all score lines and adhere to form the shadow box.

Stamp the Holiday Village scene 2x, the woman and child and the trees 1x on Strathmore Bristol Vellum Cardstock using Jet Black Archival ink. Color everything except the church on one scene and just the church on the second scene using Zig Clean Color Real Brush Markers Carmine Red, Wine Red, Yellow, May Green, Deep Green, Cornflower Blue, Light Blue and Beige. Diecut the whole scene and then just the church using coordinating dies. Diecut the whole scene one more time from deluxe flower shaping paper and adhere the two together. Diecut the church 4 more times and adhere all diecuts together to create dimension. Adhere the church to the rest of the scene. Diecut the woman and child and the trees 2x and adhere them to together, Cut the trees apart. Spritz all the diecuts with Sheer Shimmer Craft Spray-Sparkle and let dry. To create the snow effect, adhere dries white glue and Rajni Chawla’s Frosting Powder. Adhere the scene inside the box and adhere the woman and child and one tree to the outside of the box using dimensional squares.

Diecut the large snowflake from the Holiday Snowflake Frame Die 10x and a small snowflake 2x from white cardstock. Double three of the snowflakes to make them thicker and adhere the small snowflakes together. Sponge all the snowflakes with dries clear adhesive and sprinkle with Ultrafine Transparent Glitter. When dry, adhere the doubled snowflakes to the back of the top of the shadow box. Adhere the single large snowflakes to the bottom of the right side of the shadow box. Diecut two large tags using the Ticket and Tags dies from white cardstock and the inside tags from designer paper and ink the edges. Adhere the tags together and punch holes in the tops using Crop-A-Dile and add red silk cord. Cut the tags down at the bottom and adhere to the right side of the card front. Adhere the shadow box to the left side of the card front.

Diecut a small tag from sheet 5A of the paper collection and again from white cardstock. Adhere the two together and ink the edges using Archival Olive ink. Diecut from Luxe Gold Cardstock the ‘2021’ using the small numbers from the Letters & Numbers Die and adhere to the tag using dries clear adhesive. Use the Mini Laser Square to line up the numbers and place them using the QuickStik. Adhere the tag to the top of the shadow box and adhere the small snowflake to the right side of the box above the tree.

Stamp the small poinsettias from the Large Festive Poinsettia Cling Stamp set 3x on red pearl metallic cardstock using Archival Red Geranium ink, diecut using coordinating die and shape using the Large 3D Festive Poinsettia Shaping Mold and the Deluxe Flower Shaping Kit. Adhere two flowers together making sure to offset them and add dries clear adhesive and gold glass shards to the flower centers.

Stamp the Holly Leaves from the Small Festive Poinsettia Cling Stamp set and the leaves from the Holly Berry Cling Stamp Set on green pearl metallic paper using Archival Olive ink and diecut using coordinating dies. Shape the leaves using the Small 3D Festive Poinsettia Shaping Mold and the Deluxe Flower Shaping Kit. Add dries white adhesive to the tips of the poinsettias and leaves and dip them in the transparent ultrafine glitter. Adhere the poinsettias and leaves to the left and bottom of the shadow box as shown using hot glue. Adhere the last snowflake to the left bottom corner in between the poinsettias.

Other Products: White cardstock, Red Pearl Metallic Cardstock, green Pearl Metallic Cardstock, Gold Glass Shards, Red Silk Cord, Strathmore Bristol Vellum Cardstock, Crop-A-Dile, Sheer Shimmer Craft Spray-Sparkle, Dimensional Squares, Mini Laser Square Funnel Tray, Misti.

Thank you so much for stopping by. To find out all the products used on this shadow box card, please visit the heartfelt creations gallery hereAlso visit the Heartfelt Creations Blog to see all of the amazing projects created by the fabulous Design Team.

Till we meet again, stay safe, be well and have a beautiful day!

Crafty Hugs, 🤗🤗🤗

Janet