Wednesday, February 23, 2022

Heartfelt Creations - Embossed Birthday Roses

 Hi and welcome to my blog.

I have a lot of February Birthdays, including mine lol, so I thought that a birthday card would be perfect for today.


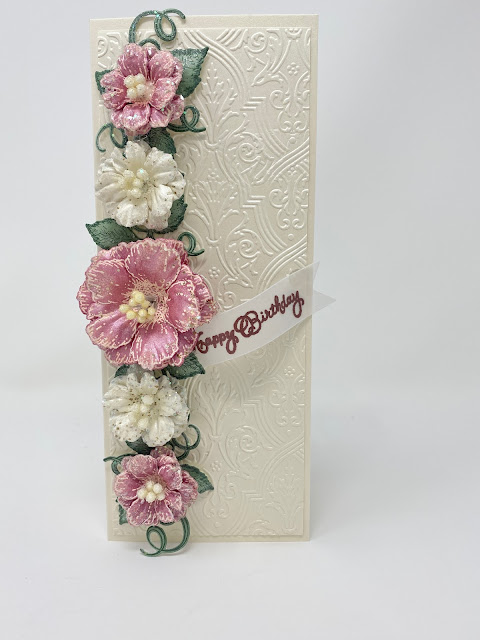
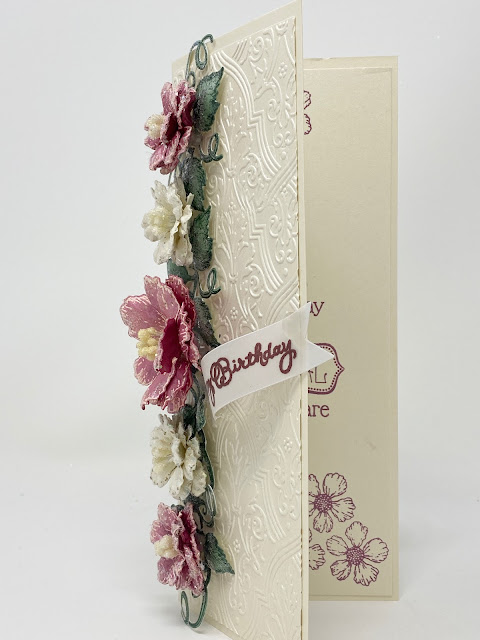
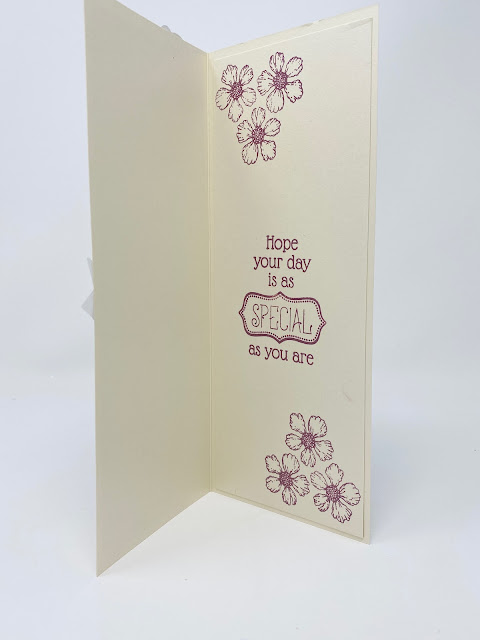
Instructions: Card size is 8 1/2 x 3 1/2”. Score and fold 8 1/2 x 7” Champagne Metallic cardstock at 3 1/2” on the short side to create side fold slimline card base. Cut 3 1/4 x 8 1/4" Champagne Metallic cardstock 2x. Dry emboss one using an embossing folder and adhere to the card front. Stamp the second one using small Wild Rose Cling stamp set at the top and the bottom with Archival Lighthouse ink. Using the Special Birthday Sentiments Cling Stamp set, stamp the sentiment ‘Hope your day is as Special as you are’ in Archival Lighthouse ink in the center. Adhere this panel to the inside of the card.

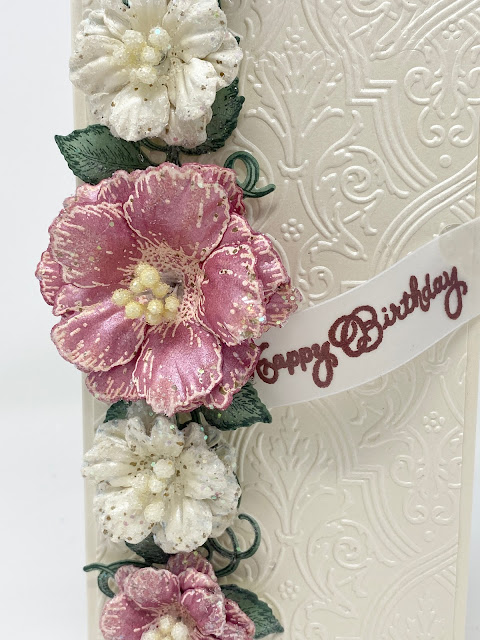
Stamp the Wild Roses on champagne metallic cardstock using VersaMark, cover with Aged Ivory embossing powder and heat set using the Heat It Tool. Diecut using the coordinating dies. Color some front and back using Light House ink and leave some uncolored. Shape stamped side down in the 3D Wild Rose Molds. Layer the flowers using three together, slightly offset. Pierce the centers using the Groove Golf Tool and insert the assorted bead stamens - medium.

Stamp Classic Rose Leaves on Deluxe Flower Shaping Paper using Archival Olive ink. Color using the same ink. Diecut using the coordinating die, add Olive ink to the edges and shape in the Rose Shaping Mold.

Adhere the flowers and leaves to the card front as shown. Sponge with dries clear adhesive and sprinkle with Rajni Chawla’s crystal clear glitter.

Stamp the Happy Birthday sentiment from the Special Birthday Sentiments Cling Stamp Set on Vellum using VersaMark ink. Cover with Ranger Cranberry Embossing Powder and heat set using the Heat It tool. Diecut using the Banner Die and adhere using hot glue.

Find all the products I used in the Heartfelt Creations Gallery.

Please be sure to visit the Heartfelt Creations Blog to see all of the gorgeous projects created by the fabulous Design Team.

Thank you so much for stopping by, I really appreciate you.

Until we meet again, please stay safe and be well!

Have a beautiful day!

Crafty Hugs, 🤗🤗🤗

Janet


Wednesday, February 16, 2022

Heartfelt Creations - Special Day Floral Mosaics

 Hi and welcome to my blog!

Today I have an easel card for you using the beautiful Floral Mosaics Stamp and Die and the Simply Elegant Centerpiece Die. The colors are so bright and cheerful, they make me think of summer and bright sunshine.


Instructions: Card size is 6 x 6”. Score and fold 12 x 6” Deluxe Flower Shaping paper at 6” and 9” on the long side to create easel card base. Cut three 6 x 6” panels, two from Luxe Gold cardstock and one from Deluxe Flower Shaping Paper. Cut two 5 3/4” panels from Elegant Mosaics Paper Collection Sheet 1B, dry emboss using an embossing folder and ink the edges with Archival Sunflower ink. Adhere one of the designer paper panels on one of the 6 x 6” gold panels, then adhere on the 6 x 6” Deluxe Flower Shaping Paper panel. Then adhere to the folded section of the card base. Diecut the second largest Simply Elegant Centerpiece Die from Luxe Gold Cardstock and adhere on the card front. Adhere the second gold 6 x 6” panel and the other designer paper panel to the inside of the card.

Using the Floral Mosaics Cling Stamp set, stamp on Bermuda Bay, Crushed Curry, Granny Apple Green and Real Red cardstock using VersaMark, cover with Ranger Gold Embossing Powder and heat set using the Heat It tool. Use the largest Floral Mosaics Die to cut the Bermuda Bay stamped image. Use the second largest die to cut the Crushed Curry stamped image. Use the third largest die to cut the Granny Apple Green image and use the smallest die to cut the Real Red image. Use the same colors to cut second diecuts and adhere the same colors together, spritz with Sheer Shimmer Craft Spray – Sparkle and let dry. Using dimensional squares on each layer, adhere the stamped images together and then onto the Simply Elegant Centerpiece diecut,

Using the Floral Mosaics Cling Stamp set, stamp again on Real Red and Granny Apple green using VersaMark, cover with the gold embossing powder and heat set. Diecut as shown using the coordinating dies and spritz with Sheer Shimmer Craft Spray – Sparkle and let dry. Adhere to the inside using dimensional squares.

Stamp the sentiment “On Your Special Day’ from the Celebrate Love Sentiments Cling Stamp set on Bermuda Bay cardstock using Versamark, cover with gold embossing powder and heat set. Diecut using the Arrows and Banner Die set and adhere to the bottom of the inside of the card using dimensional squares.

To see the products used on this project, please visit the Heartfelt Creations Gallery.

Be sure to visit the Heartfelt Creations Blog to see all of the beautiful projects created by the fabulous Design Team.

Till we meet again, please say safe and be well.

Have a beautiful day!

Crafty Hugs, 🤗🤗🤗

Janet


Wednesday, February 9, 2022

Heartfelt Creations - Debuting the Elegant Mosaics Collection

 Hi and Welcome!

Today we're debuting the gorgeous Elegant Mosaics Collection!

I just love the simplicity and yet, the boldness of this card. So pretty!

Are you a crafter that enjoys making stunning and unique layered stamped images with many colors of ink, glitter and embossing powders? If you enjoy making cards that look intricate, elegant, and majestic, but don’t have time for the stress and complexity that comes with spending a lot of time on coloring…Then it’s time to experience the fun and excitement of seeing your prestigious projects coming together with Elegant Mosaic Collection!


Instructions: Card size is 6 x 6”. Score and fold 12 x 6” Deluxe Flower Shaping Paper at 6” on the long side to create card base. Cut black cardstock 5 3/4 x 5 3/4”, cut dark purple cardstock 5 1/2 x 5 1/2” and cut white cardstock 5 1/4 x 5 /4”. Stamp the ‘Congratulations’ sentiment from the Celebrate Love Sentiments Cling Stamp set on the 5 1/4 x 5 1/4” white cardstock using Archival Jet Black ink, emboss using a simple textured embossing folder and adhere the three mat layers together using dries clear adhesive. Adhere to the card front using dimensional tape.

Cut black cardstock 5 7/8 x 5 7/8” and purple cardstock 5 3/4 x 5 3/4” and adhere to the inside of the card. Partially stamp the Bursting Bloom Mosaics on the right-hand bottom and stamp the sentiment ‘On your special Day’ from the Celebrate Love Sentiments Cling Stamp set on white 5 3/4 x 5 3/4” Deluxe Flower Shaping Paper using Archival Jet Back ink and adhere to the inside.

Using the Bursting Bloom Mosaics Cling Stamp set, stamp on dark purple, light purple, green and dark fuchsia cardstock using VersaMark, cover with Ranger Super Fine Detail Black embossing powder and heat set using the Heat It tool. Use the largest Bursting Bloom Mosaics Die to cut the dark purple stamped image. Use the second largest die to cut the light purple stamped image, Use the third largest to cut the green image and use the smallest die to cut the dark fuchsia floral image. Adhere the diecuts together using dimensional squares and adhere to the card front also using dimension squares.

Find all of the products used on my card in the Heartfelt Creations Gallery.

Please be sure to visit the Heartfelt Creations Blog to see all of the gorgeous projects created by the fabulous Design Team.

Thank you so much for stopping by!

Till we meet again, please stay safe and be well!

Crafty Hugs, 🤗🤗🤗

Janet


Wednesday, February 2, 2022

Heartfelt Creations - Rose Companion Border

 Hi and Welcome!

I have one more card for you using the Classic Companion Dies and the pretty Classic Roses. There's lots of glitter...just how I like it! lol


Instructions: Card size is 7 x 5”. Score and fold 10 x 7” Deluxe Flower Shaping Paper at 5” to create tent fold card base. Cut Moments in Time Paper Collection, sheet 11B, to 6 7/8 x 4 7/8” ink the edges using Brilliance Pearlescent Purple ink and adhere to the card front. Cut sheet 5A 6 7/8 x 4 7/8”, ink the edges and adhere to the inside of the card. Cut tags from sheet 12A using the inside Tickets and Tag Die and cut white cardstock using the outside Ticket and Tags Die. Ink the edges of the tags and adhere together. Punch a hole in the tops of the tags using a crop-a-dile and add satin cord. Adhere the tags to the inside of the card. Cut a sentiment from sheet 4B of the Moments in Time Paper Collection, ink the edges and adhere over the tags.

Using the Classic Companion Border Die, cut from white cardstock. Sponge half of the diecut with dries clear adhesive and sprinkle with Rajni Chawla’s Crystal Clear glitter. When dry, adhere to the top of the card front.

Stamp the Classic Roses on Deluxe Flower Shaping Paper using Brilliance Pearlescent Orchid ink, diecut using the coordinating dies, Color using Pearlescent Purple and Pearlescent Orchid and shape using the Groove Golf Tool and the Deluxe Flower Shaping Kit. Use three of the largest flowers and three of the next size flowers to create the large rose. Use two of the third size and three of the fourth size flowers to create the medium roses Adhere the flowers together using hot glue.

Stamp the leaves from the Classic Rose, the Leafy Accent leaves and the leaves from the Large Floral Urn on Deluxe Flower Shaping Paper using Pearlescent Ivy ink and diecut using the coordinating dies. Color the Classic Rose leaves using the Pearlescent Ivy ink and color the leaves from the Large Floral Urn using Pearlescent Ivy and Pearlescent Purple. Shape the leaves using the Deluxe Flower Shaping Kit. Use a paint brush to add dries clear adhesive to the roses and leaves and sprinkle with Rajni Chawla’s Crystal Clear Glitter. Adhere the roses and leaves to the bottom of the card front.

Use a sponge to randomly add dries clear adhesive to the inside of the card and sprinkle with Crystal Ultrafine Transparent Glitter to add a little extra sparkle.

Find all of the information about the products used on my card here in the Heartfelt Creations Gallery.

Please be sure to visit the Heartfelt Creations Blog to see all of the amazing projects created by the fabulous Design Team.

Thank you so much for stopping by, I really appreciate your visit. 

Till we meet again, please stay safe and be well!

Have a beautiful day!

Crafty Hugs, 🤗🤗🤗

Janet