Wednesday, June 29, 2022

Heartfelt Creations - Thinking of My Friend

 Hi and welcome. 

Can you believe that June is almost over? The older I get the faster the time flies lol.

This sweet little fairy is absolutely timeless though!


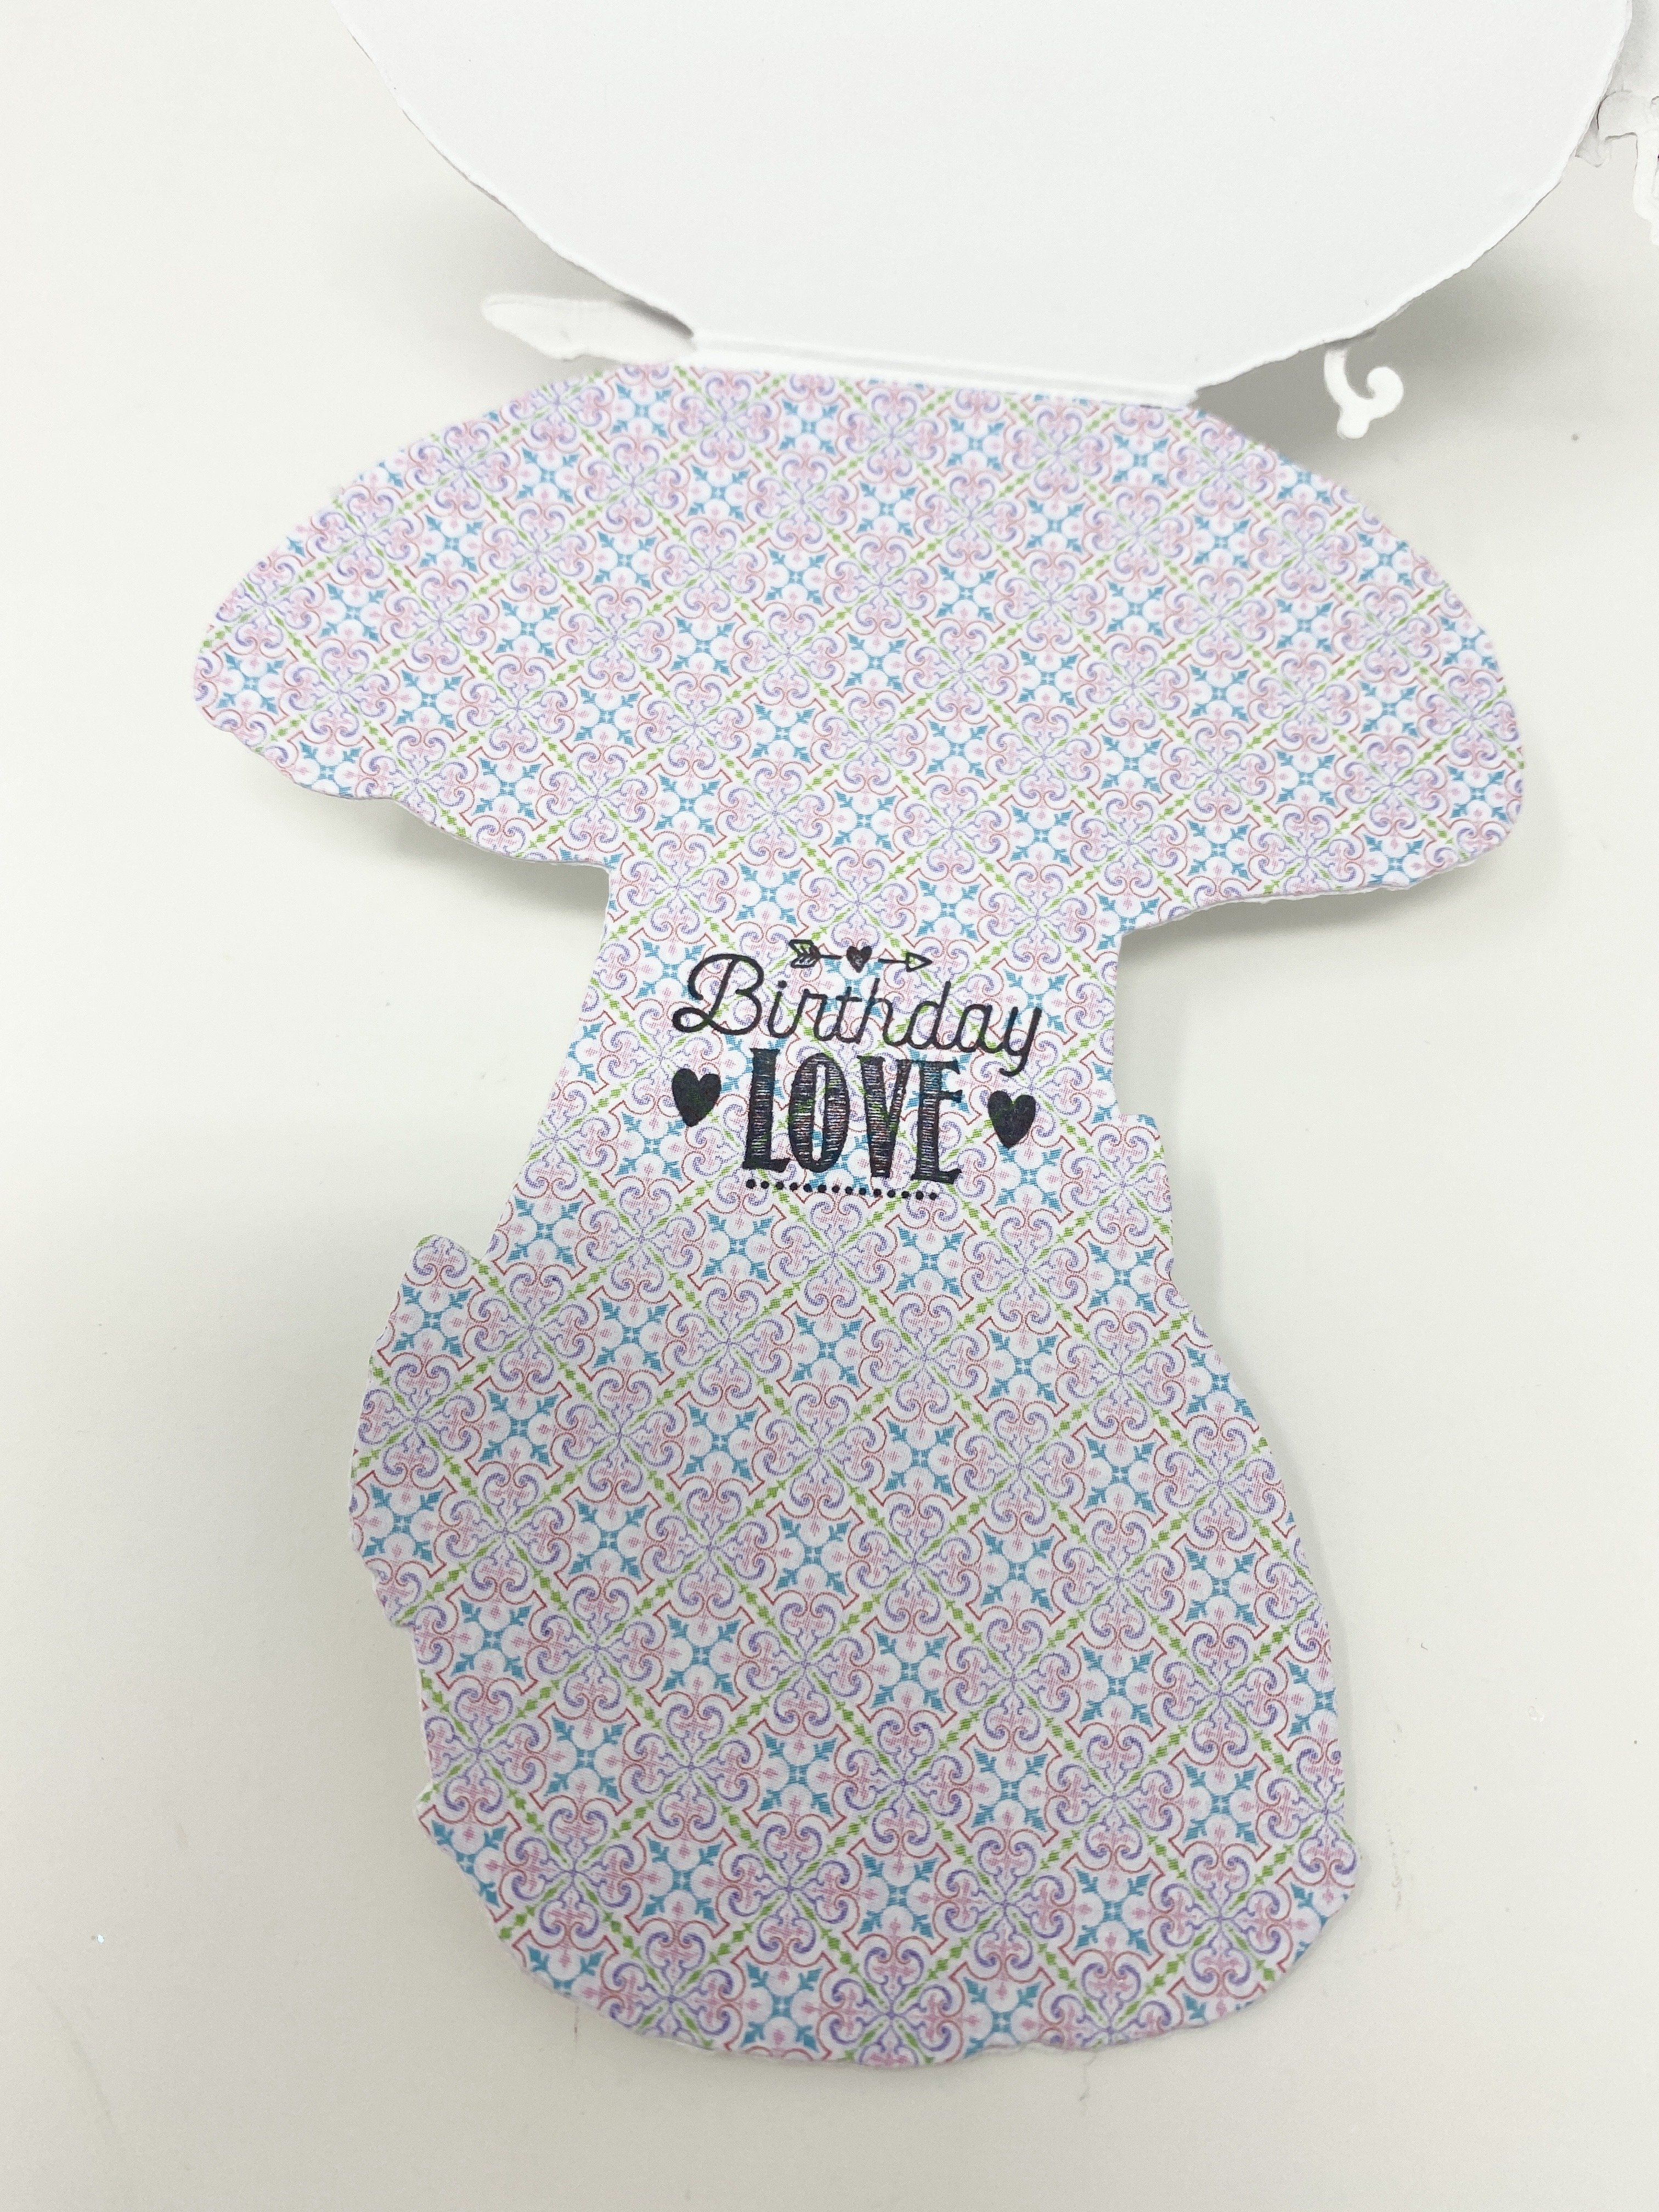
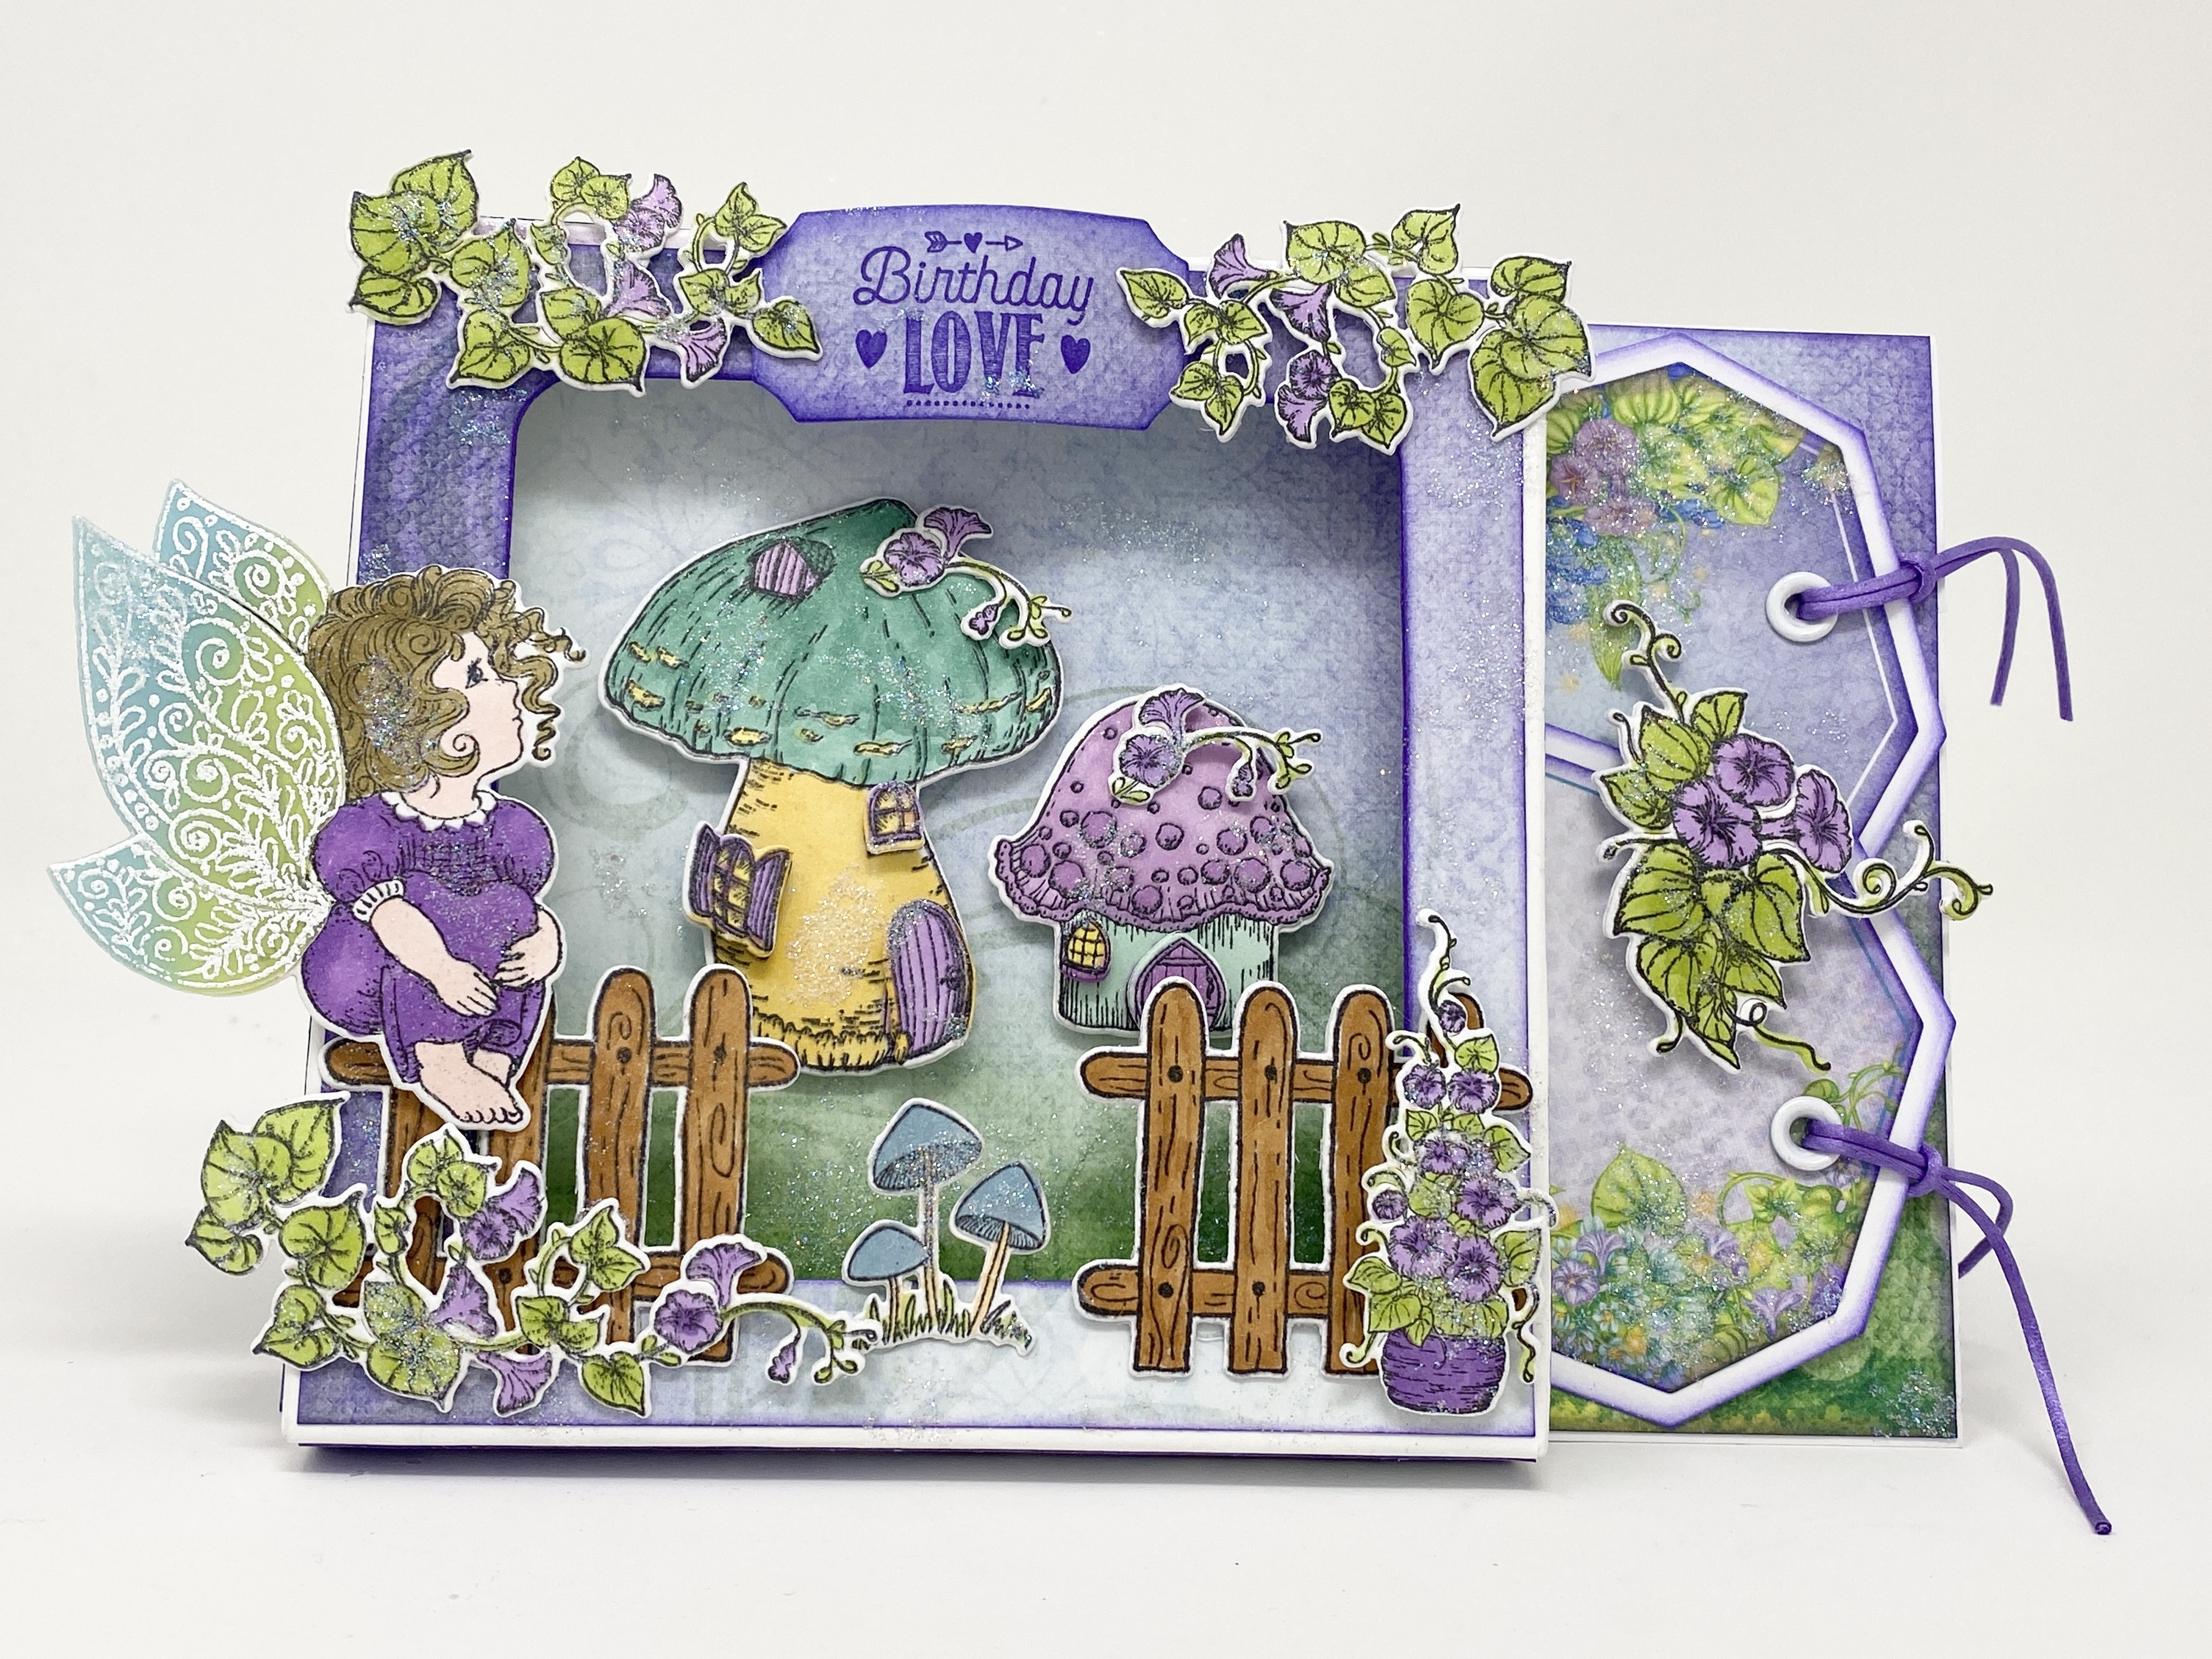
Instructions: Card size is 6 x 6”. Score and fold 12 x 6” Deluxe Flower Shaping Paper at 6” on the long side to create the tent fold card base. Cut sheet 3B from the Mushroom Cottage Paper Collection 5 7/8 x 5 7/8” and ink the edges with Archival Leaf Green ink. Cut the card panel from sheet 1A, trim to 5 3/4 x 5 3/4”, ink the edges with Archival Buttercup and adhere to the green layer. Using the largest Circle Basics Large Die, cut out the center. Ink the edges of the circle on the card front with Archival Vibrant Fuchsia ink and adhere to the card base using dimensional tape. Ink the edges of the diecut circle and adhere inside the cut out using dries clear adhesive so that it’s set back a little.

Cut Deluxe Flower Shaping Paper to 5 7/8 x 5 7/8”, ink all around the edges with Vibrant Fuchsia ink and adhere to the inside of the card. cut a 6 x 6” panel from the designer paper sheet 10A, ink the edges using Leaf Green ink, stamp the sentiment ‘I’m thinking of you’ from the For My Friend Cling Stamp set using Vibrant Fuchsia ink adhere to the inside.

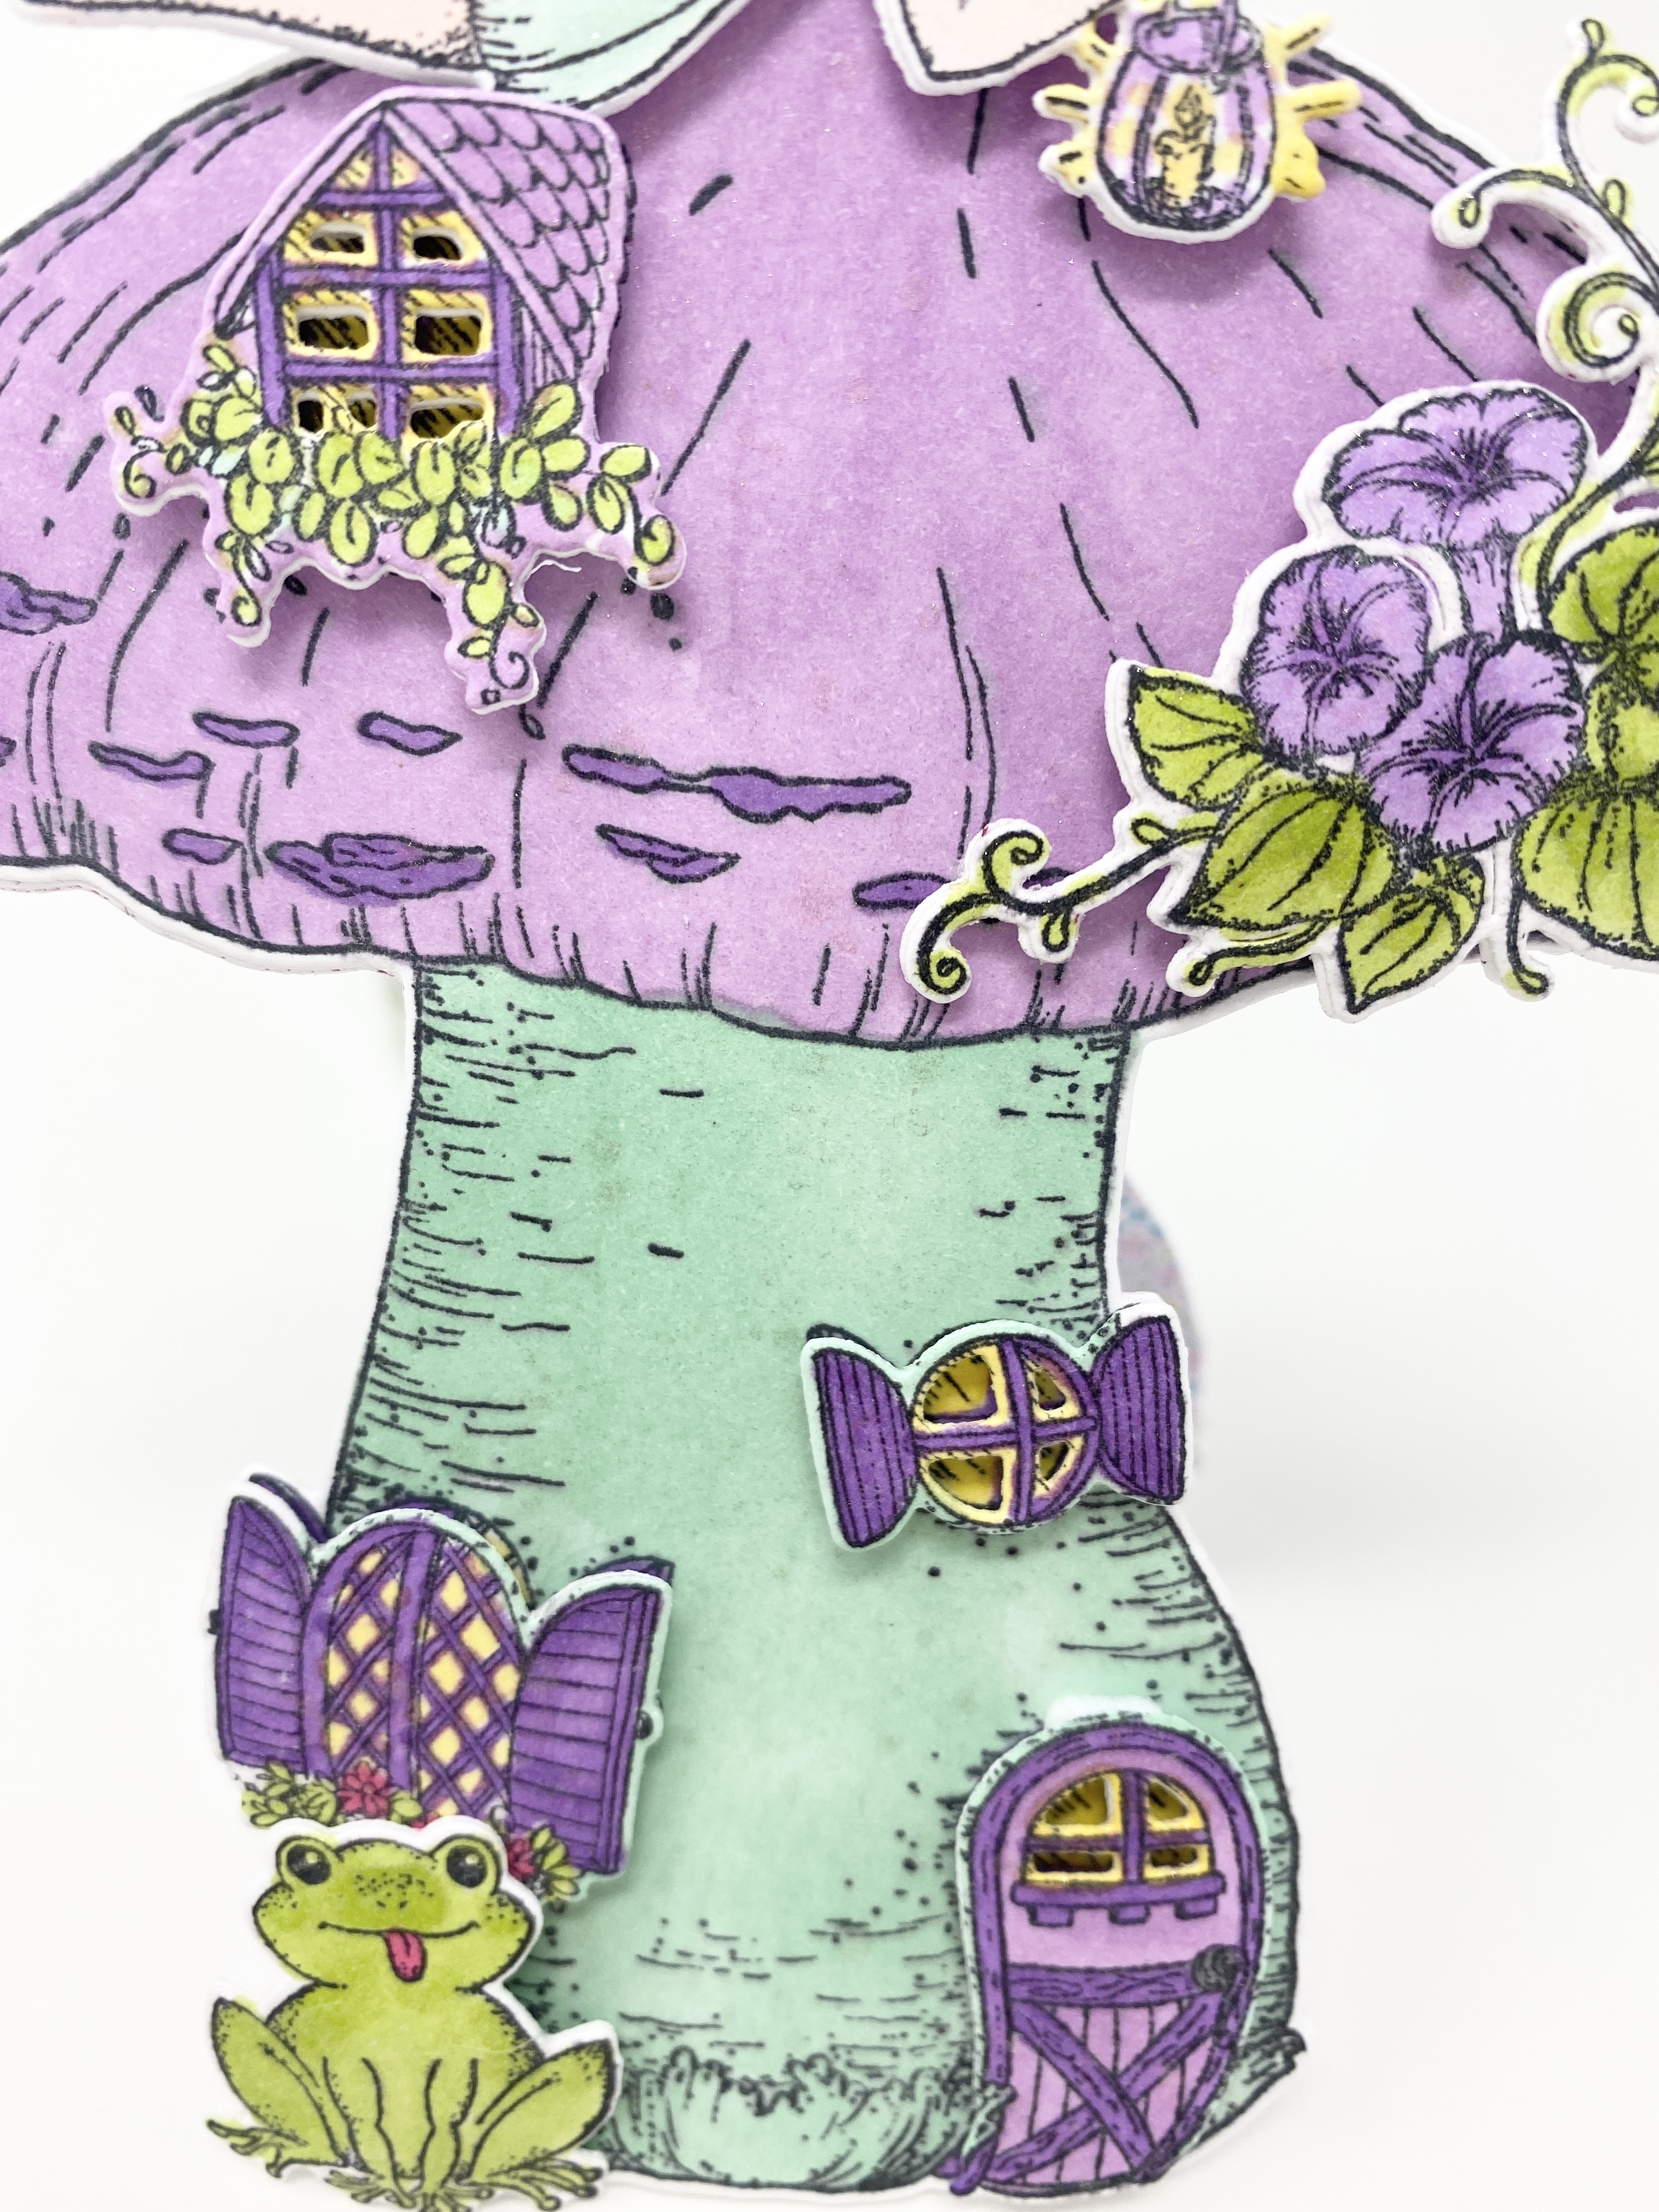
Stamp the Mini Mushroom Cottage on white cardstock 2x using Memento Tuxedo Black ink. Color the full image on one using stampin’ blend markers and just the windows and door on the other and diecut using the coordinating dies. Diecut the cottage and the windows and door again from white cardstock and adhere behind the stamped images. Adhere the windows and door to the main images using dimensional squares and dries clear adhesive. Spray the diecuts with Imagine Sheer Shimmer Craft Spray – Sparkle.

Stamp the images from the Mushroom Cottage Accents Cling Stamp set on white cardstock using Memento Tuxedo black ink, color using the Stampin Blend Markers and diecut using the coordinating dies. Diecut again from white cardstock and adhere behind the stamped images using dries clear adhesive. Spray the images with Imagine Sheer Shimmer Craft Spray – Sparkle.

Stamp the fairy from the Mushroom Cottage Fairies Cling Stamp set 2x, once on white cardstock using Tuxedo Black ink and once on vellum using VersaColor white pigment ink. Color the Tuxedo Black fairy image using Stampin’ Blend markers and the wings with Distress Oxide Picked Raspberry and Wilted Violet Distress Oxide inks then paint the image with Wink of Stella - Clear. Cover the VersaColor image with WOW Sparkling Snow Embossing Glitter and heat set using the Heat It Tool. Diecut both using the coordinating die. Color the vellum wings on the back side using Picked Raspberry and Wilted Violet inks, fussy cut the vellum wings and adhere to the cardstock image by using a little dot of dries clear adhesive at the fairy’s back. When the glue dries, fold up the vellum wings a little bit to give the appearance of flight.

Adhere all of the images on the card front as shown using hot glue and dimensional squares. Stamp the sentiment ‘Hey Friend’ from the For My Friend Cling Stamp set using Vibrant Fuchsia ink on a ticket from sheet 12A of the paper collection, diecut using the Ticket and Tags Die, ink the edges with Vibrant Fuchsia ink and adhere to the top of the card front using dimensional squares.

Add some sparkle to the card by randomly sponging with dries clear adhesive and sprinkling with Nida Tanweer’s Magic Glitter Powder.

You can find a listing of all the products I used on this card in the Heartfelt Creations Gallery

Please be sure to visit the Heartfelt Creations Blog to see all of the absolutely gorgeous projects created by the fabulous design team. 

Thank you so much for stopping by, I really do appreciate you!

Till we meet again, please stay safe and be well.

Have a beautiful day!

Crafty Hugs, 🤗🤗🤗

Janet


Wednesday, June 22, 2022

Heartfelt Creations - A Simple Celebration

 Hi and welcome!!!

My card today focuses on a sweet fairy from the Mushroom Cottage Collection.


Instructions: Card size is 5 x 7”. Score and fold 10 x 7” white cardstock at 5” on the long side to create side fold card base. Cut white cardstock mat layer at 4 7/8 x 6 7/8”, color the edges using Archival Deep Purple ink. Cut Mushroom Cottage Paper Collection sheet 6A 4 3/4 x 6 3/4”, ink the edges with the Deep Purple ink and adhere to the cardstock mat layer using dries clear adhesive. Adhere to the card front using dimensional tape. Cut sheet 6A to 4 7/8 x 6 7/8, ink the edges and adhere to the inside of the card. Stamp the sentiment ‘Hope your day is as Special as you are’ from the Special Birthday Sentiments Cling Stamp Set on 3 3/4 x 6” white deckle edged cardstock using Deep Purple ink. Stamp the floral image from the Mushroom Cottage Accents Cling Stamp on the bottom right of this cardstock using Memento Tuxedo Black ink and color using Stampin’ Blend markers. Adhere to the inside of the card using dries clear adhesive.

Using the 3rd, 4th and 5th dies from the Simply Classic Oval frame, diecut the oval frame, sponge with dries clear adhesive and sprinkle with Rajni Chawla’s Crystal Clear glitter. When dry, adhere to the card front. Stamp the ‘Let’s Celebrate’ sentiment from the Celebrate Love Sentiments Cling Stamp set on white cardstock using Archival Vibrant Fuchsia ink, diecut using the eyelet die from the Ticket and Tags Die set, sponge with dries clear adhesive and sprinkle with Rajni Chawla’s Crystal Clear glitter. When dry, lightly shape adhere to the card front using hot glue.

Stamp the fairy from the Mushroom Cottage Fairies Cling Stamp set 2x, once on white cardstock using Tuxedo Black ink and once on vellum using VersaColor white pigment ink. Color the Tuxedo Black fairy image using Stampin’ Blend markers and the wings with Distress Oxide Picked Raspberry and Peacock Feathers inks then paint the image with Wink of Stella - Clear. Cover the VersaColor image with WOW Sparkling Snow Embossing Glitter and heat set using the Heat It Tool. Diecut both using the coordinating die. Color the vellum wings on the back side using Picked Raspberry and Peacock Feathers inks, fussy cut the wings and adhere to the cardstock image by using a little dot of dries clear adhesive at the fairy’s back. When the glue dries, fold up the vellum wings a little bit to give the appearance of flight.

Stamp three Climbing Clematis Flowers on Deluxe Flower Shaping Paper, one in Rose Madder ink and colored with Pink Peony, one in Majestic Violet and colored with the same ink and one in Vibrant Fuchsia, colored with the same ink. Stamp two Hyacinths in Vivid Chartreuse. Diecut all the flowers using the coordinating dies and shape in the coordinating 3D Flower Shaping Molds. Pierce the flower centers using Groove Golf Tool and insert Bridal Bouquet Stamens.

Stamp the leaves from the Large Floral Urn Cling Stamp set on Deluxe Flower Shaping Paper using Pearlescent Ivy ink and diecut using the coordinating dies. Color using Brilliance Pearlescent Ivy and Pearlescent Purple inks. Shape the leaves using the Deluxe Flower Shaping Kit.

Adhere the flowers and leaves to the bottom of the oval frame using hot glue. Make a multiloop bow from satin cord using the bow-it-all V2. Add tassel end caps to the bow and adhere under the flowers using hot glue.

Sponge the flowers and leaves with dries clear adhesive and sprinkle with Rajni Chawla’s dries clear adhesive, randomly sponge the card front, sprinkle Nida Tanweer’s Magic Glitter Powder and adhere a few purple sequins to add that extra sparkle.

You can find all the products used to create this card in the Heartfelt Creations Gallery. Please be sure to also visit the Heartfelt Creations Blog to see all of the magnificent projects created by the fabulous design team.

Till we meet again, please stay safe and be well!

Have a beautiful day!

Crafty Hugs, 🤗🤗🤗

Janet


Wednesday, June 15, 2022

Heartfelt Creations - Mushroom Cottage Shapes

 Hi and welcome!

I just love this sweet Mushroom Cottage Collection. 

Today I've created a sweet shaped card. Hope you like it!


Instructions: Finished card size is 4 x 6 3/4” (with the fairy). Using the Large Mushroom Cottage Die, cut a 4 1/4 x 6” white tent fold card base just over the fold to create the shaped card base. Cut a full shape and adhere to the card front. Cut another full shape from the Mushroom Cottage Paper Collection sheet 11A, trim the top, stamp the sentiment ‘Birthday Love’ from the Special Birthday Sentiments Cling Stamp set using Memento Tuxedo Black ink and adhere to the inside of the card.

Stamp the Large Mushroom Cottage on white cardstock 2x using Memento Tuxedo Black ink. Color the full image on one using Stampin’ Blend markers and just the windows and doors on the other and diecut using the coordinating dies. Diecut the windows and doors again from white cardstock and adhere behind the stamped images. Adhere the windows and door to the main image using dimensional squares and dries clear adhesive. Spray the cottage with Imagine Sheer Shimmer Craft Spray – Sparkle. Adhere to the card front.

Stamp the fairy from the Mushroom Cottage Accents Cling Stamp set 2x, once on white cardstock using Tuxedo Black ink and once on vellum using VersaColor white pigment ink. Color the Tuxedo Black fairy image using Stampin’ Blend markers and the wings with Distress Oxide Peacock Feathers and Wilted Violet inks, then paint the whole image with Wink of Stella – Clear. Cover the VersaColor image with WOW Sparkling Snow Embossing Glitter and heat set using the Heat It Tool. Diecut both using the coordinating die. Color the vellum wings on the back side using Peacock Feathers and Wilted Violet inks, fussy cut the wings and adhere to the cardstock image by using a little dot of dries clear adhesive at the fairy’s back. When the glue dries, fold up the vellum wings a little bit to give the appearance of flight. Adhere the fairy to the cottage roof using dimensional squares and dries clear adhesive.

Stamp the Frog from the Large Mushroom Cottage Cling Stamp set and the flowers from the Mushroom Cottage Accents Stamp on white cardstock using Tuxedo Black ink, color with Stampin’ Blend markers and diecut using the coordinating dies. Diecut again from plain white cardstock and adhere behind the stamped diecuts. Lightly shape using the Deluxe Flower Shaping kit, spray with Imagine Sheer Shimmer Craft Spray – Sparkle and, when dry, adhere the flowers to the roof of the cottage using dimensional squares and adhere the frog to the bottom left of the cottage using hot glue.

Thank you so much for stopping by. Please check out the Heartfelt Creations Gallery to see all of the products I used to create this project. 

Please also visit the Heartfelt Creations Blog to see all of the amazing projects created by the fabulous Design Team!

Till we meet again next week, please stay safe and be well! You're all very important to me!

Have a beautiful day!


Crafty Hugs, 🤗🤗🤗

Janet

Wednesday, June 8, 2022

Heartfelt Creations - Debuting the Mushroom Cottage Collection

 Hi and Welcome to my blog!

"Do you love to create heartwarming shaped cards with endless creative possibilities, but you feel stuck in a rut using the same designs? This collection is filled with bright, beautiful whimsical images featuring the most adorable village of mushroom houses that you can pair together and create fairy-like scenes with.

Treat yourself to an exquisite floral paper collection of delicate florals, softly colored in shades of peachy corals, blush pinks, and spring greens. Stamp, die cut, and shape your elegant floral arrangements like the experts! Beginners to advanced crafters will have all they need to create stunning florals for all occasions! The easy way to bring beauty and life to all of your paper crafting projects! Create a variety of florals with more ease, and no stress!

So join us as we create whimsical mushroom cottage scenes the EZ way… Introducing the NEW Mushroom Cottage Collection!"

The first card I created using this collection is a cute birthday shadow box card. Next week I'll have a shaped card for you. 


Instructions: Card size is 7 x 5”. Score and fold 7 x 10” white cardstock at 5” on the long side to create card base. Cut sheet 6A of the Mushroom Cottage Paper Collection 6 15/16 x 4 15/16”, ink the edges with Archival Deep Purple ink and adhere to the card front using dries clear adhesive. Cut white cardstock 6 7/8 x 4 7/8”, color about 1/4” all the way around with Deep Purple and adhere to the inside of the card. Cut lower left of sheet 6A 6 3/4 x 4 3/4”, ink the edges with the Deep Purple, Stamp the sentiment ‘ Happy Birthday to You’ from the Special Birthday Sentiments Cling Stamp set with Deep Purple and adhere to the inked cardstock on the inside.

Create a 5 x 5” shadow box. Score a 7 x 11 1/2” piece of Deluxe flower Shaping Paper on the short side at 1/2”, 1”, 6” and 6 1/2”. Score both sides on the long side at 1/2”, 1”, 6” and 6 1/2”. Trim the right top and bottom score lines off up to the first vertical score line, use a scissor to cut tabs. (See sample on my blog.) Use the Cut Mat Create 2A Die to cut the aperture in the front of the box. Cut paper sheet 6A of the paper collection x2 4 7/8 x 4 7 /8”, x4 3/8 x 4 7/8” and ink the edges with Distress Oxide Deep Purple ink. Use the Cut Mat Create 2A die to cut the aperture in one of the 4 7/8 x 4 7/8” pieces for the front of the shadow box. ink all the edges with Deep Purple ink and adhere the papers to the box prior to assembling. Finish folding at all score lines and adhere to form the shadow box.

Stamp the Mini Mushroom Cottages on white cardstock 2x using Memento Tuxedo Black ink. Color the full image on one using stampin’ blend markers and just the windows and doors on the other and diecut using the coordinating dies. Diecut the cottages and all the windows and doors again from white cardstock and adhere behind the stamped images. Adhere the windows and doors to the main images using dimensional squares and dries clear adhesive. Spray the diecuts with Imagine Sheer Shimmer Craft Spray – Sparkle.

Stamp the images from the Mushroom Cottage Accents Cling Stamp set on white cardstock using Memento Tuxedo black ink, color using the Stampin Blend Markers and diecut using the coordinating dies. Diecut again from white cardstock and adhere behind the stamped images using dries clear adhesive. Spray the images with Imagine Sheer Shimmer Craft Spray – Sparkle.

Stamp the fairy from the Mushroom Cottage Fairies Cling Stamp set 2x, once on white cardstock using Tuxedo Black ink and once on vellum using VersaColor white pigment ink. Color the Tuxedo Black fairy image using Stampin’ Blend markers and the wings with Distress Oxide Twisted Citron and Salty Ocean inks then paint the image with Wink of Stella - Clear. Cover the VersaColor image with WOW Sparkling Snow Embossing Glitter and heat set using the Heat It Tool. Diecut both using the coordinating die. Color the vellum wings on the back side using Salty Ocean and Twisted Citron inks, fussy cut the wings and adhere to the cardstock image by using a little dot of dries clear adhesive at the fairy’s back. When the glue dries, fold up the vellum wings a little bit to give the appearance of flight.

Diecut two tags from designer paper sheet 12A using inside Ticket and Tags die and ink the edges with Deep Purple ink. Cut two tags from white cardstock using the outside Ticket and Tags die and ink the edges. Adhere the designer paper tags to the white tags, punch a hole, add an eyelet using a Crop-A-Dile and add purple satin cord to each tag. Adhere the tags to the back of the shadow box and adhere the shadow box to the card base.

Lightly shape all of the images using the Deluxe Flower Shaping kit and adhere to the inside and outside of the shadow box and the card front using dimensional squares, dries clear adhesive and hot glue. Randomly add glitter to the card front, the inside of the card and the images by sponging with dries clear adhesive and sprinkling with Crystal Ultrafine Transparent Glitter.

You can find a list of all the products used on this card in the Heartfelt Creations Gallery

Please be sure to visit the Heartfelt Creations Blog to see all of the gorgeous projects created by the fabulous Design Team.

Thank you so much for stoping by!

Till we meet agin, please stay safe and be well.  

Have a beautiful day!

Crafty Hugs, 🤗🤗🤗

Janet


Wednesday, June 1, 2022

Heartfelt Creations - Thank You Poppy Bouquet

Hi and Welcome!!!

Happy June!!!

I have another fast and simple Poppy card card for you today!


Instructions: Card size is 4 1/4 x 5 1/2”. Score and fold 8 1/2 x 5 1/2” Black cardstock at 4 1/4” on the long side to create card base. Cut Wild Poppy Paper Collection Sheet 12B to 4 1/8 x 5 3/8” and ink the edges with Distress Oxide Black Soot ink. Cut the A2 card front from the paper collection sheet 9A, ink the edges and using the 2.5” x 3.5” rectangular die from the Cut Mat Create 1B Die set, cut the center from the two designer papers and the card front. Ink inside the rectangle after diecutting and adhere the two designer papers together using dries clear adhesive then adhere to the card front using dimensional squares.

Cut sheet 11B to 4 1/8 x 5 3/8”, ink the edges and adhere to the inside of the card. Stamp the sentiment ‘You are so thoughtful” from the Just For You Sentiments Cling Stamp set on the rectangle cut from the designer paper using Memento Tuxedo Black ink. Ink the edges and, lining up inside the card front aperture, adhere to the inside with dries clear adhesive. Add a little Crystal Ultrafine Transparent Glitter to the design on the rectangle.

Stamp the image from the Wild Poppy Bouquet Cling Stamp on white cardstock using Memento Tuxedo Black ink 2x. Color one image completely using Stampin Blend markers Real Red Light and Dark and Granny Apple Green Light and Dark. Just color the flower on the second image. Diecut the full image on one and just the flower on the other using the coordinating dies, diecut again from white cardstock, adhere behind the stamped images for strength and lightly shape using the Deluxe Flower Shaping tools. Spray the images with Sheer Shimmer Craft Spray – Sparkle. Adhere the second flower on the full image using hot glue. Adhere to the card front over the aperture using dries clear adhesive.

Stamp the sentiment ‘thank you’ from the Thank You Sentiments Cling Stamp set on white cardstock using Memento Tuxedo Black ink, fussy cut with scissors, ink the edges and adhere to the bottom of the card front.

Find out which products I used on this card by visiting the Heartfelt Creations Gallery.

Please be sure to visit the Heartfelt Creations Blog to see all of the gorgeous projects created by the fabulous Design Team. We welcome new designers to the the team this week - Carole Wright, Maida Kamran, Melanie Smith and Jeny Johnson. We're so excited to have them on the team, they're designs are amazing!!! 

Thank you so much for stopping by, I really appreciate you!

Till we meet again, please stay safe and be well!

Have a beautiful day!

Crafty Hugs, 🤗🤗🤗

Janet