Wednesday, December 29, 2021

Heartfelt Creations - Happy New Year

Happy New Year!!!

Yes, the new year is just days away and I wanted to wish you all a

Very Happy, Healthy and Prosperous New Year,

Here's hoping that 2022 is much better than 2021!

This card is for all of you!


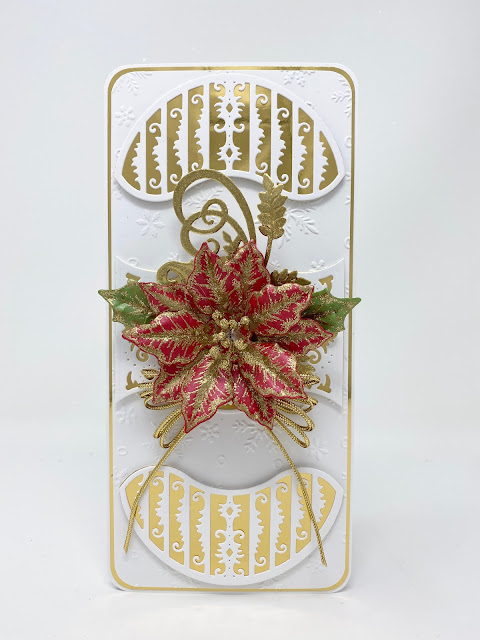
Card size is 6 x 6”. Score and fold 12 x 6” Deluxe Flower Shaping Paper at 6” to create a tent fold card base. Cut a 6 x 6” piece of Moments in Time Paper Collection, sheet 8B, to 6 x 6”, ink the edges using Brilliance Pearlescent Ivy ink, then distress the edges using a distressing tool and ink the edges again. Cut two 6 x 6” panels from sheet 10A, trim one for the front to 5 3/4 x 5 3/4” and one for the inside to 5 7/8 x 5 7/8”, ink the edges of both using Brilliance Pearlescent Purple ink, distress the edges of both and ink the edges again. Adhere lace to the bottom of the 5 3/4” x 5 3/4” mat layer, then adhere that to the green layer using dries clear adhesive and adhere to the card front using foam tape. Adhere the inside mat layer using dries clear adhesive.

Stamp the Simple Moments Timepiece on designer paper twice, once using Pearlescent Purple ink and once using Pearlescent Ivy ink. When stamping the purple one, be sure to mask off the hands. Using the circle dies from the Simple Moments Timepiece, cut the clock face from the purple image and using the large die, cut ivy image. Using the same two circles, cut each from white cardstock and adhere to the stamped images. Adhere the clock face on the decorative green border. Stamp the hands on sheet 8B using Pearlescent Ivy ink, diecut, cut again from white cardstock and adhere the white behind the stamped images. Ink using the ivy ink, brush with Wink of Stella Clear, adhere together and adhere to the clock face. Diecut the small doily from the Rounded Window Frame Die and adhere behind the clock. Adhere to the card front using dimensional squares.

Using the Ticket and Tags Die, cut two strips 5 1/2” long, one from designer paper and one from white cardstock, distress and ink the edges of both and adhere together. Cut HAPPY NEW YEAR from the Letters and Numbers die 3x, twice from white cardstock and once from sheet 10B of the designer paper, using the small letters. Adhere the layers together, ink the edges and adhere the letters to the 5 1/2” strip using dries clear adhesive with the aid of the Quickstik.

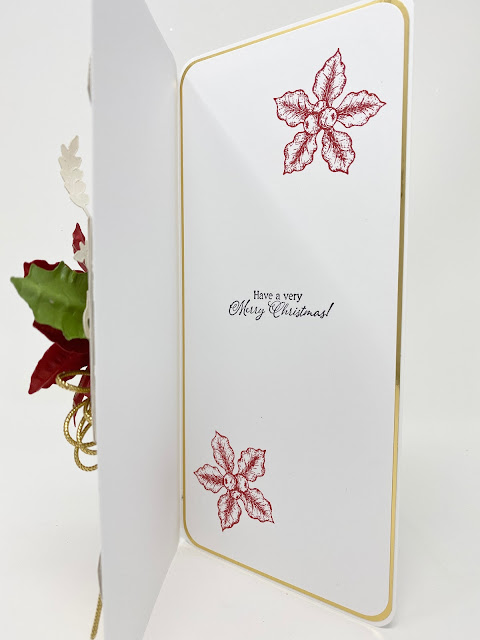
Stamp the ‘Great things take time’ sentiment from the Time Piece Sentiments Cling Stamp set on designer paper using Pearlescent Purple ink, diecut using the Simple Moments Timepiece Die. Diecut two eyelet circles from white cardstock using the second and third largest Decorative Circle Frames Dies. Ink the larger one with Pearlescent Purple ink and the other one with Pearlescent Ivy ink, adhere together and adhere to the inside of the card.

Stamp the Classic Roses on Deluxe Flower Shaping Paper using Brilliance Pearlescent Orchid ink, diecut using the coordinating dies, color using Pearlescent Purple and Pearlescent Orchid and shape using the Groove Golf Tool and the Deluxe Flower Shaping Kit. Use three of the largest flowers and three of the next size flowers to create the large rose. Use two of the third size and three of the fourth size flowers to create the medium roses and use two of the smallest flowers to create the smallest roses. Adhere the flowers together using hot glue. Stamp and color the Fragrant Hyacinth flowers in Pearlescent Ivy, diecut using the coordinating die, shape using the groove golf tool and adhere to the small roses using hot glue.

Stamp the Leafy Accent leaves, the leaves from the Classic Rose and the leaves from the Large Floral Urn on Deluxe Flower Shaping Paper using Pearlescent Ivy ink and diecut using the coordinating dies. Color the Leafy Accent and Classic Rose leaves using the Pearlescent Ivy ink and color the leaves from the Large Floral Urn using Pearlescent Ivy and Pearlescent Purple. Shape the leaves using the Deluxe Flower Shaping Kit. Use a paint brush to add dries clear adhesive to the roses and leaves and sprinkle with Rajni Chawla’s Crystal Clear Glitter.

Use a sponge to randomly add dries clear adhesive to the card front and the inside and sprinkle with Crystal Ultrafine Transparent Glitter to add a little extra sparkle.  

For a listing of the products used on this project, please visit the Heartfelt Creations Gallery.

Thank you so much for stopping by! 

Please be sure to visit the Heartfelt Creations Blog to see all of the gorgeous projects created by the fabulous Design Team.

Till we meet again next year, please stay safe and be well!

Have a beautiful day!

Crafty Hugs, 🤗🤗🤗

Janet

Wednesday, December 22, 2021

Heartfelt Creations - Merry Christmas

 Hi and Welcome!

Christmas is only a couple of days away so I thought I would make you all a Christmas card. I hope you like it.

I also want to wish you a Christmas filled with, love, happiness and many blessings.


Instructions: Card size is 4 1/4 x 9”. Score and fold 8 1/2 x 9” white cardstock at 4 1/4” to create card base. Cut Luxe Gold cardstock 2x at 4 1/8 x 8 7/8”. Cut white cardstock 2x at 4 x 8 3/4". Using a corner rounder punch, round the corners of the card base, the Luxe Gold mat layers and the white mat layers. Stamp the sentiment ‘Have a Very Merry Christmas’ from the Holiday Village Cling Stamp set in Archival Jet Black ink and stamp the small poinsettias from the Large Festive Poinsettia Cling Stamp set on one of the white mat layers, adhere it to the gold layer and adhere to the inside of the card.

Emboss the second white mat layer using a snowflake embossing folder, adhere it to the second Luxe Gold mat layer and adhere to the card front. Using the top two inside dies and the middle two inside dies from the Scalloped Flourish Gateway Die, cut the mat layer from Luxe Gold cardstock and cut the intricate layer from white cardstock x1 using the middle dies and x2 using the top two dies. Adhere the layers together and adhere to the card front as shown using dimensional squares.

Stamp the Large Festive Poinsettia on red metallic cardstock and the leaves on green metallic cardstock using VersaMark, cover with WOW Metallic Gold Sparkle Embossing Powder and heat set using the Heat It tool. Diecut using the coordinating dies and shape in the 3D shaping mold. Pierce the flower centers using the Groove Golf Tool and insert the Gold Stamens. Use two flowers to create the poinsettia making sure to offset them. Stamp the Holly Berry flourish on Luxe Gold cardstock using VersaMark, cover with metallic gold sparkle embossing glitter and heat set using the Heat It tool. Shape using the Deluxe Flower Shaping Kit.

Adhere the flourish, the poinsettia and the leaves to the center of the card front using hot glue. Make a multi-loop bow using gold cord and adhere under the poinsettia.

All the products used are listed in the Heartfelt Creations Gallery.

Please be sure to visit the Heartfelt Creations Blog to see all of the gorgeous projects created by the fabulous Design Team.

Till we meet again, please stay safe and be well!

Have a beautiful day!

Crafty Hugs, 🤗🤗🤗

Janet


Wednesday, December 15, 2021

Heartfelt Creations - Simply Timeless Roses

 Hi and welcome to my blog.

It's the middle of December already, time is flying by.

My card today is very spring like with pretty pink roses. 


Instructions: Card size is 5 3/4 x 5 3/4”. Using the largest Simply Elegant Centerpiece Die, cut just above the fold of a white 6 x 6” tent fold card base to create shaped card. Score and fold the front of the card at the midway point to create easel. Using the same die cut once from white card stock and three times from Moments in Time Paper Collection, sheet 7B. Cut one of the panels in half and trim to fit the inside top. Trim the second panel at the top to fit the inside bottom. Ink the edges of all three using Brilliant Purple ink and adhere the full one to the white diecut the adhere to the bottom of the folded card base. Adhere the other two to the inside. 

Using the decorative Simply Elegant Centerpiece Die, cut two times from white cardstock. Diecut the middle pieces one time. Color the shadow middle diecut using a sponge dauber and Pearlescent Purple ink. Sponge all of the decorative dies with dries clear adhesive and sprinkle with Rajni Chawla’s Crystal Clear glitter. When dry, adhere the two large diecuts to the card base as pictured. Adhere the decorative middle diecut to the inked shadow diecut and adhere to the center of the bottom using 3D Dots. This creates the easel stop. Stamp the ‘time precious time’ sentiment from the Timepiece Sentiments Cling Stamp set 2x on white cardstock using Pearlescent Purple ink. Fussy cut the word time from one using a scissor. Diecut the other using the circle from the Simple Timepiece Die. Ink the edges of both, sponge using dries clear adhesive and sprinkle with Crystal Clear glitter. When dry, adhere the single word to the easel stop and the circle to the inside top.

Stamp the Classic Roses on Deluxe Flower Shaping Paper using Brilliance Pearlescent Orchid ink, diecut using the coordinating dies, Color using Pearlescent Purple and Pearlescent Orchid and shape using the Groove Golf Tool and the Deluxe Flower Shaping Kit. Use three of the largest flowers and three of the next size flowers to create the large rose. Use two of the third size and three of the fourth size flowers to create the medium roses Two of the third size to create the large open buds and use two of the smallest flowers to create the smallest roses. Adhere the flowers together using hot glue. Stamp and color the Fragrant Hyacinth flowers in Pearlescent Ivy, diecut using the coordinating die, shape using the groove golf tool and adhere to the buds and small roses using hot glue.

Stamp the leaves from the Classic Rose and the leaves from the Large Floral Urn on Deluxe Flower Shaping Paper using Pearlescent Ivy ink and diecut using the coordinating dies. Color the Classic Rose leaves using the Pearlescent Ivy ink and color the leaves from the Large Floral Urn using Pearlescent Ivy and Pearlescent Purple. Shape the leaves using the Deluxe Flower Shaping Kit. Use a paint brush to add dries clear adhesive to the roses and leaves and sprinkle with Rajni Chawla’s Crystal Clear Glitter. Cut a circle from white cardstock using the Simple Timepiece Die and color using a dauber and Pearlescent Ivy ink. Arrange the roses and leaves on the circle and adhere using Hot Glue. Adhere the circle to the card front.

Use a sponge to randomly add dries clear adhesive to the inside of the card and sprinkle with Crystal Ultrafine Transparent Glitter to add a little extra sparkle.

 Please check out the Heartfelt Creations Gallery to see all of the products used on this card. Please be sure to visit the Heartfelt Creations Blog to see all of the magnificent projects created by the fabulous Design Team.

Thank you so much for stopping by, I really appreciate you!

Till we meet again, please stay safe and be well!

Craft Hugs, 🤗🤗🤗

Janet


Wednesday, December 8, 2021

Heartfelt Creations - Debuting the Moments in Time Collection

Oh, Lordy, Lordy. Christmas is right around the corner and I'm not even close to being ready. Time just keeps getting away from me, lol. Thankfully, we now have the beautiful new Moments in Time Collection to help us remember to celebrate life's beautiful moments.

"Infuse your time in the craft room with the fun and excitement of creating elegant moments in time shaped cards, perfect for celebrating all of life’s special moments! Decorating becomes quick and EZ with a delightful selection of wonderful moment in time accents, along with coordinating sentiments, allowing you to design and embellish a fancy and unique shaped card that is sure to impress friends and loved ones!"

Here's my first project using this collection. It's a bright and sparkly silver and gold Elegant Moments Timepiece.


Instructions: Card size is 3 3/4” x 6”. Score 11 x 4 1/4” white cardstock at 5 1/2” on the long side. Using the largest Elegant Moments Timepiece Die, place about 1/2” over the fold and diecut to create a shaped card base. Using the same die, cut a full clock from white cardstock and adhere to the card front. Cut again from Luxe Gold cardstock, trim the top, stamp the ‘good things take time’ sentiment using VersaMark ink, cover with Ranger Fine Detail Black Embossing Powder and heat set using the Heat It tool. Adhere to the inside of the card.

Stamp the Elegant Moments Timepiece Clock on Luxe Silver Cardstock 2x and on Luxe Gold Cardstock 1x using VersaMark ink, cover with WOW Metallic Gold Sparkle Embossing Glitter and heat set using the Heat It Tool. Diecut the full silver clock and adhere it to the card front. Using the middle die and the hands die, cut from the Luxe Gold stamped image. Cut the hands two more times from white cardstock and cut the center die four more times from white cardstock, ink the edges of all of the white diecuts using metallic gold ink. Adhere the center section layers together using dries clear adhesive and adhere to the card front. Using the circle die from the same set, cut the clock from the second Luxe Silver image and four more times from white cardstock. Ink the edges of the white diecuts using metallic gold ink and adhere behind the stamped image. Adhere this to the card base. Adhere the hands diecuts together and adhere to the clock.

Stamp the Small Wild Rose on champagne metallic cardstock using VersaMark, cover with Aged Ivory embossing powder and heat set using the Heat It Tool. Diecut using the coordinating die. Color front and back using Light House ink. Shape stamped side down in the 3D Small Wild Rose Mold. Use two layers to create the flower, pierce the centers using the Groove Golf Tool and insert the stamen. Secure with hot glue.

Stamp the Leafy Accents leaves on Deluxe Flower Shaping Paper using Archival Olive ink. Color using Vivid Chartreuse and Olive inks. Diecut using the coordinating die, add Olive ink to the edges and shape in the Leafy Accents Mold.

Sponge the flower and leaves with dries clear adhesive and sprinkle with Rajni Chawla’s Crystal Clear glitter. Adhere the flower and leaves to the clock as shown using hot glue.

Check out the Heartfelt Creations Gallery to see all of the products used in my project. 

Please visit the Heartfelt Creations Blog to see all of the magnificent projects created by the fabulous and oh, so talented Design Team. You'll be amazed!

Thank you so much for stopping by, I really appreciate you!

Till we meet again, please stay safe and be well!

Have a beautiful day!

Crafty Hugs, 🤗🤗🤗

Janet


Wednesday, December 1, 2021

Heartfelt Creations - Glittery Fancy Flourish Border

Hi and welcome to December!

I am in love with this limited edition Fancy Flourish Border Die. If you didn't order it  on Cyber Monday, be sure to snap it up today before they're all gone. 


Instructions: Card size is 7 x 6 3/4”. Cut white cardstock 11 x 6 3/4” and score at 1/2” and 7 1/2”. Cut another white cardstock 3 1/2 x 6 3/4” and adhere to the large cardstock at the 1/2” score line creating a 14 1/2” base. Using the center edge Fancy Flourish Border Die, cut both ends with the center of the die facing out. Fold at the score lines and adhere magnets to both sides.

Cut Climbing Clematis designer paper 3 1/2 x 6 3/4” 2x from sheet 8B and 2x from sheet 12B, die cut the edges using the same die and adhere the lighter color to the front of the side panels and the darker purple to the inside of the side panels. Cut a 6 3/4 x 6 1/2” panel from sheet 8B and adhere to the inside center. Stamp the ‘Have a Wonderful Birthday’ sentiment from the Special Birthday Sentiments Cling Stamp Set on white cardstock using Majestic Violet ink and diecut using the Album Tags and Accents Die. Ink the edges and adhere to the center of the inside.

Using both decorative Fancy Flourish Border Dies along with the edge die, cut 2x each from white cardstock. Sponge with dries clear adhesive and cover with Rajni Chawla’s Crystal Clear glitter. When dry, adhere the matching diecuts to the front side panels over the designer paper. Adhere the other two to the top and bottom of the inside.

Using the eyelet tag from Album Tags and Accents Die, cut from white cardstock, sponge the edges with dries clear adhesive and sprinkle with crystal clear glitter. Cut the inside die from sheet 8B of the paper collection, ink the edges with Majestic Violet ink and adhere to the eyelet diecut. Using hot glue adhere this only to the left side of the center of the card front so that the card still opens.

Stamp the Clematis Flowers on Deluxe Flower Shaping Paper using Rose Madder ink, color using Pink Peony ink and diecut using the coordinating die. Shape in the Clematis Shaping Mold, pierce the centers using the Groove Golf Tool set, insert Bridal Bouquet Stamens and secure with hot glue.

Stamp the Hyacinth flowers on Deluxe Flower shaping Paper in Majestic Violet and Vivid Chartreuse, color with the same colors, diecut using the coordinating die, shape using the Hyacinth Shaping Mold and add a stamen to the center of each.

Stamp the leaves from the Large Floral Urn Cling Stamp set on Deluxe Flower shaping Paper using Olive ink, color using Vivid Chartreuse and Olive inks, diecut using the coordinating die and shape using the Deluxe flower Shaping Kit.

Adhere the flowers and leaves on the eyelet tag using hot glue to make a pretty arrangement. Use the Heat It tool to melt any glue strings that remain on the card.

For more details on this card please visit the Heartfelt Creations Gallery.


Here's a second card for today using the new 


Instructions: Card size is 5 x 7”. Cut and fold 7 1/2 x 11” Champagne Cream Metallic Cardstock at 5 1/2”. Place largest Classic Rectangle Frame Die a little over the fold and diecut to create shaped card base. Using the same die, cut again from Champagne Cream Metallic Cardstock and adhere to card base. Using the next size die, cut from Luxe Gold cardstock and adhere to the card front using dries clear adhesive. Cut the third largest die from Luxe Gold and adhere using Luxe Gold cardstock and adhere. Use the inside diecut and adhere to card front using dimensional squares. Cut the next size from Champagne Cream Metallic, stamp the sentiment ‘Hope your day is amazing!’ from Elaborate Birthday Cling Stamp set using VersaMark, cover with Ranger Gold Embossing Powder and heat set using the Heat It Tool and adhere.

Use the gold inside piece from the second diecut and adhere to the inside of card. Using the third largest die, cut from cream cardstock. Stamp the sentiment ‘Happy Anniversary’ from the Celebrate Love Sentiments set on the inside piece using VersaMark, cover with gold embossing powder and heat set using Heat It Tool. Adhere both to the inside of card as shown.

Stamp the Small Wild Rose on champagne metallic cardstock using VersaMark, cover with Aged Ivory embossing powder and heat set using the Heat It Tool. Diecut using the coordinating dies. Color front and back using Seafarer ink. Shape stamped side down in the 3D Small Wild Rose Mold. Layer three together, slightly offset. Pierce the centers using the Groove Golf Tool and insert 10 Assorted Bead Stamens - Medium. Secure using hot glue.

Stamp the leaves from the Large Floral Urn Cling Stamp Set on Deluxe Flower Shaping Paper using Archival Olive ink. Color using Vivid Chartreuse and Olive inks. Diecut using the coordinating die and shape using the Deluxe Flower Shaping kit.

Sponge the flower and leaves with dries clear adhesive and sprinkle with Rajni Chawla’s Crystal Clear glitter. Adhere as shown.

Get more details on this card in the Heartfelt Creations Gallery.

Thank you so much for stopping by! Be sure to visit the Heartfelt Creations Blog to see all of the absolutely gorgeous projects created by the fabulous Design Team.

Till we meet again, please stay safe and be well.

Have a beautiful day!

Crafty Hugs, 🤗🤗🤗

Janet