Wednesday, February 26, 2020

Heartfelt Creations - Beau-tea-ful Day


Hi and Welcome!
I can't believe that February is almost over. Time sure does fly when you get to be my age. Lol.

Today I'm sharing a very quick and easy card created
using the beautiful Tea Time Paper Collection.


Heartfelt Creations Products:

HCDP1-2112 Tea Time Paper Collection
HCDA2-450 Stack and Store Daubers - Pack of 30
HCD2-749 Cut Mat create 1A Die
173842 Scor-Pal
159723 Designer Dries Clear Adhesive 
352854 Metal Tip for Adhesive Bottle
85-glitter Crystal Ultrafine Transparent Glitter


Other Products: White Cardstock, Dimensional Tape, Highland Heather Cardstock, Highland Heather Ink, Embossing Folder, Corner Punch, Sheer Ribbon, Bow-it-all

For more tips on creating with the Tea Time Collection watch the tutorial at https://youtu.be/4bjPeZW_oT8.

Instructions: Card size is 6 x 6”. Score 12 x 6” white cardstock at 6” on the long side and fold. Use corner punch to round the corners and ink the edges using Highland Heather ink. Cut Highland Heather cardstock to 5 3/4 x 5 3/4”, round and ink the edges. Cut white cardstock to 5 1/2 x 5 1/2”, round the edges, emboss and ink the edges. Adhere these two layers together using dries clear adhesive. Use the Bow-It-All to create a triple layer bow and adhere as shown. Adhere these layers to card base using dimensional tape.

Cut Highland Heather cardstock to 4 7/8 x 3 7/8”, round the corners and ink the edges. Cut panel from Tea Time Paper Collection 4 5/8 x 3 5/8”, round and ink the edges, adhere the two layers together using dries clear adhesive and adhere to card base using dimensional tape. 

Using the Cut Mat Create 1A die, cut the sentiment from the paper collection, ink the edges, shape and adhere using dries clear adhesive. Add Crystal Ultrafine Transparent Glitter to the design on the paper. 

Thank you so much for stopping by!
Please make sure to visit the Heartfelt Creations Blog
to see all of the beautiful projects created by the
fabulous Design Team!

Have a beautiful day!
Crafty Hugs, 🤗🤗🤗
Janet

Wednesday, February 19, 2020

Heartfelt Creations - Stepping Out for Tea

Hi and welcome!

I've been under the weather this week 
and have been drinking a lot of tea. I sure wish
that I had pretty teacups like these to drink from. 

Here's a center step card I created using the fabulous
Tea Time Collection.


Heartfelt Creations Products

HCD1-7287 My Cup of Tea Die
HCPC-3904 My Cup of Tea Cling Stamp Set
HCD1-7286 Special Teapot Die
HCPC-3903 Special Teapot Cling Stamp Set
HCDP1-2112 Tea Time Paper Collection
HCD1-7278 Cottage Garden Hydrangea Die
HCPC-3900 Cottage Garden Hydrangea Cling Stamp Set
HCFB1-489 3D Hydrangea Shaping Mold
HCD1-7263 Swirly Accent Spray Die
HCPP1-475 Deluxe Flower Shaping Paper - Pack of 50
HCST1-401 Deluxe Flower Shaping Kit
HCDA2-450 Stack and Store Daubers - Pack of 30
HCPC-3835 Leafy Accents Stamp set
HCD1-7193 Leafy Accents Die
HCFB1-467 3D Leafy Accents Shaping Mold
RAHT – Heat It Craft Tool
173842 Scor-Pal
359848 Spellbinders Tool N One 
159723 Designer Dries Clear Adhesive 
352854 Metal Tip for Adhesive Bottle
PGM15015 Rajni Chawla’s Crystal Clear
85-glitter Crystal Ultrafine Transparent Glitter
RLHS100 Hydra Sponges
TSMP707 Memento Dye Ink Bamboo Leaves
RACP614 Ranger Archival Ink Pad – Magenta Hue
478455 Zig Clean Color Real Brush Markers
409311Color In Watercolor Brush - Fine


Other Products: White Cardstock, Dimensional Squares, VersaMark, WOW Metallic Silver Sparkle Embossing Glitter, WOW Sparkling Snow Embossing Glitter, Hot Glue Gun, Misti, Sweet Sugarplum cardstock, Sweet Sugarplum ink, Wink of Stella Clear

For more tips on creating with the Tea Time Collection watch the tutorial at https://youtu.be/4bjPeZW_oT8.

For more tips on creating with the Cottage Garden Collection watch the tutorial at https://youtu.be/faBoB2s49RI.

Instructions: Create a 5 1/2 x 5 1/2” center step card. Splitcoaststampers has a great tutorial here.  https://www.splitcoaststampers.com/resources/tutorials/centerstepcard/
Cut sweet sugar plum mat layers (x1) 4 3/8 x 3 3/8”, (x3) 5 1/4 x 7/8” and 5 3/8 x 5 3/8” (trimmed to fit the inside of the card.) Cut from the Tea Time Paper Collection (x1) 4 1/2 x 3 1/4”, (x1) 5 1/8 x 3/4” (x2) 4 1/8 x 3/4” and (x2) 3/4 x 3/4”. Ink the edges of the designer paper with Sweet Sugarplum ink, adhere the mat layers together and adhere to the card base. 

Stamp the cups, (x2) mini cups and spoon from the My Cup of Tea Stamp set on white cardstock using VersaMark ink and heat set using WOW Metallic Silver Sparkle Embossing Glitter. Color using Zig markers, diecut using coordinating dies and lightly shape using the Deluxe Flower Shaping Kit. Add Wink of Stella to the spoon. Adhere to the card base using dimensional squares and dries clear adhesive. 

Diecut the Swirly Accent Spray Die from white cardstock, trim to fit card front, sponge with dries clear adhesive and when dry, adhere to card.

Stamp the hydrangea flowers on Deluxe Flower Shaping paper using VersaMark ink, heat set using WOW Sparkling Snow Embossing Glitter and color using Magenta Hue ink. Diecut using the coordinating dies. Shape the little flowers using the hydrangea mold and the Deluxe Flower Shaping kit. Adhere the petals together to form petite roses, sponge with dries clear adhesive and sprinkle with Rajni Chawla’s Crystal Clear glitter.

Stamp the Leafy Accent leaves on Deluxe Flower shaping paper using Bamboo Leaves ink, color using the same ink, diecut using coordinating dies and shape using the Leafy Accents mold. Sponge with dries clear adhesive and sprinkle with Rajni Chawla’s Crystal Clear glitter.

Adhere the mini roses as shown using hot glue and add crystal ultrafine transparent glitter to the designer paper.


Stamp sentiment from Special Teapot Cling Stamp Set on white cardstock, diecut using the label die from Special Teapot Die and adhere to inside of card. 

Thank you so much for stopping by and please be sure to visit
the heartfelt Creations Blog to see all of the beautiful projects
created by the fabulous design team.

Crafty Hugs, 🤗🤗🤗
Janet

Wednesday, February 12, 2020

Debuting the Tea Time Collection

Infuse your time in the craft room with the fun and excitement of creating elegant teapot shaped card creations, perfect for celebrating all of life’s grandest occasions! Decorating becomes quick and EZ with a delightful selection of wonderful tea themed accessories, along with coordinating sentiments, allowing you to design and embellish a fanciful and unique teapot shaped card that is sure to impress friends and loved ones!

Send an outpouring of love, encouragement and well wishes for any occasion with a beautifully illustrated paper collection steeped in elegant tea time settings and stunning garden florals. A charming assembling of detailed cling stamp sets, along with coordinating dies featuring illustrations of vintage style teapots, dainty tea cups, and other tea related accents in various sizes, bring an abundance of designing opportunities allowing you to customize your very own tea party creation!

So, join us for a spot of tea, and share in an outpouring of love across the globe one tea themed creation at a time…. Introducing the NEW Tea Time Collection!


Heartfelt Creations Products:

HCD1-7286 Special Teapot Die
HCPC-3903 Special Teapot Cling Stamp Set
HCDP1-2112 Tea Time Paper Collection
HCD1-7278 Cottage Garden Hydrangea Die
HCPC-3900 Cottage Garden Hydrangea Cling Stamp Set
HCFB1-489 3D Hydrangea Shaping Mold
HCPP1-475 Deluxe Flower Shaping Paper - Pack of 50
HCST1-401 Deluxe Flower Shaping Kit
HCDA2-450 Stack and Store Daubers - Pack of 30
HCPC-3835 Leafy Accents Stamp set
HCD1-7193 Leafy Accents Die
HCFB1-467 3D Leafy Accents Shaping Mold
RAHT – Heat It Craft Tool
173842 Scor-Pal
359848 Spellbinders Tool N One 
159723 Designer Dries Clear Adhesive 
352854 Metal Tip for Adhesive Bottle
PGM15015 Rajni Chawla’s Crystal Clear
RLHS100 Hydra Sponges
TSMP707 Memento Dye Ink Bamboo Leaves
RACP614 Ranger Archival Ink Pad – Magenta Hue
478455 Zig Clean Color Real Brush Markers
409311Color In Watercolor Brush - Fine

Other Products: Pearl Metallic Cardstock, Dimensional Squares, VersaMark, WOW Metallic Silver Sparkle Embossing Glitter, WOW Sparkling Snow Embossing Glitter, Hot Glue Gun, Misti 

For more tips on creating with the Tea Time Collection watch the tutorial at https://youtu.be/4bjPeZW_oT8.

Instructions: Prepare a 5 x 7” side fold card base from Pearl metallic cardstock. Place large teapot die just over the fold and die cut. Stamp the teapot on the pearl metallic cardstock x2 using VersaMark and heat emboss using WOW Metallic Silver Sparkle Embossing Glitter. Diecut one full teapot and just the lid and the tag from the second teapot. Color using the Zig markers. Stamp the sentiment on the label using VersaMark and heat emboss using WOW Metallic Silver Sparkle Embossing Glitter. Using teapot die, cut paper from the Tea Time paper collection, ink the edges with Magenta Hue ink, stamp a sentiment, trim to fit the inside of the shaped card and adhere using dries clear adhesive.

Stamp the hydrangea flowers on Deluxe Flower Shaping paper using VersaMark ink, heat set using WOW Sparkling Snow Embossing Glitter and color using Magenta Hue ink. Diecut using the coordinating dies. Shape the little flowers using the hydrangea mold and the Deluxe Flower Shaping kit. Adhere the petals together to form petite roses, sponge with dries clear adhesive and sprinkle with Rajni Chawla’s Crystal Clear glitter. 

Stamp the Leafy Accent leaves on Deluxe Flower shaping paper using Bamboo Leaves ink, color using the same ink, diecut using coordinating dies and shape using the Leafy Accents mold. Sponge with dries clear adhesive and sprinkle with Rajni Chawla’s Crystal Clear glitter.

Adhere the petite roses and the leaves to the teapot as pictured.

Thank you so much for stopping by! 
Please be sure to visit the Heartfelt Creations Blog
to see all of the gorgeous projects created by the 
fabulous Design Team.

Crafty Hugs, 🤗🤗🤗
Janet 

Wednesday, February 5, 2020

Heartfelt Creations - Blossoms in the Courtyard

Well, I did it..the Christmas decorations are finally down!!!
Now I'm getting ready for my Mother/Daughter trip to Nashville.
My amazing daughter, Laura, gave me this trip for Christmas and
I'm so excited. I love country music and Nashville was right
there at the top of my bucket list. We're leaving on Friday
with my BFF and her daughter. 
We're going to Keith Urban's concert on Monday and that should be amazing!!!
Watch out Nashville, here we come!!! lol.

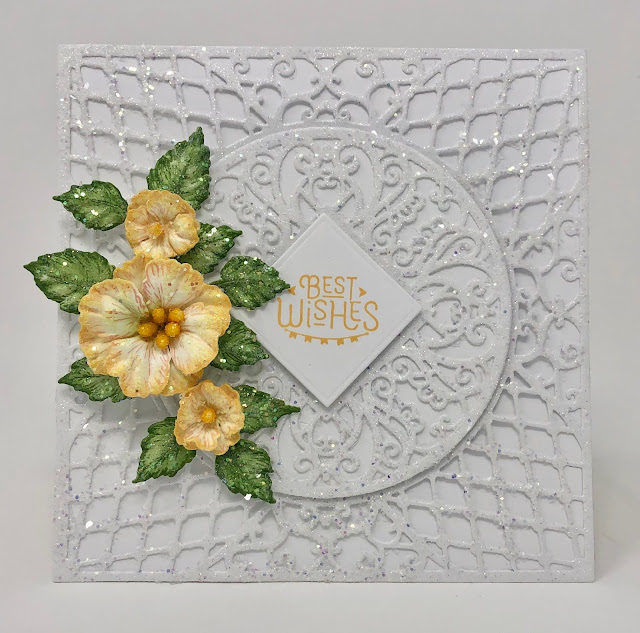
Today's card reminds of a spring wedding. What do you think?


Heartfelt Creations Products Used:

HCD1-7283 Courtyard Elegance Die

HCD1-7200 Oakberry Lane Blossoms Die
HCPC-3812 Oakberry Lane Blossoms Cling Stamp Set
HCFB1-469 Blossoms Shaping Mold
HCD1-7193 Leafy Accents Die
HCPC-3835 Leafy Accents Cling Stamp Set
HCFB1-467 Leafy Accents Shaping Mold
HCDP1-2106 Wild Aster Paper Collection
HCS1-458-2 Bright Bead Stamens - Medium
HCPP1-475 Deluxe Flower Shaping Paper - Pack of 50
HCDA2-450 Stack and Store Daubers - Pack of 30
HCST1-401 Deluxe Flower Shaping Kit
HCPC-3847 Celebrate Love Sentiments
173842 Scor-Pal
RAHT Heat It Tool
359848 Spellbinders Tool N One 
159723 Designer Dries Clear Adhesive 
352854 Metal Tip for Adhesive Bottle
PGM15015 Rajni Chawla’s Crystal Clear
RLHS100 Hydra Sponges
RACP005 Ranger Archival Ink Sunflower
TSMP707 Memento Dye Ink Bamboo Leaves


Other Products: White Cardstock, Dimensional Squares, Hot Glue Gun, Misti,

For more ideas on creating with the Decorative Royale Square & Circle Dies, watch the tutorial at https://youtu.be/tqmtn_TiVVw.

For more tips on creating with the Oakberry Lane collection, watch the tutorial at https://youtu.be/HirfUN8NEYY.

Card size is 5 3/4 x 5 3/4”. Score and fold 11 1/2 x 5 3/4” white cardstock at 5 3/4” to create top fold card base. Diecut white cardstock using inside plain square and lacy inside dies from Courtyard Elegance Die set. Diecut lacy circle and plain circle from the same set from white cardstock. Sponge the diecuts with dries clear adhesive and sprinkle with Rajni Chawla’s Crystal Clear glitter. Adhere the square diecuts to the card base using dries clear adhesive. Adhere the lacy circle to the plain circle using dries clear adhesive and then adhere to the card base using dimensional squares. Cut paper from the Wild Aster Paper collection to 5 5/8 x 5 5/8”, ink the edges with Sunflower ink and adhere to the inside of the card. 

Stamp the sentiment from Celebrate Love Sentiments on white cardstock using Ranger Archival Sunflower ink, diecut using the diamond shaped die from the Courtyard Elegance Die and adhere to center of card front using dimensional squares. 

Stamp the Oakberry Blossoms on Deluxe Flower Shaping Paper Using Archival Sunflower ink, color lightly with the same ink, diecut with coordinating die and shape using the 3D Blossoms Mold. Press the centers using the Deluxe Flower Shaping kit, pierce the centers using the Groove Golf Tool and insert Bright Bead Stamens. Add hot glue to the underside of the flowers to secure stamens. Sponge with dries clear adhesive and sprinkle with Rajni Chawla's Crystal Clear glitter.

Stamp Leafy Accents leaves with Archival Olive ink, color with Olive and Leaf Green inks, diecut using the coordinating dies and shape using the Leafy Accents mold. Sponge with dries clear adhesive and sprinkle with Rajni Chawla's Crystal Clear glitter.

Adhere the flowers and leaves to the card as shown using hot glue gun. Use Heat It tool to shrink glue strings.

Thank you so much for stopping by! Please be sure to visit the Heartfelt Creations Blog to see all of the absolutely gorgeous projects created by
the fabulous Design Team. You won't be disappointed.

Have a beautiful day!

Crafty Hugs, 🤗🤗🤗
Janet