Wednesday, November 30, 2022

Heartfelt Creations - Giving Thanks Slimline

 Hi and welcome!

I hope you all had a very Happy Thanksgiving. 

I was thinking about Thanksgiving and feeling grateful for my life when I created this card using the fabulous Cyber Monday die.


Instructions: Slimline card size is 4 x 9”. Score and fold 8 x 9” black cardstock at 4” on the short side to create side fold card base. Using the outer die from the Slim Star Lattice Rectangle Die set, cut the Seasonal Wreath Paper Collection sheet 8B. Using the inside plain edge die, cut sheet 1B from the same collection. Using the outer die and the two lattice dies, cut from black cardstock and from Luxe Gold cardstock. Sponge the black lattice diecut with dries clear adhesive and cover with Martha Stewart Onyx glitter. When dry, adhere to the Luxe Gold diecut slightly offset so that the gold is just peeking out from behind the black. Adhere the previous cut darker green paper behind the center of the black and gold diecuts and then adhere the 4 x 9” lighter green designer paper behind the whole piece. Adhere to the card front. Cut Luxe Gold cardstock 3 7/8 x 8 7/8”, cut sheet 1B 3 3/4 x 8 3/4”, adhere together and adhere to the inside of the card. Using the plain edge inside Slim Star Lattice Rectangle Die, cut from sheet 8B, stamp the sentiment ‘I am so grateful for you’ from the For My Friend Sentiments Cling Stamp set using Bright Tangelo ink and adhere to the inside of the card.

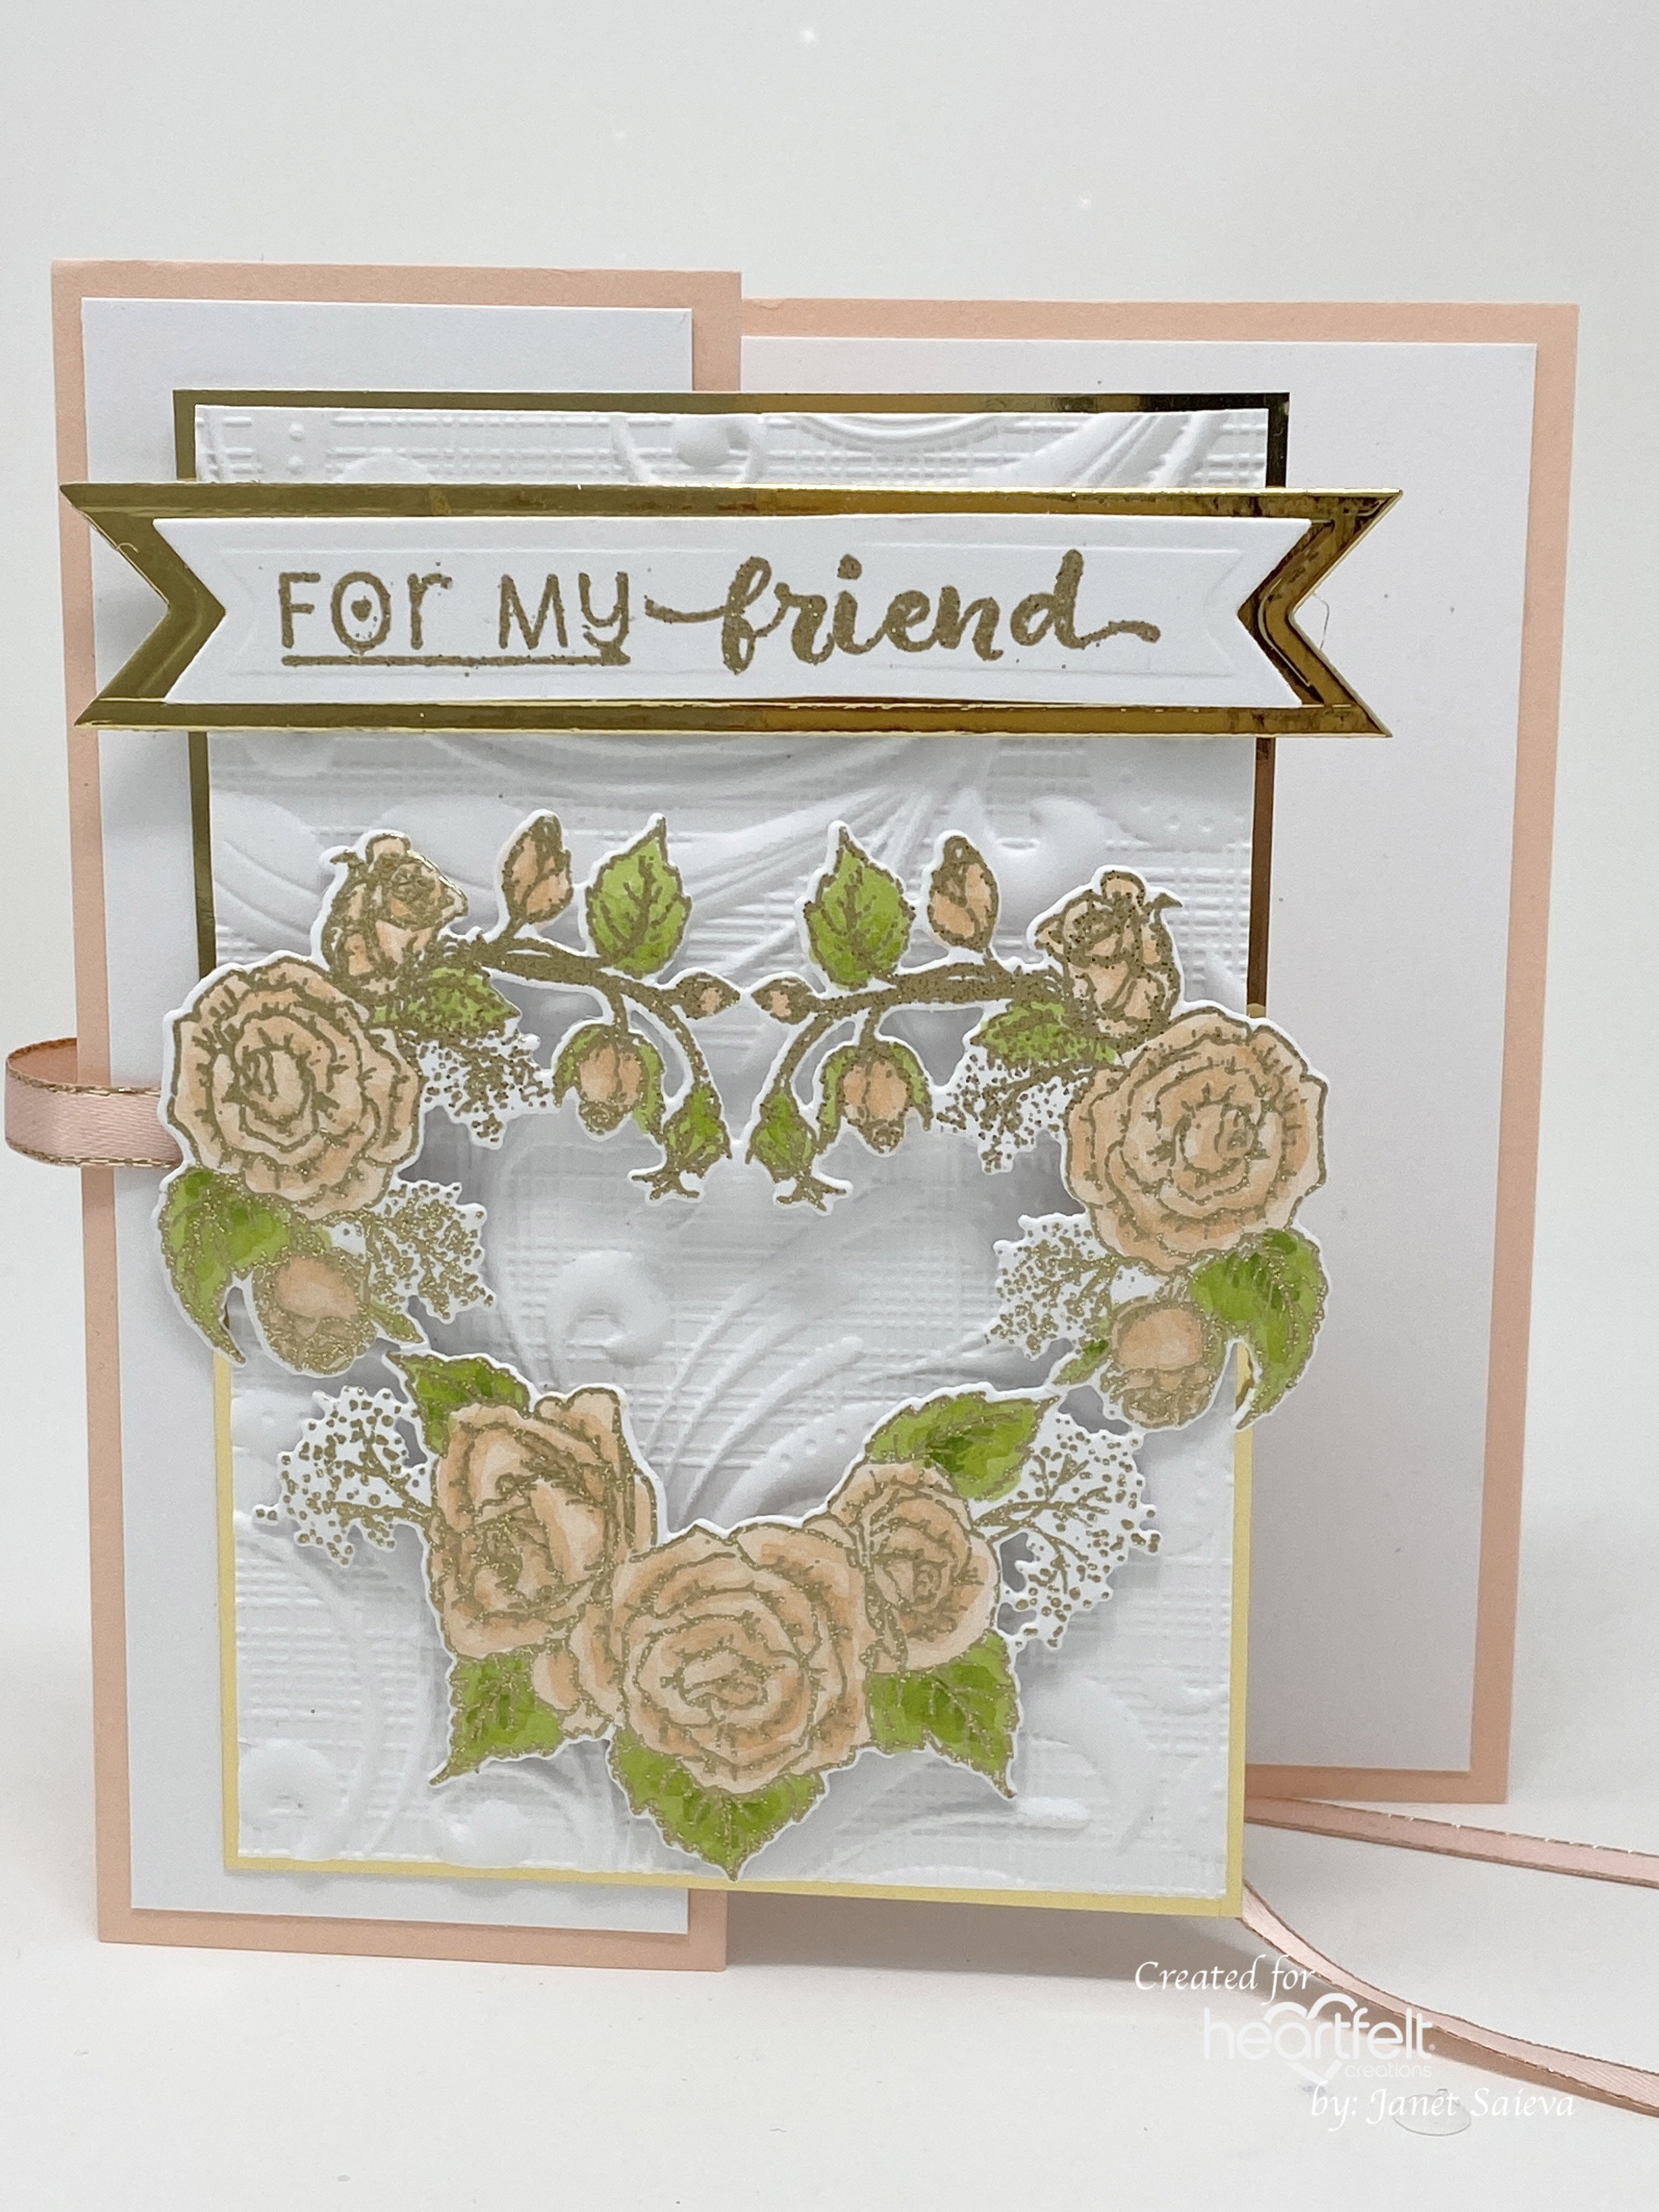
Stamp the Large Wild Rose and the Small Wild Rose on Deluxe Flower Shaping Paper using Bright Tangelo ink, color using Vivid Chartreuse and Bright Tangelo inks, diecut with the coordinating dies and add a little more color to the edges of the flowers and color the backs using the Bright Tangelo. Place face down in the coordinating 3D molds, spritz with water and run through the die cutting machine. Use the Deluxe Flower Shaping tools to add more shape. Put three flowers together slightly offset to create each wild rose. Add a puddle of hot glue to the flower centers and cover with Orange Juice prills. 

Stamp the Leafy Accents leaves with Brilliance Pearlescent Ivy ink and color using the same ink. Diecut using the coordinating die and add more color to the edges of the leaves for more depth. Color the backs, place face down in the mold, spritz with water and run through the die cutting machine.

Sponge the flowers and leaves with dries clear adhesive and sprinkle with Rajni Chawla’s Crystal Clear glitter and adhere to the card front as shown using hot glue. 

Stamp the ‘thank you’ sentiment from the Thank You Sentiments Cling Stamp set on Luxe Gold cardstock using VersaMark, cover with Ranger Black Super Fine Detail Embossing Powder, heat set using the Heat It tool and diecut using the banner die from the Arrows and Banner Die set. Adhere to the card front using dimensional squares.  

All of the products used on this card are listed in the Heartfelt Creations Gallery. Please be sure to visit the HC Blog to see all of the gorgeous projects created by the fabulous Design Team.

Thank you so much for stopping by, I'm so grateful for you!

Till we meet again, please stay safe and be well!

Have a beautiful day!

Crafty Hugs, 🤗🤗🤗

Janet


Friday, November 25, 2022

Heartfelt Creations - Black Friday Release

 Happy day after Thanksgiving!

I hope your day was filled with love, happiness, many blessings and lots of good food!

I am absolutely loving creating with the brand new dies that Heartfelt Creations released today!

I can definitely see myself making many cards like the slimline I created here. The edge dies are amazing!!!


Instructions: Slimline card size is 9 x 4”. Score and fold 9 x 8” white cardstock at 4” on the short side to create tent fold card base. Using the plain edged curved die and the two insert curved dies from the Curvy Accent Border Die set, tape together and cut the 9” card front edge. Also cut one of the decorative curved dies from the same set from white cardstock. Sponge the diecut edge of the card and the decorative diecut with dries clear adhesive and cover with Rajni Chawla’s Crystal Clear glitter. Cut white cardstock 9 x 2 1/2”, cut the long edge using the plain edged curved die, adhere to the card front above the diecut area and adhere the decorative diecut to the top of this piece (this will add 1/4” to the top of the card). Cut paper from the Summer Garden Paper Collection sheet 5A 9 by 3 7/8”, ink the edges using Archival Bright Tangelo ink and adhere to the inside of the card using dries clear adhesive. Diecut the center die from the Slim Lattice Oval Die set, stamp the center with the ‘Best Wishes’ sentiment from the Celebrate Love Sentiments Cling Stamp Set using Tuxedo Black ink on the center piece and adhere the two pieces to the inside of the card.

Stamp the largest and the second largest Small Wild Rose on Deluxe Flower Shaping Paper using Bright Tangelo ink, color using Bright Tangelo and Vivid Chartreuse inks. Diecut using the coordinating dies, ink the edges and color the backs using the Bright Tangelo, place face down in the Small 3D Wild Rose Shaping Mold, spritz with water and run through the diecutting machine. Press down on all the centers, sponge with dries clear adhesive and sprinkle with Rajni Chawla’s Crystal Clear Glitter. Using hot glue adhere three flowers together offset to make one complete flower. Add a puddle of hot glue to each flower center and add Orange Juice prills.

Stamp the Leafy Accents on Deluxe Flower Shaping Paper using Brilliance Pearlescent Ivy ink, color with the same ink, diecut, add more ink to the edges and centers of all the leaves using daubers and color the backs with the same color. Shape the leaves using the Deluxe Flower Shaping Kit. Sponge with dries clear adhesive and cover with Crystal Clear glitter. Diecut the swirly leaf image from white cardstock using the Cut Mat Create 2A Die, sponge with adhesive and cover with glitter.

Adhere the flowers, leaves and swirly leaves to the card front using hot glue. To add a little extra sparkle, randomly sponge the inside of the card and the top of the card front with dries clear adhesive and sprinkle with Crystal Ultrafine Transparent Glitter.

You can get the list of products used on this card by visiting the Heartfelt Creations GalleryPlease be sure to also visit the Heartfelt Creations Blog to see all of the absolutely gorgeous projects created by the fabulous design team.

Thank you so much for stopping by! I really appreciate you!

Till we meet again, please stay safe and be well.

Have a beautiful day!

Crafty Hugs, 🤗🤗🤗

Janet 


Wednesday, November 16, 2022

Heartfelt Creations - Friends Close in Heart

 Hi and welcome!

By the time I post again, Thanksgiving will be over so I'd like to wish everyone a Very Happy and Blessed Thanksgiving. I hope your day is filled with love, laughter, many blessings and lots of good food! Gobble, Gobble!!! 🦃🦃🦃

Back to business...my card today is a favorite fun fold of mine, Whenever I get stuck creatively, I always go back to this fun fold. I do love this Friendship Rose Collection, it's so easy to create with. 


Instructions: Card size is 4 1/4 x 5 1/2”. Score and fold 5 1/2 x 8 1/2” Petal Pink cardstock at 2 1/8” and 4 1/4” on the long side. The 4 1/4” fold is a valley fold and the 2 1/8” fold is a mountain fold. Cut white cardstock 4 x 5 1/4”, 1 7/8” x 5 1/4” and 3 1/4 x 4 3/4”. Cut Luxe Gold Cardstock 3 3/8 x 4 7/8". Using VersaMark, stamp the white 4 x 5 1/4” piece with the ‘Right next door or miles apart, friends are always close in Heart’ sentiment from the Friendship Sentiments Cling Stamp set and the single rose from the Budding Rose Heart Cling stamp set, cover with WOW Metallic Gold Sparkle Embossing Glitter and heat set using the Heat It Tool. Color the rose with Stampin' Blend markers – Light and Dark Petal Pink and Light and Dark Granny Apple Green. Adhere that piece to the inside of the card. Adhere the white 1 7/8” x 5 1/4 to the left side of the card front.

Using a punch, cut an opening in the card base for the ribbon. Cut a 20” piece of ribbon, adhere to the card front, feed through the opening, wrap around the back and tie into a bow. Using an embossing folder of your choice, emboss the 3 1/4 x 4 3/4 white cardstock, adhere to a piece of 3 3/8 x 4 7/8” Luxe Gold cardstock, add dries clear adhesive to the left side only and adhere to the card front as shown.

Using VersaMark, stamp the Friendship Rose Heart on heavy white cardstock, cover with WOW Metallic Gold Sparkle Embossing Glitter and heat set using the Heat It Tool. Color the image with Stampin Blend markers – Light and Dark Petal Pink and Light and Dark Granny Apple Green. Diecut using the coordinating dies, lightly shape using the Deluxe Flower Shaping kit and adhere to the card front using dimensional dots.

Stamp the ‘For My friend’ sentiment from the Just For You Sentiments Cling Stamp Set on white cardstock using VersaMark, cover with WOW Metallic Gold Sparkle Embossing Glitter, heat set using the Heat It Tool and diecut using the Arrows and Banner Die set. Using the same set cut a gold mat a little larger that the friendship banner. Adhere the sentiment banner to the top of the card front using dimensional tape.

You can find out which products I used on this card by visiting the Heartfelt Creations Gallery.

Please be sure to visit the Heartfelt Creations Blog to see all of the absolutely gorgeous projects created by the fabulous Design Team.

Thank you so much for stopping by, I really appreciate you.

Till we meet again, please stay safe and be well.

Have a beautiful day and again, have a Blessed Thanksgiving!

Crafty Hugs, 🤗🤗🤗

Janet


Wednesday, November 9, 2022

Heartfelt Creations - Debuting the Friendship Rose Collection

 Hi and welcome to my blog!

Today we're debuting the beautiful Friendship Rose Collection.

"Do you love creating elegant roses but you need some elegant background images to pair them with? Maximize your creativity with the versatility of the Friendship Rose Collection and use it as a focal point on your card or pair it with the Classic Rose for a one-of-a-kind project! From beginner to advanced, it’s an essential set to showcase your paper crafting skills! Experience the elegant beauty of the Friendship Rose Collection! Treat yourself to an exquisite floral paper collection of delicate florals, softly colored in shades of peachy corals, blush pinks, and spring greens. Stamp, die cut, and shape your elegant floral arrangements like the experts! Beginners to advanced crafters will have all they need to create stunning florals for all occasions!"

I fell in love with the Decorative Heart Die the minute I saw it and knew I had to create a shaped card with it.


Instructions: Shaped card size is 5 x 7”. Cut Decorative Heart Die 2x from heavy white cardstock. Add 1” double sided tape to the top of one before diecutting. Score the one with the tape just under the tape. Diecut the decorative heart and the “Love’ sentiment from the heavy white cardstock. Sponge all the diecuts except the one with the tape with dries clear adhesive and cover with Rajni Chawla’s crystal Clear glitter. When dry, adhere the two full diecuts together to create the card base. Using the inside scalloped heart die, cut 2x from the Friendship Rose Paper Collection sheet 5B and adhere one on the card front. Using Brilliance Pearlescent Orchid and Purple inks, stamp the sentiment ‘Happy Valentine’s Day’ on the small heart that came from the center of the decorative heart, adhere that to the second pink heart and then adhere to the inside of the card. Adhere the decorative heart to the card front using dimensional strips and then adhere the ‘Love’ diecut to the center.

Stamp the Classic Roses on Deluxe Flower Shaping Paper using Brilliance Pearlescent Orchid ink, diecut using the coordinating dies, color using Pearlescent Purple and Pearlescent Orchid and shape using the Groove Golf Tool and the Deluxe Flower Shaping Kit. Adhere the flowers together using hot glue. Stamp and color the Fragrant Hyacinth flowers in Pearlescent Ivy, diecut using the coordinating die, shape using the Groove Golf Tool and adhere to the small roses using hot glue.

Stamp the leaves from the Large Floral Urn on Deluxe Flower Shaping Paper using Pearlescent Ivy ink and diecut using the coordinating die. Color the leaves using Pearlescent Ivy and Pearlescent Purple. Shape the leaves using the Deluxe Flower Shaping Kit. Use a paint brush to add dries clear adhesive to the roses and leaves and sprinkle with Rajni Chawla’s Crystal Clear Glitter.

Adhere the roses and leaves as shown using hot glue.

You can find the products used on this card by visiting the Heartfelt Creations Gallery. Please also be sure to visit the Heartfelt Creations Blog to see all of the gorgeous projects created by the fabulous design team.

Thank you so much for stopping by, I really appreciate you!

Till we meet again, please stay safe and be well!

Have a beautiful day!

Crafty Hugs, 🤗🤗🤗 

Janet


Wednesday, November 2, 2022

Heartfelt Creations - Flip Fold Hollyhocks

 Hi and welcome to my blog!

Can you believe that's it's November already? Thanksgiving and Christmas will be here before we know it! I do love the holidays though so bring them on.

Today I have a fun fold card for you.


Instructions: Flip Fold card size is 5 1/2 x 4 1/4”. Score 11 x 4 1/4” white cardstock at 2 1/8” and 5 1/2” on the long side. Turn the cardstock in the score board to the short side and make a small pencil mark at 2 1/8”. Place on the paper trimmer and cut from the pencil mark to the 2 1/8” score line on both sides to create a point which will hold the flip panel. Fold the card at the 5 1/2” score line then fold up at the 2 1/8” score line.

Cut white card stock as follows: 2 7/8 x 2 7/8” x2, 3 1/4 x 4 1/8” and 5 3/8 x 4 1/8”, place all in an embossing folder of your choice except for one of the 2 7/8 x 2 7/8” panels and run through the diecutting machine. Adhere the 3 1/4 x 4 1/8” panel to the left card front, adhere the embossed 2 7/8” diamond to the plain 2 7/8’ diamond panel, add glue to the left side of the diamond shape and adhere to the flip panel as shown. Adhere the 5 3/8” x 4 1/8’ panel to the inside of the card. Cut another piece of white cardstock 2 3/4 x 2 3/4”, stamp the ‘Hey it’s your Birthday’ sentiment from Special Birthday Sentiments cling stamp set at an angle using Archival Vibrant Fuchsia ink and adhere to the center of the inside of the card.

Stamp the flowers and leaves from the Hollyhock Petals & Leaves Cling Stamp set on Deluxe Flower Shaping paper using Lovely Lipstick and Leaf Green inks, color with the same ink and diecut using the coordinating dies. Color the backs of the flowers, too. Place the flowers and leaves in the Hollyhock Shaping Mold and run through the diecut machine. Pierce the flower centers using the Groove Golf tools and add a yellow stamen to each flower securing with hot glue. Sponge with dries clear adhesive and sprinkle with crystal clear glitter.

Adhere the flowers and leaves to the card front as shown using hot glue.

You find all the products used on my card by visiting the Heartfelt Creations Gallery

Please be sure to visit the Heartfelt Creations Blog to see all of the absolutely gorgeous projects created by the fabulous Design Team.

Thank you so much for visiting today, I really appreciate you!

Till we meet again, please stay safe and be well.

Have a beautiful day!


Crafty Hugs, 🤗🤗🤗

Janet