Wednesday, June 28, 2023

Heartfelt Creations - Sweet Christmas Birdies

 Hi and welcome!

My Christmas card today has a pretty decorative edge and sweet little birdies. 


Instructions: Card size is 7 x 5”. Score and fold 7 x 10” white cardstock at 5” on the long side to create card base. Using the Filigree Accents Die, cut the bottom edge of the card front. Using the same die, cut again from 7 x 5” Luxe Gold cardstock. Adhere the gold behind the white slightly offset to create a golden shadow. Cut Luxe Gold cardstock 7 x 2 7/8” and white cardstock 7 7/8 x 2 3/4”. Dry emboss the white using any embossing folder and adhere to the gold. Then adhere to the card front as shown. Cut Luxe Gold cardstock 7 x 4 7/8” and 7 x 2 7/8” and cut sheet 9B 6 7/8 x 4 3/4 and 6 7/8 x 2 3/4”. Adhere the designer paper to the Luxe Gold pieces and adhere to the inside of the card. Cut white cardstock 6 3/4 x 2 5/8”, stamp the sentiment ‘Wishing You A Wonderful Christmas” from the Christmas Lantern Cling Stamp set using Real Red ink, use a corner snowflake punch to create the decorative corners and adhere to the inside of the card.

Stamp the images from the Festive Berry & Birdies Cling Stamp set on watercolor paper using Archival Olive ink and color using Zig Clean Color Real Brush Markers – Blue Gray, Warm Gray 2, Carmine Red, Light Green and Pale Green. Stamp the image with the three birdies a second time using Archival Jet Black ink and color just the birds with the Zig markers on this one. Diecut the images a second time from white cardstock and adhere to the stamped images using dries clear adhesive. Diecut the three colored birdies, cut two more times from white cardstock, adhere together and adhere to the full diecut image. Lightly shape, spray with Sheer Shimmer Craft Spray – Sparkle and adhere Minnie Pearl prills to the image with the single bird. When dry, adhere to the card front using dimension squares and hot glue.

Stamp the poinsettias and holly leaves from the Poinsettia & Holly Clusters Cling Stamp set on Real Red and Garden Green cardstock using Real Red and Garden Green ink, diecut using the coordinating dies and shape using the coordinating mold. Using a stylus from the Deluxe Flower Shaping Kit, cup the centers and adhere two flowers together and one holly using dries clear adhesive to create the poinsettias. Using a paint brush, add diluted dries clear adhesive to the flowers and leaves and sprinkle with Rajni Chawla’s Crystal Clear glitter. Add Heart of Gold Prills to the flower centers and adhere the flowers to the card front as shown using hot glue.

You can find a list of all the products used on this card in the Heartfelt Creations Gallery. Please be sure to also visit the Heartfelt Creations Blog to see all of the absolutely gorgeous projects created by the fabulous Design Team.

Thank you so much for stopping by, I really appreciate you!

Till we meet again, please stay safe and be well. 

Have a beautiful day!

Crafty Hugs, 🤗🤗🤗

Janet

Wednesday, June 21, 2023

Heartfelt Creations - A Christmas Lantern

 Hi and welcome!

Today I'm sharing another card with an aperture using the beautiful Festive Christmas Collection. 


Instructions: Card size is 5 x 7”. Score and fold 10 x 7” white cardstock at 5” on the long side to create card base. Cut Luxe Silver cardstock 2x at 4 7/8 x 6 7/8” and sheet 9B from the Festive Christmas Paper Collection 2x at 4 3/4 x 6 3/4”. Ink the edges of the designer papers with Real Red ink. Adhere one Luxe Silver piece and one designer paper to the card front using removable tape. Using the plain oval from the Simply Classic Oval Frame Die, cut an aperture in the card front. It will usually only cut through two of the layers but will leave a deep impression on the cardstock so you can remove the two mat layers, lay the die on the impression on the card base and run through the diecutting machine one more time. You will wind up with perfectly aligned layers to adhere permanently with dries clear adhesive. Adhere the second set of mat layers to the inside of the card. Using the third, fourth and fifth largest Simply Classic Oval Frame Dies, cut from white cardstock and Luxe Silver cardstock. Cut the corner pieces from the same set 2x each from white cardstock and 2x each from Luxe Silver cardstock. Sponge the white diecuts with dries clear adhesive and sprinkle with Rajni Chawla’s Crystal Clear adhesive. When dry, adhere to the silver diecuts slightly offset and adhere to the card front as shown using dimensional dots.

Stamp the image from the Christmas Lantern Cling Stamp set on heavy white cardstock using Memento Tuxedo Black ink and color using Stampin’ Blends Markers – Light and Dark Granny Apple green, Light and Dark Real Red, Light and Dark Smokey Slate, Dark Daffodil Delight and Light So Saffron. Diecut using the coordinating die. Diecut again from white cardstock and from Luxe Silver Cardstock. Adhere the white behind the white for stability, then adhere the silver slightly offset. Lightly shape using the Deluxe Flower Shaping Kit and adhere to the card front over the aperture using hot glue.

Stamp the ‘Merry Christmas’ from the Christmas Holly Accents Cling Stamp Set on white cardstock using Real Red Ink and diecut using the coordinating die. Diecut again from white cardstock and adhere the layers together using dries clear adhesive. Adhere to the inside of the card so that it shows through the bottom of the opening.

Sponge the lantern and the sentiment with dries clear adhesive and sprinkle with Crystal Ultrafine Transparent glitter.

Check out the heartfelt Creations Gallery and you'll see all the products I used on this card. Please be sure to also visit the Heartfelt Creations Blog to see all of the magnificent projects created by the fabulous design team.

Thank you so much for stopping by, I really appreciate you!

Till we meet again, please stay safe and be well. 

Have a beautiful day!

Crafty Hugs, 🤗🤗🤗

Janet

Wednesday, June 14, 2023

Heartfelt Creations - Festive Christmas Accents

 Hi and welcome!

Today we're debuting the gorgeous Festive Christmas Collection. I just love all the little birdies in this one. 


Instructions: Card size is 5 x 7”. Score and fold 10 x 7” white cardstock at 5” on the long side to create card base. Cut Luxe Silver cardstock 2x at 4 7/8 x 6 7/8” and sheet 5B from the Festive Christmas Paper Collection 2x at 4 3/4 x 6 3/4”. Ink the edges of the designer papers with Archival Sky Blue ink. Adhere one Luxe Silver piece and one designer paper to the card front using removable tape. Using the plain oval from the Fancy Classic Oval Frame Die, cut an aperture in the card front. It will usually only cut through two of the layers but will leave a deep impression on the cardstock so you can remove the two mat layers, lay the die on the impression on the card base and run through the diecutting machine one more time. You will wind up with perfectly aligned layers to adhere permanently with dries clear adhesive. Adhere the second set of mat layers to the inside of the card. Using the third and fourth largest Fancy Classic Oval Frame Dies, cut from white cardstock and Luxe Silver cardstock. Adhere together slightly offset and adhere to the card front using dimensional dots.

Stamp the images from the Christmas Holly Accents Cling Stamp Set on watercolor paper using Archival Olive, Jet Black and Vermillion inks, Color using Zig Clean Color Real Brush markers - Pale Green, Light Green, Carmine Red, Wine Red, Cornflower Blue, Yellow and Ochre and a water brush. Stamp the images with the birds two times, once in Olive and once in Jet Black. Color the leaves on the one stamped in Olive and color the birds on the one stamped in Jet Black. Diecut all images using the coordinating dies, diecut the images a second time from white cardstock one more time and adhere to the back of the stamped images. Diecut the birds four more times and adhere for dimension. Lightly shape the images using the Deluxe Flower Shaping kit and spritz with Sheer Shimmer Craft Spray – Sparkle. Adhere the images to the frame and the inside of the card as pictured using dimensional dots and hot glue.

Add some extra sparkle by randomly dabbing the images, the frame, the card front and the inside with dries clear adhesive and sprinkle with Crystal Ultrafine Transparent glitter.

You can find all the products used on my card in the Heartfelt Creations Gallery. Please be sure to also visit the Heartfelt Creations Blog to see all of the gorgeous projects created by the fabulous Design Team.

I really appreciation you stopping by. Thank you!

Till we meet again, please stay safe and be well!

Have a beautiful day!

Crafty Hugs, 🤗🤗🤗

Janet


Wednesday, June 7, 2023

Heartfelt Creations - June Wedding

 Hi and welcome!

June is always such a business month with graduations and weddings,

My card today is a pretty fun fold wedding card.


Instructions: Card size is 4 1/4 x 5 1/2”. Score and fold 5 1/2 x 8 1/2” pink cardstock at 2 1/8” and 4 1/4” on the long side. The 4 1/4” fold is a valley fold and the 2 1/8” fold is a mountain fold. Cut white cardstock 4 x 5 1/4”, 1 7/8” x 5 1/4” and 3 1/4 x 4 3/4”. Cut Luxe Gold Cardstock 4 1/8 x 5 3/8", 2 x 5 3/8”, 3 3/8 x 4 7/8”. Using VersaMark ink, stamp the white 4 x 5 1/4” piece with the ‘For the Bride and Groom’ sentiment from the Classic Wedding Wishes Cling Stamp set, cover with Ranger Gold Gold Embossing Powder and heat set using the Heat It Tool. Adhere that to the Luxe Gold 4 1/8 x 5 3/8” piece and adhere to the inside of the card. Stamp the image from the Feathery Floral Cling Stamp set on the white 1 7/8” x 5 1/4” piece using Pink Peony ink. Adhere that to the Luxe Gold 2 x 5 3/8” piece and adhere to the left side of the card using dries clear adhesive.

Using a punch, cut an opening in the card base for the ribbon. Cut a 20” piece of pink iridescent ribbon, adhere to the card front, feed through the opening, wrap around the back and tie into a bow. Using an embossing folder of your choice, emboss the 3 1/4 x 4 3/4 white cardstock, adhere to the piece of 3 3/8 x 4 7/8” Luxe Gold cardstock, add dries clear adhesive to the left side only and adhere to the card front as shown.

Stamp the sentiment ’Celebrate’ from the Celebrate Love Sentiments Cling Stamp set on white cardstock using VersaMark ink, cover with Ranger Gold Gold Embossing Powder and heat set using the Heat It Tool. Diecut using the smallest Slim lattice Oval Die. Cut again from Luxe Gold cardstock, adhere together slightly offset and adhere to the top of the card front using dries clear adhesive and foam dots.

Stamp the Classic Rose flowers on Deluxe Flower Shaping Paper using Pink Peony ink, color using Rose Madder ink, diecut using the coordinating dies and shape using the Groove Golf Tool. Using four same size flowers to create the larger rose and two same size flowers to create the small roses. Pierce the center of two of the smallest flowers and insert a Bridal Bouquet stamen in each. Stamp the Lush Lilac Flowers in Olive, color with the same ink and diecut using the coordinating die. Adhere these to the back of the roses to use as a calyx.

Stamp the Leafy Accent leaves on Deluxe Flower Shaping Paper using Archival Olive ink, color with the same ink, diecut using the coordinating die, add more ink to the edges of the leaves and shape using the Groove Golf Tool and the Deluxe Flower Shaping kit.

Using a paint brush, add diluted dries clear adhesive to the flowers and leaves and sprinkle with Rajni Chawla’s Crystal Clear glitter. Cut the leaves apart and adhere the flowers and leaves to the card front using hot glue.

Get the rest of details in the Heartfelt Creations Gallery. Please be sure to also visit the Heartfelt Creations Blog to see all of the absolutely gorgeous projects created by the fabulous design team.

I really appreciate you stopping by, thank you!!! 

Till we meet again, please stay safe and be well!

Have a beautiful day!

Crafty Hugs, 🤗🤗🤗

Janet 

Wednesday, May 31, 2023

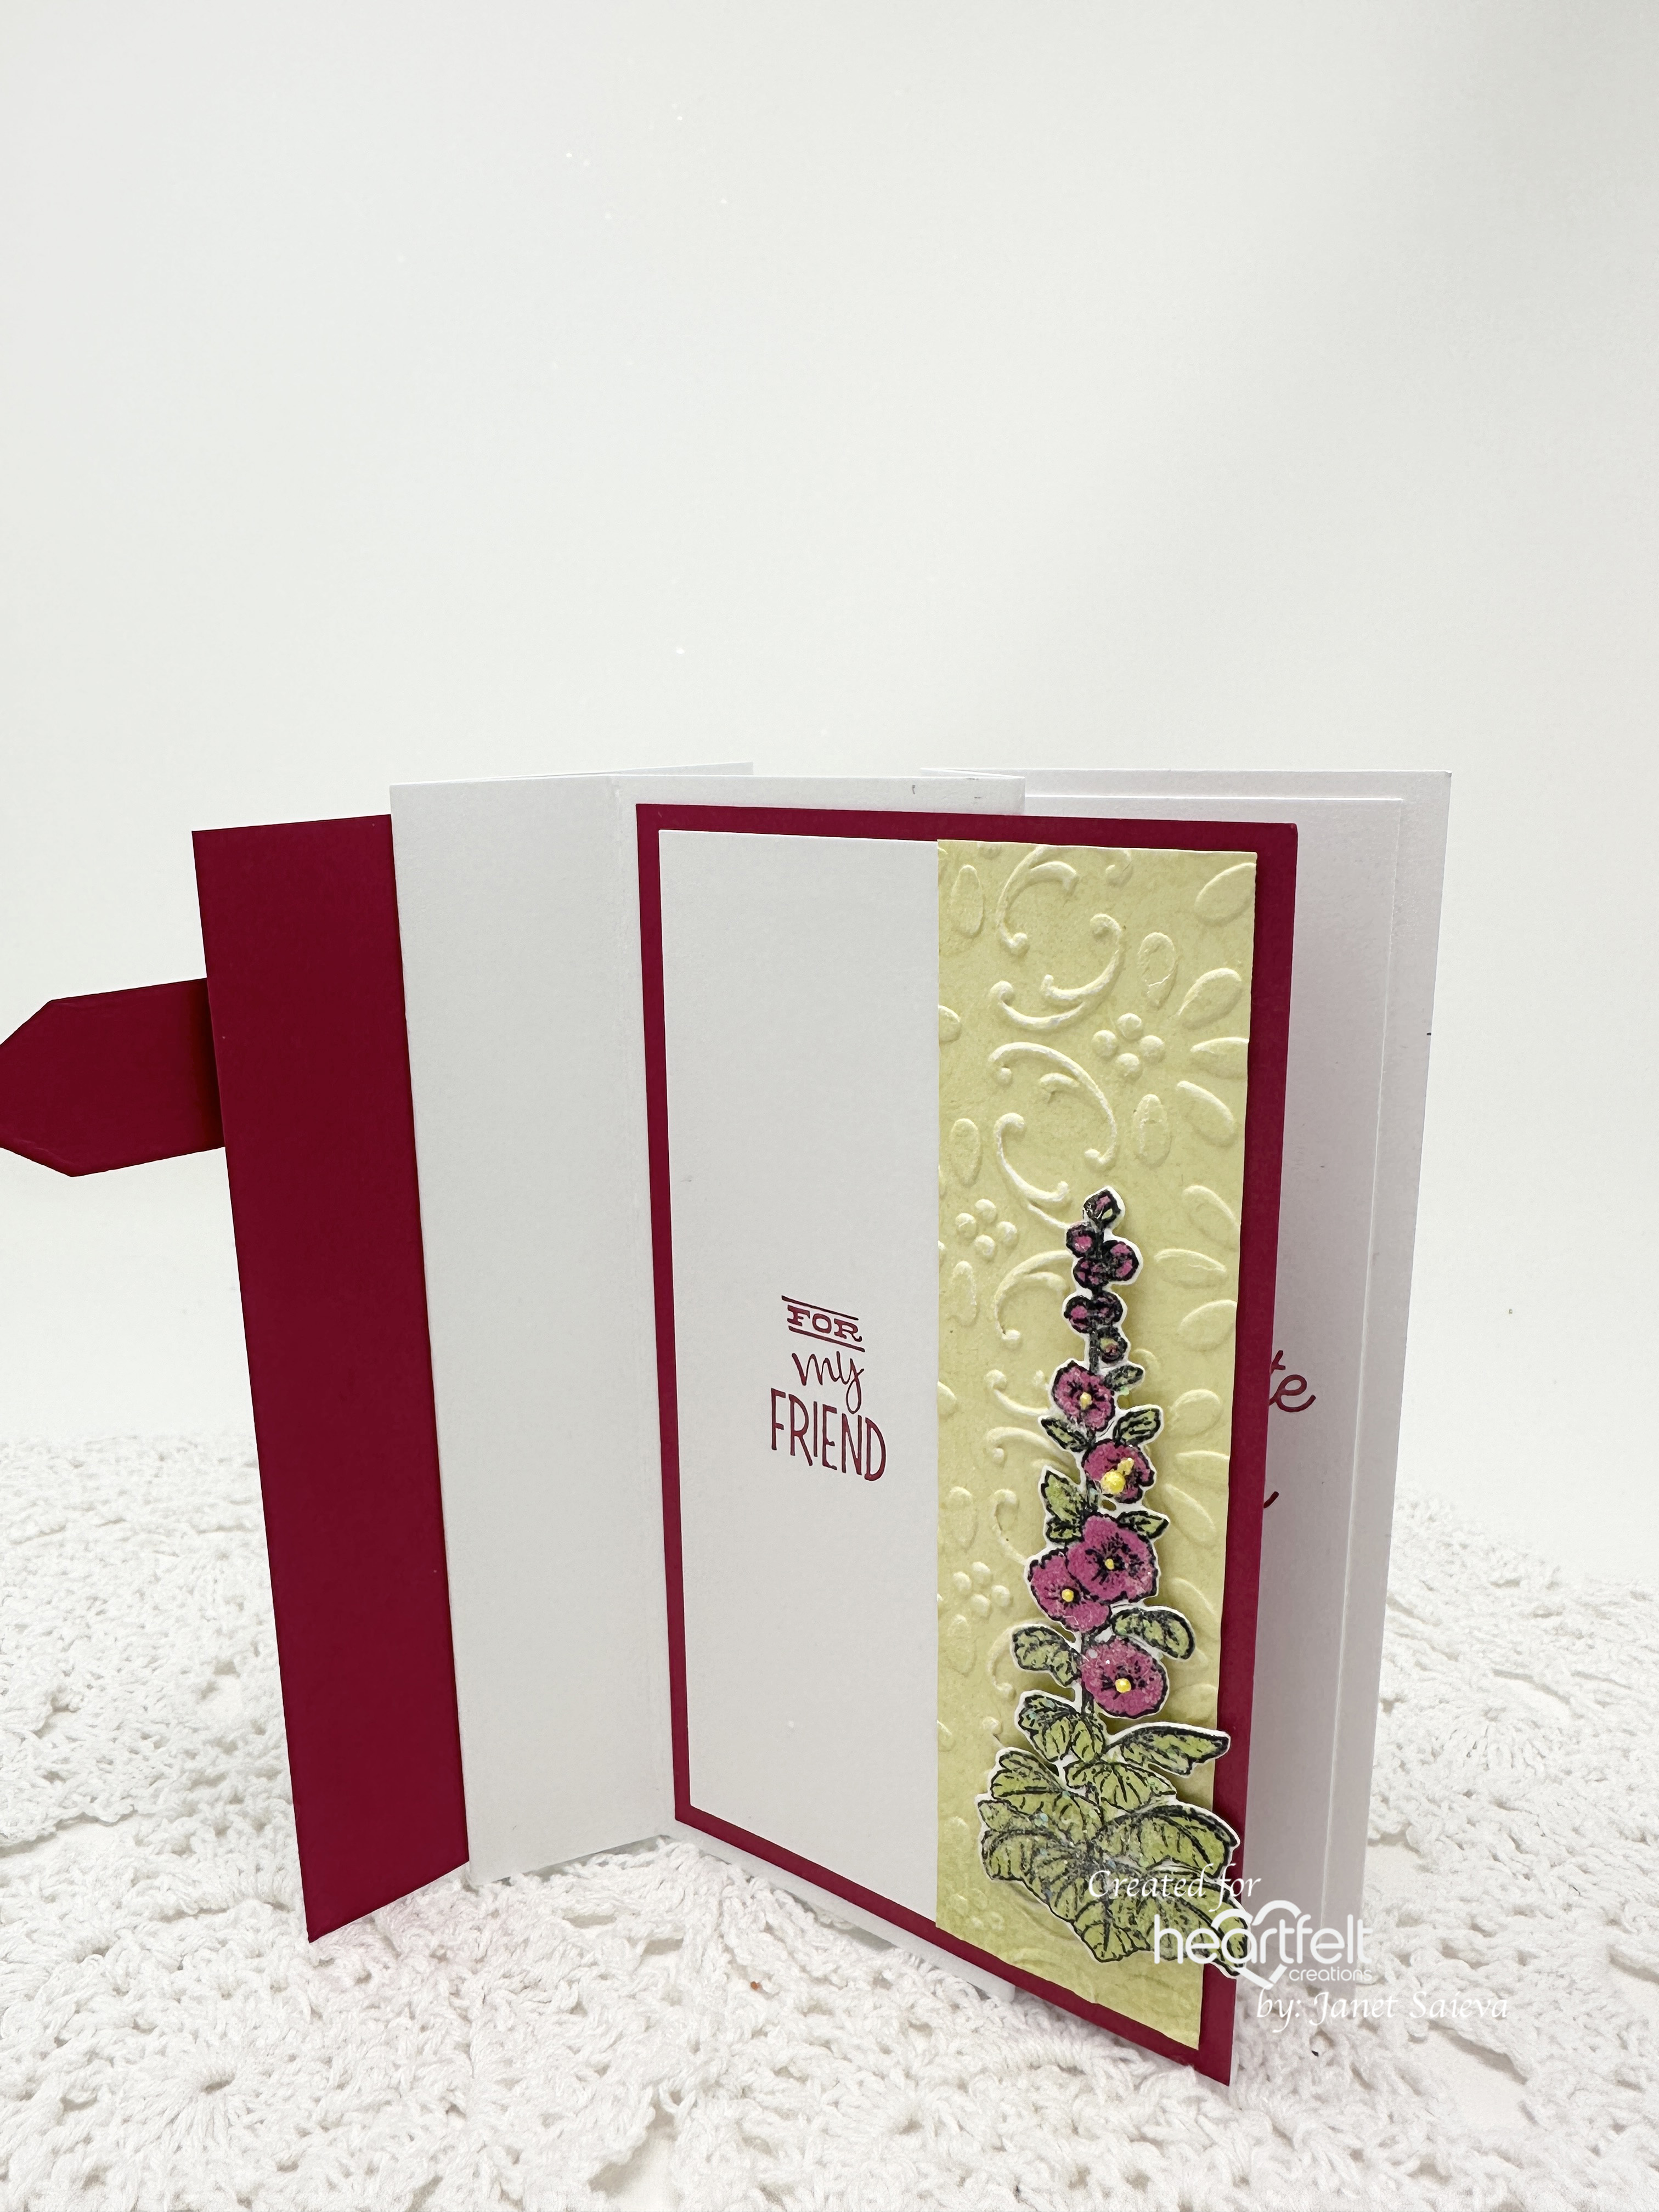
Heartfelt Creations - Hollyhock Accordion Fold

 Hi and welcome!

My card today is bright and beautiful just like the weather we've been having. I love hollyhocks! 


Instructions: Accordion card size is 4 1/4 x 5 1/2”. Score and fold 8 1/4 x 5 1/2” white cardstock at 2 1/8” (mountain fold), 3 1/8” (valley fold), 5 1/8” (mountain fold) and 6 1/8” (valley fold). Cut Lovely Lipstick cardstock 2x to 2 7/8 x 5 1/4”, cut white cardstock 2x t 2 5/8 x 5” and one more at 1 3/4 x 5 1/4”. Cut a strip of yellow paper from the Hollyhock Garden Paper Collection 1 1/4 x 5”. Dry emboss one of the white 2 5/8 x 5” layers and the yellow layer using any embossing folder. Adhere the white embossed layer to one of the colored cardstock panels and adhere to the card front. Adhere the second white layer to the colored cardstock layer and adhere the yellow embossed strip to the right side of the white panel. Stamp the sentiment ‘For My Friend’ from the Just for You Sentiments Cling Stamp using Lovely Lipstick ink set on the left side of the panel. Stamp the sentiment ‘I appreciate you so much’ from the Thank You Sentiments Cling Stamp set using Lovely Lipstick ink on the 1 3/4 x 5 1/4 white cardstock and adhere to the inside of the card. Stamp the ‘thank you’ sentiment from the Thank You Sentiments Cling Stamp set on white cardstock using the same ink and diecut using the smallest arrow die from the Arrows and Banners Die set. Diecut the next size arrow from Lovely Lipstick Cardstock, trim and adhere behind the white arrow. Adhere to the top of the card front as shown using dimensional squares.

Stamp the stem from the Hollyhock Fence Cling Stamp set on white cardstock using Memento Tuxedo Black ink, color using Stampin’ Blend markers Light Granny Apple Green and Light Lovely Lipstick, diecut with the coordinating die and lightly shape using the Deluxe Flower Shaping Kit. Add a dot of glue in the flower centers and sprinkle with You Had Me at Yellow prills. Sponge with dries clear adhesive and sprinkle with Rajni Chawla’s crystal clear glitter. Adhere to the yellow designer paper using dimensional squares and dries clear adhesive. 

Stamp the Hollyhock Petals & Leaves on Deluxe Flower Shaping paper using Lovely Lipstick and Leaf green inks, color with the same inks and diecut using the coordinating dies. Color the backs of the flowers, too. Place the flowers and leaves in the Hollyhock Shaping Mold and run through the diecut machine. Pierce the flower centers using the Groove Golf tools and add a yellow stamen to each flower, secure with hot glue. Sponge with dries clear adhesive and sprinkle with crystal clear glitter. Adhere the flowers to the leaves and adhere to the card front using hot glue.

You can find the rest of the details in the Heartfelt Creations Gallery. Please be sure to also visit the Heartfelt Creations Blog to see all of the gorgeous projects created by the fabulous Design Team. 

Thank you so much for stopping by, I really appreciate you!

Till we meet again, please stay safe and be well!

Have a beautiful day!!!

Crafty Hugs, 🤗🤗🤗

Janet


Wednesday, May 24, 2023

Heartfelt Creations - Amazing Day Ornate Slimline

 Hi and welcome!!!

My card today features the Slim Elegant Rectangle Die and the beautiful Floral Sentiments Collection.


Instructions: Slim tent fold card base is 9 x 4”. Using the outside Slim Ornate Rectangle Die, cut 2x from white cardstock. Before cutting the second one, adhere 1/2” double sided tape to the top of the white cardstock. After cutting, score and fold underneath the tape, remove the backing and adhere the two diecuts together to create card base. Using the same die cut 2x from sheet 7B of the Floral Sentiments Paper Collection and trim one to fit inside the card. Ink the edges of both with Buttercup ink and adhere to the card front and to the inside. Cut the largest label from the Slim Elegant Rectangle Die, stamp the ‘Have a Wonderful Birthday’ sentiment from the Special Birthday Sentiments Cling Stamp set using Vibrant Fuchsia ink, ink the edges with the same ink and adhere inside the card. Diecut the decorative frame using the Slim Ornate Rectangle Die 2x, once from white cardstock and once from Luxe Gold cardstock. Sponge the white diecut with dries clear adhesive and sprinkle with Rajni Chawla’s crystal clear glitter. When dry, adhere the white on top of the gold, slightly offset, and adhere to the card front. Diecut the largest Slim Elegant Rectangle label die from Luxe Gold cardstock and the next size from white cardstock. Dry emboss with a textured embossing folder, adhere together and adhere to the center of the card front. 

Stamp the Special Floral Sentiment frame on watercolor cardstock 2x, once using Emerald Green ink and once using Vibrant Fuchsia ink. Color just the foliage on one using Zig Clean Color Real Brush Marker – Emerald green. Color just the flowers on the other using Zig Clean Color Real Brush Marker – Peach Pink and Yellow for the flower centers. Diecut using the coordinating dies and cut the frame apart, gently shape the part being used for this card using the Deluxe Flower Shaping Kit. Add dries clear adhesive to the flower centers and sprinkle with You Had Me at Yellow prills. Stamp the ‘Have an amazing Day’ sentiment from the same set on white cardstock using Vibrant Fuchsia ink, diecut with the coordinating die and diecut three more times from white cardstock. Adhere the diecuts together with the stamped image on top. Sponge the sentiment and the floral piece with dries clear adhesive and cover with Rajni Chawla’s crystal clear glitter. Adhere the floral piece to the left side of the card front using dimensional squares and hot glue. Adhere the sentiment to the labels in the center. 

Stamp the Small Floral Butterfly on Vellum Flowerite using VersaColor pigment white ink, cover with white opaque embossing powder, heat set using the Heat It Tool, color the back using Vibrant Fuchsia ink and diecut using the coordinating die. Gentle shape the butterfly and adhere to the top right of the card front using hot glue.

You can find all the products I used on my card by visiting the Heartfelt Creations Gallery. Please b sure to also visit the Heartfelt Creations Blog to see all of the gorgeous projects created by the fabulous Design Team.

Thank you so much for stopping by, I really appreciate you. 

Till we meet again, please stay safe and be well.

Have a beautiful day!

Crafty Hugs, 🤗🤗🤗

Janet


Wednesday, May 17, 2023

Heartfelt Creations - Grateful Dutch Door Floral

 Hi and welcome!

I love creating fun fold cards and my dutch door fun fold works beautifully with the Floral Sentiments Collection. 


Instructions: Dutch Door fun fold card size is 5 x 7”. Cut Gorgeous Grape cardstock to 10 x 7”. Use a paper trimmer to trim a 5 x 3” piece off of the top right and save for another project. Score and fold the remaining cardstock at 5” on the long side to create the Dutch door fold card base, Cut Highland Heather cardstock 4 3/4 x 6 3/4” and white cardstock 4 1/2 x 6 1/2”. Stamp the ‘In Appreciation’ sentiment from the Grateful Floral Sentiment Cling Stamp set on the white card stock using Highland Heather and Gorgeous Grape inks. Tip: Cover the word ‘Appreciation’ with a post-it note, ink the word ‘In’, remove the post-it and stamp on the top center about 3/4” down. Clean the stamp and this time cover the word ‘In’ with the post-it note, ink ‘Appreciation’, remove the post-it and stamp underneath ‘In’. This way you won’t have to cut the stamp to use the words individually. Stamp a butterfly from the Small Floral Butterfly Cling Stamp set at the bottom right using Highland Heather ink and adhere the white cardstock to the Highland Heather cardstock and adhere to the inside of the card. Cut Highland Heather cardstock 3 3/4 x 4 3/4” and Decorative Dragonfly paper sheet 10A, ink the edges of the designer paper with Highland Heather ink, adhere together and adhere to the card front using dries clear adhesive. Cut Gorgeous Grape cardstock 4 x 5 1/2”, Highland Heather cardstock 3 3/4 x 5 1/4” and white cardstock 3 1/2 x 5”. Dry emboss the white cardstock using a textured embossing folder and adhere the three layers together using dries clear adhesive. Center the stack on the card and add dries clear adhesive just to the bottom section then adhere to the card front.

Stamp the Grateful Floral Sentiment 3x on white cardstock, twice using Highland Heather ink and once using Soft Succulent ink. Diecut the Soft Succulent image using the largest die from the set. Diecut the Highland Heather image using the largest die and the inside die. Diecut the word ‘Grateful’ from the other heather image using the coordinating die, cut two more times from white cardstock, adhere all diecuts together with the stamped one on top and adhere to the green diecut. Color the heather frame using Stampin’ Blends markers and gently shape using the Deluxe Flower Shaping kit.

Sponge both images using dries clear adhesive and sprinkle with Rajni Chawla’s Crystal Clear glitter. Adhere the heather image to the green image using dimensional squares and then adhere to the card front using the dimensional squares and dries clear adhesive. Add three Swarovski crystals to the top right using dries clear adhesive and the QuickStik Craft tool. 

You can find all of the products used on my card in the Heartfelt Creations Gallery. Please be sure to also visit the Heartfelt Creations Blog to see all of the absolutely gorgeous projects created by the fabulous design team. 

Thank you so much for stopping by. I really appreciate your visit!

Till we meet again, please stay safe and be well!

Have a beautiful day!

Crafty Hugs, 🤗🤗🤗

Janet