Wednesday, July 30, 2025

Festive Red Robin - Elizabeth Craft Designs

 Merry Christmas in July and Welcome!

Today's the day! The release of Angelica Turner's Festive Holly Collection for Elizabeth Craft Designs is finally here!

I've loved creating with this beautiful collection and these sweet Festive Robins have stolen my heart.

Create a 7 x 5" card base from red cardstock. Add a 6 3/4 x 4 3/4" white embossd layer.

Cut white cardstock 6 3/4 x 4 3/4", stamp the image and the sentiment and adhere to the inside of the card. 
Cut Festive robins from Soft Finish Cardstock and color using various inks. Glitter the hat brims and pompoms. Add 3D Crystal Lacquer to the eyes. Cut the holly branches from brown cardstock and the berries from red cardstock. Add 3D Crystal Lacquer to the berries. Cut the Poinsettias, holly leaves and winter greenery from colored cardstock, shape, assemble and add stamens to flower centers. Brush the poinsettias with Wink of Stella. Add a little white pearlescent ink to the tips of the holly leaves and winter greenery. 

Assemble the card as pictured. 

Elizabeth Craft Designs Products Used:

Other Products Used: Red, White and Green Cardstock, 3D 
Crystal Lacquer, Embossing Folder, Stamens, Hot Glue, Wink of Stella, white Pearlescent Ink. 

Thank you so much for stopping by, I love seeing you!

Till we meet again, please stay safe and be well!

Have a beautiful day!

Crafty Hugs,🤗🤗🤗
Janet


Saturday, July 26, 2025

Vintage Vase - Elizabeth Craft Designs

 Hi! Happy Saturday and welcome!

I finished creating this today for a special lady who just turned 94. Angelica Turner designed this vase as very modern but it was so easy to turn it into a vase with a vintage, shabby chic look.


Create a 5 x 7" white card base. Cut two panels of designer paper, one should be 5 x 7" and the other 4 3/4 by 6 3/4". Stamp the image from Garden Party Elements randomly on the smaller panel using VersaMark ink, cover with Aged Ivory embossing powder and heat set. Distress the edges of both panels. Add a piece of lace ribbon at the bottom of the smaller panel. Adhere the panels together and adhere to the card front.

Cut two more panels the same sizes from designer paper, distress the edges, layer together and adhere to the inside of the card. 

Cut all the flowers and leaves from the beautiful deisgner papers, shape and add a pearl stamen to the flower centers. Cut the vase from designer paper, assemble, add lace ribbon, pearl strings and a flower. Adhere all the elements to the card front creating a lovely floral bouquet. Stamp the sentiment on designer paper using VersaMark ink, cover with Aged Ivory embossing powder, heat set, distress the edges and adhere using dimensional tape.

Elizabeth Craft Designs Products Used:

2248-Modern Vases

2098-Wild Flower 3

2217-Floral Greenery 3

C031-Spring Blossom Cardstock

C023-Evening Rose Cardstock

C019-Garden Party Cardstock


Other Products Used: White Cardstock, Lace Ribbon, Stamens, Pearl Strings,VersaMark, Aged Ivory embossing Powder, Heat Gun, Dimensional Tape 

Thank you so much for stopping in, I truly appreciate your visit.

Till we meet again, please stay safe and be well!

Have a beautiful weeked!

Crafty Hugs,  🤗🤗🤗
Janet


Wednesday, July 23, 2025

Thoughtful Tulips - Elizabeth 'Craft Designs

 Hi and Welcome!!!

My friend has been in a lot of pain so I created this card for her to cheer her up. She happens to love tulips so I decided to use the beautiful Tulips from Angelica Turner's Spring Awakening Collection. The rest of the products I used came from Angelica's Spring Blossom Collection.

Using the largest Ornamental Frame die, cut a card base from cream cardstock. Cut a cream layer and another layer from the Spring Blossom Collection. Adhere the layers together and adhere to card base. Using the decorative die from the same frame, cut from cream cardstock and champagne metallic cardstock. Adhere together slightly offset and adhere to the card front.   

Diecut the vase, emboss the strips, assemble and adhere to the card front.

Cut, color, shape and glitter the tulips and add them to the vase. Cut some of the Floral Greenery 3 leaves from champagne metallic cardstock and tuck them in back of the tulips. Stamp the sentiment on cream cardstock, ticket punch the corners and adhere to a champagne gold ticket punched layer and adhere to the front with dimensionals.

Elizabeth Craft Designs Proucts Used:

2215 - Tulip
2217 - Floral Greenery 3
2248 - Modern Vases
2249 - Ornamental Frame
CSF144 - Soft Finish Cardstock
  CS405 - Floral Branches and Sentiments 
C031 - Spring Blossom Cardstock

Other Products Used: Cream Cardstock, Champagne Metallic Cardstock, 
archival inks: Periwinkle, Sunflower and Magenta Hue, Hot Glue Gun. Embossing Folder, corner ticket punch.

Thank you so much for stopping by, I really appreciate you! 

Till we meet again, please stay safe and be well!

Have a beautiful day!

Crafty Hugs, 🤗🤗🤗 
Janet


Thursday, July 17, 2025

Moving Up - Elizabeth Craft Designs

 Hi and welcome!

I'm a day late posting this week. Life got in the way.

My granddaughter moved up from Junior High to the High School and this is the card I created for her with her school colors. The beautiful Spring Blossom Collection designed by Angelica Turner for Elizabeth Craft Designs worked wonderfully for this card. 

Using largest Ornamental Frame die, cut base from white cardstock. Using same die, cut two more panels, one from white cardstock and one from green cardstock. Adhere together, then adhere to base using dimensional tape.

Using the decorative Ornamental Frame dies, cut from yellow/gold cardstock and from metallic gold cardstock. Adhere together slightly offset and adhere to card front.

Adhere the center panel using dimensional tape.

Cut magnolia flowers from Soft Finish Cardstock, color and shape. Assemble flowers, add stamens and adhere to card front using hot glue. Cut leaves from green cardstock, color the tips using white pearlescent ink, shape and adhere around flowers. Stamp sentiment on white cardstock using VesaMark ink, cover with gold embossing powder and heat set. Cut using Layered Labels die along with a gold mat layer. Adhere with dimensional tape. 

To finish the card, roll a piece of vellum to create a diploma, glue together, tie with gold cord and adhere to the top right corner along with some magnolia buds.

Elizabeth Craft Designs Products Used:  


Other Products Used: White Cardstock, Green Cardstock, Yellow/Gold Cardstock, Gold Metallic Cardstock, Yellow/Gold Ink, Stamens, VersaMark, Gold Embossing Powder, Vellum, Gold Cord, Heat gun, Hot Glue Gun.

Thank you so much for stopping by, I really enjoy your visits.

Till we meet again, please stay safe and be well. 

Have a beautiful day!

Crafty Hugs, 🤗🤗🤗
Janet


Wednesday, July 9, 2025

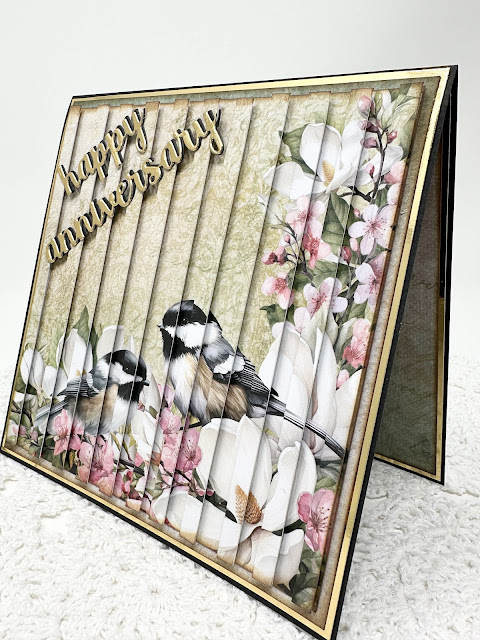
Anniversary Eclipse - Elizabeth Craft Designs

Hi and Welcome! 

Here's my perfectly imperfect first attempt at an eclipse card using just the gorgeous Spring Blossom paper and an old ECD sentiment from my stash. I definitely need to practice more but I gave this one to my husband for our 62nd Anniversary and he loved it.


Create a 6 x 6" black tent fold card base. Add a 5 7/8 x 5 7/8" gold layer and 5 3/4 x 5 3/4" layer from the Spring Blossom paper collection. Ink the edges of the designer paper, adhere the layers together and adhere to card front.
Cut exact same image from the Spring Blossom paper two times 5 1/2 x 5 1/2". Ink the edges of one of these. Cut the second one in 1/4" strips.
Adhere every other strip to the bottom image using dimensional tape. When finished, ink the edges. Adhere this panel to the card front.
Cut "happy anniversary" 2x, once from black and once from gold. Adhere together slightly offset to create a shadow effect. Adhere to the top left corner at an angle. (I used an older ECD die from my stash.)

Elizabeth Craft Designs Products Used:

C031 - Spring Blossom Cardstock

Sentiment (retired)

Other Products Used: Black Cardstock, Gold Cardstock, Paper Trimmer, Dimensional Strips, Vintage Photo Distress Oxide Ink

Thank you so much for stopping by, I appreciate your visit. 

Till we meet again, please stay safe and be well.

Have a beautiful day!

Crafty Hugs, 🤗🤗🤗

Janet


Wednesday, July 2, 2025

Pretty Pink Magnolias - Elizabeth Craft Designs

Hi and welcome!

The beautiful magnolia flowers are so pretty in pink. Pair them with a gorgeous die cut in pearlized paper and you have a stunning card that can be used for any occasion. 


Using the largest Ornamental Frame die, cut the card base from white cardstock. Cut another layer from pearlized cardstock and adhere to the card front. Cut center of the Ornamental Frame die 3x, once from pearlized cardstock and 2x from white cardstock. Adhere the layers together using glue and adhere to the right side of the card front using dimensional strips.
Using the largest Ornamental Frame die, cut pink cardstock and adhere to the inside of the card.
Cut, color and shape Magnolia flowers, buds, leaves and branch. Create stamens                          and assemble flowers. Adhere to the left side of the card front using hot glue.
To finish off, add pretty pink Swarovski crystals.

Elizabeth Craft Designs Products Used:


Other Products Used: White Cardstock, Pearlized Cardstock, Pink Cardstock, Archival Magenta Hue Ink, Memento Ink: New Sprout and Bamboo Leaves, Swarovski Crystals, Dimensional Tape, Dimensional Strips, Hot Glue.

Thank you for stopping by, I always look forward to your visit. 

Till we meet again, please stay safe and be well. 

Have a beautiful day!

Crafty Hugs, 🤗🤗🤗
Janet